


Introducing HTTP/2 Server Push with NGINX 1.13.9

We’re delighted to announce that NGINX 1.13.9, released on February 20, 2018, includes support for HTTP/2 server push. For NGINX Plus users, HTTP/2 server push support will be included in the upcoming NGINX Plus R15 release, scheduled for April 2018.
Server push, which is defined in the HTTP/2 specification, allows a server to pre-emptively push resources to a remote client, anticipating that the client may soon request those resources. By doing so, you can potentially reduce the number of RTTs (round trip time – the time needed for a request and response) in a page-load operation by one RTT or more, providing faster response to the user.
Server push can be used to prime a client with style sheets, images, and other resources that it will need to render a web page. You should take care to only push resources that are required; don’t push resources that a client is likely to already have cached.
In this blog post, I’ll describe:
- Basic configuration for HTTP/2 server push
- How to verify that HTTP/2 server push is working (using browser tools or
nghttp) - Automatically pushing content using the
Link:header - Selectively pushing content
- Measuring the effect of HTTP/2 server push
Configuring HTTP/2 Server Push
To push resources along with a page load, use the http2_push directive as follows:
server {

    # Ensure that HTTP/2 is enabled for the server

    listen 443 ssl http2;
    ssl_certificate ssl/certificate.pem;

    ssl_certificate_key ssl/key.pem;
    root /var/www/html;
    # whenever a client requests demo.html, also push

    # /style.css, /image1.jpg and /image2.jpg

    location = /demo.html {

        http2_push /style.css;

        http2_push /image1.jpg;

        http2_push /image2.jpg;

    }

}
Verifying HTTP/2 Server Push
You can easily verify that server push is in effect using either of two methods:
- The developer tools in your web browser
- A command-line HTTP/2 client such as nghttp
Verifying with Developer Tools (Google Chrome)
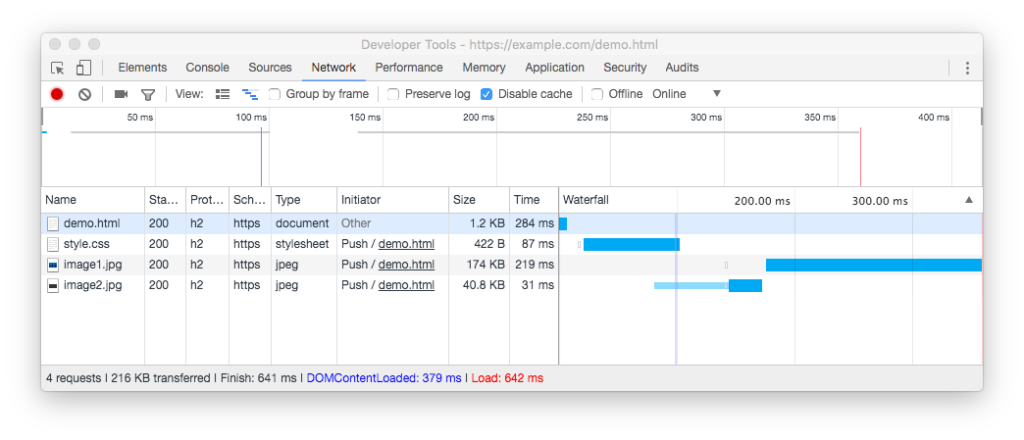
Here’s how to use the developer tools in your web browser to verify that server push is in effect, using Google Chrome as an example. In the figure, the ‘Initiator’ column on the Network tab of Chrome’s developer tools indicates that several resources were pushed to the client as part of a request for /demo.html.

Verifying with a Command-Line Client (nghttp)
In addition to using web browser tools, you can use the nghttp command-line client to verify that server push is in effect. You can download the nghttp command-line client from GitHub, or install the appropriate operating system package (where available; for Ubuntu, use the nghttp2-client package):
$ nghttp -ans https://example.com/demo.html

id  responseEnd requestStart  process code size request path

 13    +84.25ms       +136us  84.11ms  200  492 /demo.html

  2    +84.33ms *   +84.09ms    246us  200  266 /style.css

  4   +261.94ms *   +84.12ms 177.83ms  200  40K /image2.jpg

6 +685.95ms * +84.12ms 601.82ms 200 173K /image1.jpgNote: The asterisk (*) marks resources that were pushed by the server.
Automatically Pushing Resources to Clients
In many situations, it’s inconvenient, or even impossible to list the resources you wish to push in the NGINX configuration file. For this reason, NGINX also supports the convention of intercepting Link preload headers, then pushing the resources identified in these headers. To enable preload, enable the http2_push_preload directive in the configuration:
server {

    # Ensure that HTTP/2 is enabled for the server

    listen 443 ssl http2;
    ssl_certificate ssl/certificate.pem;

    ssl_certificate_key ssl/key.pem;
    root /var/www/html;
    # Intercept Link header and initiate requested Pushes

    location = /myapp {

        proxy_pass http://upstream;

        http2_push_preload on;

    }

}
For example, when NGINX is operating as a proxy (for HTTP, FastCGI, or other traffic types), the upstream server can add a Link header to its response:
Link: </style.css>; as=style; rel=preload;NGINX intercepts this header and commences a server push for /style.css. The path in the Link header must be an absolute path — for example, ./style.css is not supported. The path can optionally include a query string.
To push multiple objects, you can provide multiple Link headers, or, better still, merge the list of objects into a comma-separated list:
Link </style.css>; as=style; rel=preload, </favicon.ico>; as=image; rel=preload;If you don’t want NGINX to push a preloaded resource, add a nopush parameter to the header:
# Resource is not pushed

Link: </nginx.png>; as=image; rel=preload; nopush;
When http2_push_preload is enabled, you can also initiate server push by setting the response header in your NGINX configuration:
add_header Link "</style.css>; as=style; rel=preload;";Selectively Pushing Resources to Clients
The HTTP/2 specification doesn’t address the challenge of determining whether or not to push resources. Clearly, it’s best to push only resources to clients if you know both that they are likely to need the resource and that it’s unlikely they already have it cached.
One possible approach is to only push resources to clients on their first visit to the site. You can test for the presence of a session cookie, for example, and set the Link header conditionally, so the resources are preloaded only if the session cookie is not present.
Assuming clients are well-behaved and include the cookie in subsequent requests, NGINX will only push the resources to the clients once per browser session:
server {

    listen 443 ssl http2 default_server;
    ssl_certificate ssl/certificate.pem;

    ssl_certificate_key ssl/key.pem;
    root /var/www/html;

    http2_push_preload on;
    location = /demo.html {

        add_header Set-Cookie "session=1";

        add_header Link $resources;

    }

}
map $http_cookie $resources {

    "~*session=1" "";

    default "</style.css>; as=style; rel=preload, </image1.jpg>; as=image; rel=preload, </image2.jpg>; as=style; rel=preload";

}
Measuring the Effect of HTTP/2 Server Push
To measure the effect of server push, we created a simple test page, /demo.html, that references a separate stylesheet, /style.css. The stylesheet further references two images. We tested page load times using three different configurations, over HTTP, HTTPS and HTTP/2:


Multiple tests were made:
- HTTP sequential GETs used no optimization; the browser loaded resources when it discovered they were required
- HTTP with preload hints included Preload hints in the first response to tell the browser to load the dependencies
- HTTP/2 with server push preemptively pushed the dependencies to the browser
The behavior was measured using the Chrome developer tools. The most common behaviour of each configuration was assessed and averaged, and the times were correlated with the RTT of the link (as measured using ping) to illustrate the mechanical effect of each method.


Some Basic Observations
- Establishing an HTTP connection takes 1 RTT; HTTPS and HTTP/2 take 2 RTTs
- The payload for the HTML and CSS resources is smaller than the maximum transmission unit (MTU) size, so a GET operation completes in approximately 1 RTT
- “DOM loaded” is the time to initiate a new connection and retrieve the demo.html page
Interpreting the Results: Preload
- Preload has minimal effect for the CSS resource because it is directly referenced within the HTML resource, and the HTML resource is delivered quickly. The browser initiates the CSS request as soon as the HTML page is delivered.
- Preload does have an effect in quickly starting the download of resources that are declared in the CSS resource. The downloads can start 1 RTT faster when preload is used.
- The net savings from preload may be one RTT or more. When downloading the resources in parallel, the browser must open one or more additional connections. Performance depends on whether slow requests (larger responses) are scheduled first, or delayed while new connections are opened. This unpredictable request ordering accounts for the one-RTT speedup for HTTP and HTTP/2, and the two-RTT speedup compared to HTTPS.
Interpreting the Results: Server Push
- Server push reduced the preload time by a further 1 RTT. The push “responses” were initiated at the same time as the response to the first request, whereas the preload responses incurred 1 RTT delay — 0.5 RTT for the response to the first request, plus 0.5 RTT for the preload GET request.
Test Notes
- Multiple measurements were taken. Each test began with an empty browser cache and with no established keepalive connections to the NGINX server. The NGINX settings
keepalive_timeoutandhttp2_idle_timeoutwere used to quickly close keepalive connections. - It’s not possible to push or preload font resources efficiently, due to a known issue in Chrome. Chrome makes an explicit request for a font resource even it it has already been pushed or preloaded.
- Care was taken to explicitly clear browser caches before each test, and all content was served with expired cache control headers.
- Chrome caches preloaded resources. These cached resources are not consistently ignored by the devtools ‘Disable cache’ option and are not consistently cleared by an explicit ‘Clear Browser Cache’ operation. Some attempts to preload content caused Chrome to unsuccessfully revalidate cached copies, then download the resource normally. These attempts were not counted in the measurements.
- Chrome adds an unnecessary two-RTT delay to all new SSL connections that use previously accepted self-signed certificates. The test was conducted using CA-signed Let’s Encrypt certificates to avoid this two-RTT delay.
- DNS delays were addressed by editing the local
/etc/hostsfile. - This simple test did not attempt to measure the effect of Server Push where the client already has a cached copy of the resource. In this case, all caches were cleared before each test, and most pushes were too quick to cancel.
Conclusion
This test was deliberately simple, in order to highlight the mechanics of preload and push. Push delivers a one-RTT improvement over preload in simple situations, and a greater improvement compared to unoptimized, sequential requests and discovery of dependent resources.
More realistic use cases have a great many more variables: multiple dependent resources, multiple sources, even the possibility of wasted bandwidth by pushing resources that are already cached or not immediately needed. Browser inconsistencies also affect performance. Your mileage will certainly vary from this simple test.
For example, the Chrome team have published some detailed recommendations on when to deploy Server Push, and have performed measurements on more complex sites to compare the effects of no optimization, Preload and Push over HTTP/2. Their “Rules of Thumb for HTTP/2 Push” report is worth reading for anyone considering deploying HTTP/2 Push in production.
The pragmatic conclusion is that if you can identify which resources are required in advance, there’s real benefit in having upstream servers send a preload hint. The additional benefit of pushing these resources is small but measurable, but may possibly result in wasted bandwidth and delays for needed resources. You should test and monitor any push configurations carefully.
Appendix: How Does HTTP/2 Push Work?
The information below is based in part on the research in Jake Archibald’s very detailed “HTTP/2 push is tougher than I thought” blog post.
HTTP/2 server push is typically used to send dependent resources preemptively when the client requests a resource. For example, if a client requests a web page, the server may push dependent stylesheets, fonts, and images to the client.
When a client makes an HTTP/2 connection, the server can chose to initiate one or more push responses using the connection. These pushes send resources that the client has not explicitly requested.
The client can either reject a push (by sending an RST_STREAM frame) or accept it. The client stores the pushed content in a local ‘Push Cache’ that is associated with the HTTP/2 connection.
Later, when the client makes a request for a resource using an established HTTP/2 connection, it checks the connection’s push cache for a completed or in-transit response to the request. It uses the cached resource in preference to making a new HTTP/2 request for the resource.
Any pushed resource remains in the per-connection push cache until (a) it is used or (b) the HTTP/2 connection is closed:
- If the resource is used, the client takes a copy and the entry in the push cache is deleted. If the resource is cacheable, the client can then cache its copy in its HTTP cache.
- If the HTTP/2 connection is closed for any reason, its local push cache is deleted.
This has several implications:
- Content in the HTTP page cache in the browser is used in preference to content in the push cache, even if the pushed content is fresher.
- HTTP/2 connections can be shared among different page loads. A resource that is pushed as a result of one page load can be used when requested in a different page load.
- Requests with credentials use different HTTP/2 connections to those without; for example, a resource that is pushed with a cross-origin request (credentialed) may not be found if the browser makes a non-credentialed request for the resource.
You can review a much more detailed list of issues in Jake Archibald’s “HTTP/2 push is tougher than I thought” blog post.
HTTP/2 server push is an interesting capability. Make sure to thoroughly test your HTTP/2 server push configuration, and be prepared to fall back to preload in cases where this gives more predictable, cache-aware behaviour.
The post Introducing HTTP/2 Server Push with NGINX 1.13.9 appeared first on NGINX.
Source: Introducing HTTP/2 Server Push with NGINX 1.13.9