Working with Brushes and Content – XAML and Visual Layer Interop, Part One

The Composition APIs empower Universal Windows Platform (UWP) developers to do beautiful and powerful things when they access the Visual Layer. In the Windows 10 Creators Update, we made working with the Visual Layer much easier with new, powerful APIs.
In this blog series, we’ll cover some of these improvements in the Creators Update and take a look at the following APIs:
- In Part 1, today’s post:
- XamlCompositionBrushBase – easily paint a XAML UIElement with a CompositionBrush
- LoadedImageSurface – load an image easily and use with Composition APIs
- In Part 2, we’ll look at:
- XamlLights – apply lights to your XAML UI with a single line of XAML
- PointerPositionPropertySet – create 60 FPS animations using pointer position, off the UI thread!
- Enabling the Translation property – animate a XAML UI Element using Composition animation
If you’d like to review the previously available ElementCompositionPreview APIs, for example working with “hand-in” and “hand-out” Visuals, you can quickly catch up here.
Using XamlCompositionBrushBase
One of the benefits of the new Composition and XAML interop APIs is the ability to use a CompositionBrush to directly paint a XAML UIElement rather than being limited to XAML brushes only. For example, you can create a CompositionEffectBrush that applies a tinted blur to the content beneath and use the brush to paint a XAML rectangle that can be included in the XAML markup
This is accomplished by using the new abstract class XamlCompositionBrushBase available in the Creators Update. To use it, you subclass XamlCompositionBrushBase to create your own XAML Brush that can be used in your markup. As seen the example code below, the XamlCompositionBrushBase exposes a CompositionBrush property that you set with your effect (or any CompositionBrush) and it will be applied to the XAML element.
This effectively replaces the need to manually create SpriteVisuals with SetElementChild for most effect scenarios. In addition to needing less code to create and add an effect to the UI, using a Brush means you get the following added benefits for free:
- Theming and Styling
- Binding
- Resource and Lifetime management
- Layout aware
- PointerEvents
- HitTesting and other XAML-based advantages
Microsoft, as part of the Fluent Design System, has included a few Brushes in the Creators Update that leverage the features of XamlCompositionBrushBase:
Building a Custom Composition Brush
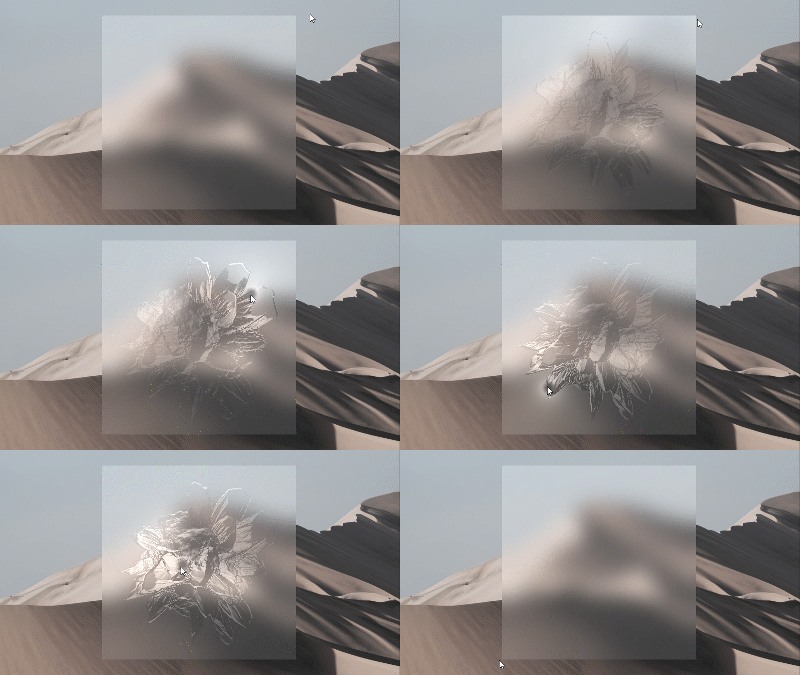
Let’s create a XamlCompositionBrush of our own to see how simple this can be. Here’s what we’ll create:
To start, let’s create a very simple Brush that applies an InvertEffect to content under it. First, we’ll need to make a public sealed class that inherits from XamlCompositionBrushBase and override two methods:
- OnConnected
- OnDisconnected
Let’s dive into the code. First, create your Brush class, which inherits from XamlCompositionBrushBase:
public class InvertBrush : XamlCompositionBrushBase
{
    protected override void OnConnected()
    {
        if (CompositionBrush == null)
        {
            // 1 - Get the BackdropBrush, this gets what is behind the UI element
            var backdrop = Window.Current.Compositor.CreateBackdropBrush();

            // CompositionCapabilities: Are effects supported? If not, return.
            if (!CompositionCapabilities.GetForCurrentView().AreEffectsSupported())
            {
               return;
            }

            // 2 - Create your Effect
            // New-up a Win2D InvertEffect and use the BackdropBrush as its Source
            // Note – To use InvertEffect, you'll need to add the Win2D NuGet package to your project (search NuGet for "Win2D.uwp")
            var invertEffect = new InvertEffect
            {
                Source = new CompositionEffectSourceParameter("backdrop")
            };

            // 3 - Set up the EffectFactory
            var effectFactory = Window.Current.Compositor.CreateEffectFactory(invertEffect);

            // 4 - Finally, instantiate the CompositionEffectBrush
            var effectBrush = effectFactory.CreateBrush();

            // and set the backdrop as the original source
            effectBrush.SetSourceParameter("backdrop", backdrop);

            // 5 - Finally, assign your CompositionEffectBrush to the XCBB's CompositionBrush property
            CompositionBrush = effectBrush;
         }
    }

    protected override void OnDisconnected()
    {
        // Clean up
        CompositionBrush?.Dispose();
        CompositionBrush = null;
    }
}
There are a few things to call out in the code above.
- In the OnConnected method, we get a CompositionBackdropBrush. This allows you to easily get the pixels behind the UIElement.
- We use fallback protection. If the user’s device doesn’t have support for the effect(s), then just return.
- Next, we create the InvertEffect and use the backdropBrush for the Effect’s Source.
- Then, we pass the finished InvertEffect to the CompositionEffectFactory.
- Finally, we get an EffectBrush from the factory and set the XamlCompositionBrushBase.CompositionBrush property with our newly created effectBrush.
Now you can use it in your XAML. For example, let’s apply it to a Grid on top of another Grid with a background image:
<Grid>
    <Grid.Background>
        <ImageBrush ImageSource="ms-appx:///Images/Background.png"/>
    </Grid.Background>
    <Grid Width="300" Height="300"
               HorizontalAlignment="Center"
               VerticalAlignment="Center">
        <Grid.Background>
            <brushes:InvertBrush />
        </Grid.Background>
    </Grid>
</Grid>
Now that you know the basics of creating a brush, let’s build an animated effect brush next.
Creating a Brush with Animating Effects
Now that you see how simple it is to create a CompositionBrush, let’s create a brush that applies a TemeratureAndTint effect to an image and animate the Temperature value:
We start the same way we did with the simple InvertBrush, but this time we’ll add a DependencyProperty, ImageUriString, so that we can load an image using LoadedImageSurface in the OnConnected method.
public sealed class ImageEffectBrush : XamlCompositionBrushBase
    {
        private LoadedImageSurface _surface;
        private CompositionSurfaceBrush _surfaceBrush;

        public static readonly DependencyProperty ImageUriStringProperty = DependencyProperty.Register(
            "ImageUri",
            typeof(string),
            typeof(ImageEffectBrush),
            new PropertyMetadata(string.Empty, OnImageUriStringChanged)
        );

        public string ImageUriString
        {
            get => (String)GetValue(ImageUriStringProperty);
            set => SetValue(ImageUriStringProperty, value);
        }

        private static void OnImageUriStringChanged(DependencyObject d, DependencyPropertyChangedEventArgs e)
        {
            var brush = (ImageEffectBrush)d;
            // Unbox and update surface if CompositionBrush exists
            if (brush._surfaceBrush != null)
            {
                var newSurface = LoadedImageSurface.StartLoadFromUri(new Uri((String)e.NewValue));
                brush._surface = newSurface;
                brush._surfaceBrush.Surface = newSurface;
            }
        }

        protected override void OnConnected()
        {
            // return if Uri String is null or empty
            if (string.IsNullOrEmpty(ImageUriString))
                return;

            // Get a reference to the Compositor
            Compositor compositor = Window.Current.Compositor;

            // Use LoadedImageSurface API to get ICompositionSurface from image uri provided
            _surface = LoadedImageSurface.StartLoadFromUri(new Uri(ImageUriString));

            // Load Surface onto SurfaceBrush
            _surfaceBrush = compositor.CreateSurfaceBrush(_surface);
            _surfaceBrush.Stretch = CompositionStretch.UniformToFill;

            // CompositionCapabilities: Are Tint+Temperature and Saturation supported?
            bool usingFallback = !CompositionCapabilities.GetForCurrentView().AreEffectsSupported();
            if (usingFallback)
            {
                // If Effects are not supported, Fallback to image without effects
                CompositionBrush = _surfaceBrush;
                return;
            }

            // Define Effect graph (add the Win2D.uwp NuGet package to get this effect)
            IGraphicsEffect graphicsEffect = new SaturationEffect
            {
                Name = "Saturation",
                Saturation = 0.3f,
                Source = new TemperatureAndTintEffect
                {
                    Name = "TempAndTint",
                    Temperature = 0,
                    Source = new CompositionEffectSourceParameter("Surface"),
                }
            };

            // Create EffectFactory and EffectBrush
            CompositionEffectFactory effectFactory = compositor.CreateEffectFactory(graphicsEffect, new[] { "TempAndTint.Temperature" });
            CompositionEffectBrush effectBrush = effectFactory.CreateBrush();
            effectBrush.SetSourceParameter("Surface", _surfaceBrush);

            // Set EffectBrush to paint Xaml UIElement
            CompositionBrush = effectBrush;

            // Trivial looping animation to demonstrate animated effect
            ScalarKeyFrameAnimation tempAnim = compositor.CreateScalarKeyFrameAnimation();
            tempAnim.InsertKeyFrame(0, 0);
            tempAnim.InsertKeyFrame(0.5f, 1f);
            tempAnim.InsertKeyFrame(1, 0);
            tempAnim.Duration = TimeSpan.FromSeconds(5);
            tempAnim.IterationBehavior = AnimationIterationBehavior.Count;
      tempAnim.IterationCount = 10;
             effectBrush.Properties.StartAnimation("TempAndTint.Temperature", tempAnim);
        }

        protected override void OnDisconnected()
        {
            // Dispose Surface and CompositionBrushes if XamlCompBrushBase is removed from tree
            _surface?.Dispose();
            _surface = null;

            CompositionBrush?.Dispose();
            CompositionBrush = null;
        }
    }
There are some new things here to call out that are different from the InvertBrush:
- We use the new LoadedImageSurface API to easily load an image in the OnConnected method, but also when the ImageUriString value changes. Prior to Creators Update, this required a hand-in Visual (a SpriteVisual, painted with an EffectBrush, which was handed back into the XAML Visual Tree). See the LoadedImageSurface section later in this article for more details.
- Notice that we gave the effects a Name value. In particular, TemperatureAndTintEffect, uses the name “TempAndTint.” This is required to animate properties as it is used for the reference to the effect in the AnimatableProperties array that is passed to the effect factory. Otherwise, you’ll encounter a “Malformed animated property name” error.
- After we assign the CompositionBrush property, we created a simple looping animation to oscillate the value of the TempAndTint from 0 to 1 and back every 5 seconds.
Let’s take a look at an instance of this Brush in markup:
<Grid>
            <Grid.Background>
                <brushes:ImageEffectBrush ImageUriString="ms-appx:///Images/Background.png"/>
            </Grid.Background>
</Grid>
For more information on using XamlCompositionBrushBase, see here. Now, let’s take a closer look at how easy it is now to bring in images to the Visual layer using LoadedImageSurface
Loading images with LoadedImageSurface
With the new LoadedImageSurface class, it’s never been easier to load an image and work with it in the visual layer. The class has the same codec support that Windows 10 has via the Windows Imaging Component (see full list here), thus it supports the following image file types:
- Joint Photographic Experts Group (JPEG)
- Portable Network Graphics (PNG)
- Bitmap (BMP)
- Graphics Interchange Format (GIF)
- Tagged Image File Format (TIFF)
- JPEG XR
- Icons (ICO)
NOTE: When using an animated GIF, only the first frame will be used for the Visual, as animation is not supported in this scenario.
To load in an image, you can use one of the four factory methods:
- StartLoadFromUri(Uri)
- StartLoadFromUri(Uri, Size)
- StartLoadFromStream(IRandomAccessStream)
- StartLoadFromStream(IRandomAccessStream, Size)
As you can see there are two ways to load an image: with a Uri or a Stream. Additionally, you have an option to use an overload to set the size of the image (if you don’t pass in a Size, it will decode to the natural size).
CompositionSurfaceBrush imageBrush = compositor.CreateSurfaceBrush();
LoadedImageSurface loadedSurface = LoadedImageSurface.StartLoadFromUri(new Uri("ms-appx:///Images/Photo.jpg"), new Size(200.0, 200.0));
imageBrush.Surface = loadedSurface;
This is very helpful when you need to load an image that will be used for your CompositionBrush (e.g. CompositionEffectBrush) or SceneLightingEffect (e.g. NormalMap for textures) as you no longer need to manually create a hand-in Visual (a SpriteVisual painted with an EffectBrush). In an upcoming post in this series, we will explore this further using NormalMap images with to create advanced lighting to create unique and compelling materials.
Using LoadedImageSurface with a Composition Island
LoadedImageSurface is also useful when loading an image onto a SpriteVisual inserted in XAML UI using ElementCompositionPreview. For this scenario, you can use the Loaded event to adjust the visual’s properties after the image has finished loading.
Here is an example of using LoadedImageSurface for a CompositionSurfaceBrush, then updating the SpriteVisual’s size with the image’s DecodedSize when the image is loaded:
private SpriteVisual spriteVisual;
private void LoadImage(Uri imageUri)
{
    CompositionSurfaceBrush surfaceBrush = Window.Current.Compositor.CreateSurfaceBrush();

    // You can load an image directly and set a SurfaceBrush's Surface property with it
    var loadedImageSurface = LoadedImageSurface.StartLoadFromUri(imageUri);
    loadedImageSurface.LoadCompleted += Load_Completed;
    surfaceBrush.Surface = loadedImageSurface;

    // We'll use a SpriteVisual for the hand-in visual
    spriteVisual = Window.Current.Compositor.CreateSpriteVisual();
    spriteVisual.Brush = surfaceBrush;

    ElementCompositionPreview.SetElementChildVisual(MyCanvas, spriteVisual);
}

private void Load_Completed(LoadedImageSurface sender, LoadedImageSourceLoadCompletedEventArgs args)
{
    if (args.Status == LoadedImageSourceLoadStatus.Success)
    {
        Size decodedSize = sender.DecodedSize;
        spriteVisual.Size = new Vector2((float)decodedSize.Width, (float)decodedSize.Height);
    }
}
There are some things you should be aware before getting started with LoadedImageSurface. This class makes working with images a lot easier, however you should understand the lifecycle and when images get decoded/sized. We recommend that you take a couple minutes and read the documentation before getting started.
Wrapping up
Using Composition features in your XAML markup is easier than ever. From painting your UIElements with CompositionBrushes and applying lighting, to smooth off-UIThread animations, the power of the Composition API is more accessible than ever.
In the next post, we’ll explore more new APIs like the new Translation property, using XamlLights in your XAML markup and how to create a custom light using the new PointerPositionPropertySet.
Resources
- XAML Composition Interop Behavior Changes
- Visual Layer with XAML
- XamlCompositionBrushBase
- LoadedImageSurface
Source: Working with Brushes and Content – XAML and Visual Layer Interop, Part One


Leave a Reply