Autoscaling and Orchestration with NGINX Plus and Chef

Introduction
There are many solutions for handling autoscaling in cloud environments, but they’re usually dependent on the specific infrastructure of a given cloud provider. Leveraging the flexibility of NGINX Plus with the functionality of Chef, we can build an autoscaling system that can be used on most cloud providers.
Chef has a tool, knife, which you can use at the command line to act on objects such as cookbooks, nodes, data bags, and more. Knife plugins help you extend knife. So we use knife plugins to help abstract out functionality specific to one specific cloud, enabling knife commands to work the same way across clouds.
Requirements
For this setup, we’ll be leveraging our NGINX Chef cookbook. The installation and a basic overview of this cookbook can be found here. Also, we’ll be utilizing Hosted Chef, to make switching between clouds more straightforward. This setup is currently configured to work with AWS, Azure, and OpenStack. It’s possible to extend it to cover all of the Knife cloud plug-ins, but they haven’t been tested.
Basic Setup
This configuration heavily relies on role membership to look up information about the different nodes that are part of the cluster. You’ll need to have three basic roles; one for the NGINXPlus servers, one for the autoscaler server, and one for the upstream application servers. The autoscaler server is a node that monitors the NGINX Plus status page, and will make the API calls to scale up or down servers based on NGINX Plus statistics. Here are the example roles:
NGINX Plus server role:
name "nginx_plus_autoscale"

description "An example role to install nginx plus"

run_list "recipe[nginx]","recipe[nginx::autoscale]"

default_attributes "nginx" => { "install_source" => "plus",

                                "plus_status_enable" => true,

                                "enable_upstream_conf" => true,

                                "plus_status_allowed_ips" => ['104.245.19.144', '172.31.0.0/16', '127.0.0.1'],

                                "server_name" => "test.local",

                                "upstream" => "test",

                                "nginx_repo_key" => "-----BEGIN PRIVATE KEY-----nMIIEvQIBADANBgkqhkiG9w0BAQEFAASCBKcwggSjAgEAAoIBAQCbYwum24BwEYDf4P4x0/KZjkKN7/EE/gg0qAU3ebG5kY8gWb8NpQ2itj/DfmwPAEnvI6In86c6YFokAZxeo6HbkKkeQKBgQDGQEHp2lCON9FLgRNMjtcp4S2VYjxdAMVinDLkIgVb9qgh6BvTDt5hRY/Vhcx8xV70+BCnoMSzbvLWhZbpSrdmD9nOj1KkPcWn4ArSv6prlYItUwWbNtFLw/E=n-----END PRIVATE KEY-----",

  "nginx_repo_crt" => "-----BEGIN CERTIFICATE-----nMIIDrDCCApSgAwIBAgICBs8wDQYJKoZIhvcNAQEFBQAwXjELMAkGA1UI2pLoSbonYiEvivb4Cg7POn+cQBwurcYUH/jB9zLPPSwlqcUiG2hScuEeaBiEoK/ixHIRuMV9nyp3xTi3b0ZKvOFjEZpBHB8WIdQVneTNRvaFLbiwznhiAe7D4uMaAEYqF96GTgX2XnbovinLlYPfdi7BhlXTI9u78+tqbo0YVsSBiDV49hcIA=n-----END CERTIFICATE-----" }
Upstream application server role:
name "test-upstream"

description "An example role to install nginx plus hello demo"

run_list "recipe[nginx::hello-demo]"

default_attributes "nginx" => { "application_port" => "80"}
Autoscaler server role:
name "autoscaler"

description "An example role to install autoscaler script"

run_list "recipe[nginx::autoscale_script]"

default_attributes "nginx" => { "server_name" => "test.local",

				"upstream" => "test",

				"cloud_provider" => "ec2" }
Here’s a quick breakdown of the different attributes leveraged in the roles:
install_source– Tells the NGINX cookbook to install NGINX Plus instead of open sourceplus_status_enable– Enables the NGINX Plus status pageenable_upstream_conf– Enables the dynamic reconfiguration APIplus_status_allowed_ips– List of IPs or IP ranges that are allowed to access the status page and reconfiguration APIserver_name– Defines a server directive in the NGINX configurationupstream– Defines an upstream group to be used with theserver_nameconfiguration abovenginx_repo_key– Defines a certificate key to be used to access the NGINX Plus repositoriesnginx_repo_crt– Defines a certificate to be used to access the NGINX Plus repositoriesapplication_port– The port that the upstream application servers will listen oncloud_provider– Defines the cloud provider(ec2/azure/google/openstack) to be used for theautoscale_nginxscript
You’ll also need to configure your knife.rb file to have the necessary credentials to access the different cloud providers you would like to leverage. Here’s an example knife.rb with the different supported cloud provider details:
current_dir = File.dirname(__FILE__)

log_level                :info

log_location             STDOUT

node_name                "damiancurry"

client_key               "#{current_dir}/damiancurry.pem"

chef_server_url          "https://api.chef.io/organizations/nginx"

cookbook_path            ["#{current_dir}/../cookbooks"]

#AWS variables

knife[:aws_access_key_id] =

knife[:aws_secret_access_key] =

#azure variables

knife[:azure_tenant_id] =

knife[:azure_subscription_id] =

knife[:azure_client_id] =

knife[:azure_client_secret] =

#openstack variables

knife[:openstack_auth_url] =

knife[:openstack_username] =

knife[:openstack_password] =

knife[:openstack_tenant] =

knife[:openstack_image] =

knife[:openstack_ssh_key_id] = "demo_key"
Now we can check out the few scripts that make the autoscaling happen. First is the script that runs on the NGINX Plus nodes to watch for changes in the nodes that are online:
#!/bin/bash

NGINX_NODES="$(mktemp)"

/usr/bin/curl -s "http://localhost:/upstream_conf?upstream="| /usr/bin/awk '{print $2}' | /bin/sed -r 's/;//g' | /usr/bin/sort > $NGINX_NODES

CONFIG_NODES="$(mktemp)"

/bin/grep -E '[0-9]{1,3}.[0-9]{1,3}.[0-9]{1,3}.[0-9]{1,3}' /etc/nginx/conf.d/-upstream.conf | /usr/bin/awk '{print $2}' | /bin/sed -r 's/;//g' | /usr/bin/sort > $CONFIG_NODES

DIFF_OUT="$(mktemp)"

/usr/bin/diff $CONFIG_NODES $NGINX_NODES > $DIFF_OUT

ADD_NODE=`/usr/bin/diff ${CONFIG_NODES} ${NGINX_NODES} | /bin/grep "" | /usr/bin/awk '{print $2}'`
for i in $ADD_NODE; do

    echo "adding node ${i}";

    /usr/bin/curl -s "http://localhost:/upstream_conf?add=&upstream=&server=${i}&max_fails=0"

done

for i in $DEL_NODE; do

    echo "removing node ${i}";

    #NODE_ID=`/usr/bin/curl -s "http://localhost:/upstream_conf?upstream=" | /bin/grep ${i} | /usr/bin/awk '{print $4}' | /bin/sed -r 's/id=//g'`

    NODE_ID=`/usr/bin/curl -s "http://localhost:/upstream_conf?upstream=" | /bin/grep ${i} | /bin/grep -oP 'id=Kd+'`

    NODE_COUNT=`/usr/bin/curl -s "http://localhost:/upstream_conf?upstream=" | /bin/grep -n ${i} | /bin/grep -oP 'd+:server' | /bin/sed -r 's/:server//g'`

    JSON_NODE_NUM=$(expr $NODE_COUNT - 1)

    NODE_CONNS=`/usr/bin/curl -s "http://localhost:/status" | /usr/bin/jq ".upstreams..peers[${JSON_NODE_NUM}].active"`

    NODE_STATE=`/usr/bin/curl -s "http://localhost:/status" | /usr/bin/jq ".upstreams..peers[${JSON_NODE_NUM}].state"`

    if [[ ${NODE_STATE} == '"up"' ]] && [[ ${NODE_CONNS} == 0 ]]; then

	echo "nodes is up with no active connections, removing ${i}"

	/usr/bin/curl -s "http://localhost:/upstream_conf?remove=&upstream=&id=${NODE_ID}"

    elif [[ ${NODE_STATE} == '"draining"' ]] && [[ ${NODE_CONNS} == 0 ]]; then

    echo "nodes is draining with no active connections, removing ${i}"

    /usr/bin/curl -s "http://localhost:/upstream_conf?remove=&upstream=&id=${NODE_ID}"

    elif [[ ${NODE_STATE} == '"down"' ]]; then

	echo "node state is down, removing ${i}":

	/usr/bin/curl -s "http://localhost:/upstream_conf?remove=&upstream=&id=${NODE_ID}"

    elif [[ ${NODE_STATE} == '"unhealthy"' ]]; then

	echo "node state is down, removing ${i}":

	/usr/bin/curl -s "http://localhost:/upstream_conf?remove=&upstream=&id=${NODE_ID}"

    elif [[ ${NODE_STATE} == '"up"' ]] && [[ ${NODE_CONNS} != 0 ]]; then

	echo "node has active connections, draining connections on ${i}"

    fi

done
rm $NGINX_NODES $CONFIG_NODES $DIFF_OUT
The script is a little harder to read because it’s still in the Chef template version. It’s comparing the running config from the extended status page to the upstream config file managed by Chef. Here’s the logic used to generate the upstream configs:
upstream_node_ips = []

upstream_role = (node[:nginx][:upstream]).to_s

search(:node, "role:#{node[:nginx][:upstream]}-upstream") do |nodes|

  host_ip = nodes['ipaddress']

  unless host_ip.to_s.strip.empty?

    host_port = nodes['nginx']['application_port']

    upstream_node_ips << "#{host_ip}:#{host_port}" # if value.has_key?("broadcast")
  end
end

template "/etc/nginx/conf.d/#{node[:nginx][:upstream]}-upstream.conf" do
  source 'upstreams.conf.erb'
  owner 'root'
  group node['root_group']
  mode 0644
  variables(
    hosts: upstream_node_ips
  )
  # notifies :reload, 'service[nginx]', :delayed
  notifies :run, 'execute[run_api_update_script]', :delayed
end[/config]

You can see that we’re using the Chef search functionality to find nodes that are currently assigned to the upstream role you defined for this application. It then extracts the IP and application port for the node, and passes it to the template as an array. Here’s the templated version of the upstream configuration:

[config]upstream  {

       zone  64k;


       server ;


   }
Finally, we can take a look at the actual script that will handle the autoscaling:
require 'chef/api_client'

require 'chef/config'

require 'chef/knife'

require 'chef/node'

require 'chef/search/query'

require 'net/http'

require 'json'

class MyCLI

  include Mixlib::CLI

end
Chef::Config.from_file(File.expand_path("~/.chef/knife.rb"))

nginx_node = ""

cloud_provider = ""

nginx_upstream = ""

nginx_server_zone = ""

if cloud_provider == "ec2"

  create_args = ["#{cloud_provider}", 'server', 'create', '-r', "role[#{nginx_upstream}-upstream]", '-S', 'chef-demo', '-I', 'ami-93d80ff3', '--region', 'us-west-2', '-f', 'm1.medium', '-g', 'chef-demo', '--ssh-user', 'ubuntu', '-i', '~/.ssh/chef-demo.pem']

elsif cloud_provider == "openstack"

  create_args = ["#{cloud_provider}", 'server', 'create', '-i', '~/.ssh/demo_key.pem', '--ssh-user', 'ubuntu', '-f', 'demo_flavor', '--openstack-private-network', '-Z', 'nova', '-r', "role[#{nginx_upstream}-upstream]"]

else

  puts "Please specify a valid cloud provider"

  exit

end

sleep_interval_in_seconds = 10

min_server_count = 1

max_server_count = 10

min_conns = 10

max_conns = 20

nginx_status_url = "http://#{nginx_node}:8080/status"
def get_nginx_active_servers(nginx_status_data, nginx_upstream)

  active_nodes = Array.new

  peers = nginx_status_data["upstreams"]["#{nginx_upstream}"]["peers"]

  peers.each do |node|

    if node["state"] == "up"

      active_nodes.push node["server"]

    end

  end

  return active_nodes

end
def get_nginx_server_conns(nginx_status_data, nginx_server_zone)

  return nginx_status_data["server_zones"]["#{nginx_server_zone}"]["processing"]

end
def add_backend_node(create_args)

  #search for existing hostnames to pick a new one

  query = Chef::Search::Query.new

  #nodes = query.search('node', 'role:#{nginx_upstream}-upstream').first rescue []

  nodes = query.search('node', 'role:-upstream').first rescue []

  hosts = Array.new

  used_num = Array.new

  nodes.each do |node|

    node_name = node.name

    hosts.push node_name

    num = node_name.scan(/d+/)

    used_num.push num

  end

  used_num.sort!

  fixed1 = used_num.flatten.collect do |num| num.to_i end

  fixed_num = fixed1.sort!

  firstnum = fixed_num.first

  lastnum = fixed_num.last

  firsthost = hosts.sort[0].to_i

  lasthost = hosts.sort[-1].to_i
  unless firstnum.nil? && lastnum.nil?

    total = (1..lastnum).to_a

    missingnum = total-fixed_num

  end

  newhostname = ""

  if missingnum.nil?

    puts "No existing hosts"

    fixnum = "1"

    newnum = fixnum.to_i

    newhostname = "-app-#{newnum}"

  elsif missingnum.any?

    puts "Missing numbers are #{missingnum}"

    newnum = missingnum.first

    newhostname = "-app-#{newnum}"

  else

    newnum = lastnum + 1

    puts "new number is n"

    newhostname = "-app-#{newnum}"

  end

  new_create_args = create_args + ['--node-name', newhostname]

  knife = Chef::Knife.new

  knife.options=MyCLI.options

  Chef::Knife.run(new_create_args, MyCLI.options)

  #sleep to wait for chef run

  1.upto(10) do |n|

    puts "."

    sleep 1 # second

  end

end
def del_backend_node(nginx_status_data, nginx_node, active_nodes, cloud_provider, nginx_upstream)

  #lookup hostnames/ips and pick a backend at random

  query = Chef::Search::Query.new

  #nodes = query.search('node', 'role:#{nginx_upstream}-upstream').first rescue []

  nodes = query.search('node', 'role:-upstream').first rescue []

  hosts = Array.new

  nodes.each do |node|

    node_name = node.name

    node_ip = node['ipaddress']

    if active_nodes.any? { |val| /#{node_ip}/ =~ val }

      hosts.push "#{node_name}:#{node_ip}"

    end

  end

  del_node = hosts.sample

  node_name = del_node.rpartition(":").first

  node_ip = del_node.rpartition(":").last

  puts "Removing #{node_name}"

  nginx_url = "http://#{nginx_node}:8080/upstream_conf?upstream=#{nginx_upstream}"

  response = Net::HTTP.get(URI(nginx_url))

  node_id = response.lines.grep(/#{node_ip}/).first.split('id=').last.chomp

  drain_url = "http://#{nginx_node}:8080/upstream_conf?upstream=#{nginx_upstream}&id=#{node_id}&drain=1"

  Net::HTTP.get(URI(drain_url))

  sleep(5)

  knife = Chef::Knife.new

  knife.options=MyCLI.options

  #delete_args = ["#{cloud_provider}", 'server', 'delete', "#{node_name}", '--purge', '-y']

  #Chef::Knife.run(delete_args, MyCLI.options)

  delete_args = "#{cloud_provider} server delete -N #{node_name} -P -y"

  `knife #{delete_args}`

end
last_conns_count = -1
while true

  response = Net::HTTP.get(URI(nginx_status_url))

  nginx_status_data = JSON.parse(response)
  active_nodes = get_nginx_active_servers(nginx_status_data, nginx_upstream)

  server_count = active_nodes.length

  current_conns = get_nginx_server_conns(nginx_status_data, nginx_server_zone)
  conns_per_server = current_conns / server_count.to_f
  puts "Current connections = #{current_conns}"

  puts "connections per server = #{conns_per_server}"
  if server_count  max_conns

    if server_count < max_server_count
      puts "Creating new #{cloud_provider} Instance"
      add_backend_node(create_args)
    end
  elsif conns_per_server  min_server_count

      del_backend_node(nginx_status_data, nginx_node, active_nodes, cloud_provider, nginx_upstream)

    end
  end
  last_conns_count = current_conns

  sleep(sleep_interval_in_seconds)

end
The primary roles of this script are to monitor the NGINX Plus status page and to add and remove nodes based on statistics to and from the NGINX Plus node. In its current state, the script is making decisions based on the number of active connections, divided by the amount of active servers in the load-balanced pool. You can easily modify this to use any of the other statistics available from the NGINX Plus status page.
Deploying an Autoscaling Stack
First, we’re going to start an autoscaler instance. We’ll use the knife-ec2 plug-in:
Damians-MacBook-Pro:chef-repo damiancurry$ knife ec2 server create -r "role[autoscaler]" -g sg-1f285866 -I ami-93d80ff3 -f m1.medium -S chef-demo --region us-west-2  --node-name autoscaler-test --ssh-user ubuntu -i ~/.ssh/chef-demo.pem

Instance ID: i-0c359f3a443d18d64

Flavor: m1.medium

Image: ami-93d80ff3

Region: us-west-2

Availability Zone: us-west-2a

Security Group Ids: sg-1f285866

Tags: Name: autoscaler-test

SSH Key: chef-demo
Waiting for EC2 to create the instance......

Public DNS Name: ec2-35-164-35-19.us-west-2.compute.amazonaws.com

Public IP Address: 35.164.35.19

Private DNS Name: ip-172-31-27-162.us-west-2.compute.internal

Private IP Address: 172.31.27.162
Waiting for sshd access to become available

SSH Target Address: ec2-35-164-35-19.us-west-2.compute.amazonaws.com(dns_name)

done
SSH Target Address: ec2-35-164-35-19.us-west-2.compute.amazonaws.com()

Creating new client for autoscaler-test

Creating new node for autoscaler-test

Connecting to ec2-35-164-35-19.us-west-2.compute.amazonaws.com

ec2-35-164-35-19.us-west-2.compute.amazonaws.com -----> Installing Chef Omnibus (-v 12)

…

ec2-35-164-35-19.us-west-2.compute.amazonaws.com Chef Client finished, 6/6 resources updated in 13 seconds
Now let’s take a look at the script that will actually handle the autoscaling that runs on this node, /usr/bin/autoscale_nginx.rb:
require 'chef/api_client'

require 'chef/config'

require 'chef/knife'

require 'chef/node'

require 'chef/search/query'

require 'net/http'

require 'json'

class MyCLI

  include Mixlib::CLI

end
Chef::Config.from_file(File.expand_path("~/.chef/knife.rb"))

nginx_node = "[]"

cloud_provider = "ec2"

nginx_upstream = "test"

nginx_server_zone = "test.local"

if cloud_provider == "ec2"

  create_args = ["#{cloud_provider}", 'server', 'create', '-r', "role[#{nginx_upstream}-upstream]", '-S', 'damiancurry', '-I', 'ami-93d80ff3', '--region', 'us-west-2', '-f', 'm1.medium', '--ssh-user', 'ubuntu', '-i', '~/.ssh/damiancurry.pem']

elsif cloud_provider == "openstack"

  create_args = ["#{cloud_provider}", 'server', 'create', '-i', '~/.ssh/demo_key.pem', '--ssh-user', 'ubuntu', '-f', 'demo_flavor', '--openstack-private-network', '-Z', 'nova', '-r', "role[#{nginx_upstream}-upstream]"]

else

  puts "Please specify a valid cloud provider"

  exit

end

sleep_interval_in_seconds = 10

min_server_count = 1

max_server_count = 10

min_conns = 10

max_conns = 20

nginx_status_url = "http://#{nginx_node}:8080/status"
def get_nginx_active_servers(nginx_status_data, nginx_upstream)

  active_nodes = Array.new

  peers = nginx_status_data["upstreams"]["#{nginx_upstream}"]["peers"]

  peers.each do |node|

    if node["state"] == "up"

      active_nodes.push node["server"]

    end

  end

  return active_nodes

end
def get_nginx_server_conns(nginx_status_data, nginx_server_zone)

  return nginx_status_data["server_zones"]["#{nginx_server_zone}"]["processing"]

end
def add_backend_node(create_args)

  knife = Chef::Knife.new

  knife.options=MyCLI.options

  Chef::Knife.run(create_args, MyCLI.options)

  #sleep to wait for chef run

  1.upto(10) do |n|

    puts "."

    sleep 1 # second

  end

end
def del_backend_node(nginx_status_data, nginx_node, active_nodes, cloud_provider, nginx_upstream)

  #lookup hostnames/ips and pick a backend at random

  query = Chef::Search::Query.new

  #nodes = query.search('node', 'role:#{nginx_upstream}-upstream').first rescue []

  nodes = query.search('node', 'role:test-upstream').first rescue []

  hosts = Array.new

  nodes.each do |node|

    node_name = node.name

    node_ip = node['ipaddress']

    if active_nodes.any? { |val| /#{node_ip}/ =~ val }

      hosts.push "#{node_name}:#{node_ip}"

    end

  end

  del_node = hosts.sample

  node_name = del_node.rpartition(":").first

  node_ip = del_node.rpartition(":").last

  puts "Removing #{node_name}"

  nginx_url = "http://#{nginx_node}:8080/upstream_conf?upstream=#{nginx_upstream}"

  response = Net::HTTP.get(URI(nginx_url))

  node_id = response.lines.grep(/#{node_ip}/).first.split('id=').last.chomp

  drain_url = "http://#{nginx_node}:8080/upstream_conf?upstream=#{nginx_upstream}&id=#{node_id}&drain=1"

  Net::HTTP.get(URI(drain_url))

  sleep(5)

  knife = Chef::Knife.new

  knife.options=MyCLI.options

  #delete_args = ["#{cloud_provider}", 'server', 'delete', "#{node_name}", '--purge', '-y']

  #Chef::Knife.run(delete_args, MyCLI.options)

  delete_args = "#{cloud_provider} server delete #{node_name} -P -y"

  `knife #{delete_args}`

end
last_conns_count = -1
while true

  response = Net::HTTP.get(URI(nginx_status_url))

  nginx_status_data = JSON.parse(response)
  active_nodes = get_nginx_active_servers(nginx_status_data, nginx_upstream)

  server_count = active_nodes.length

  current_conns = get_nginx_server_conns(nginx_status_data, nginx_server_zone)
  conns_per_server = current_conns / server_count.to_f
  puts "Current connections = #{current_conns}"

  puts "connections per server = #{conns_per_server}"
  if server_count  max_conns

    if server_count < max_server_count
      puts "Creating new #{cloud_provider} Instance"
      add_backend_node(create_args)
    end
  elsif conns_per_server  min_server_count

      del_backend_node(nginx_status_data, nginx_node, active_nodes, cloud_provider, nginx_upstream)

    end
  end
  last_conns_count = current_conns

  sleep(sleep_interval_in_seconds)

end
root@ip-172-31-27-162:~#
You can see that the nginx_node variable at the top of the script does not have an IP address associated with it yet. This is because we haven’t created an NGINX Plus server yet, but Chef will update the script with that information once it has been created.
Now we can start our NGINX Plus server:
Damians-MacBook-Pro:default damiancurry$ knife ec2 server create -r "role[nginx_plus_autoscale]" -g sg-1f285866 -I ami-93d80ff3 -f m1.medium -S chef-demo --region us-west-2 --ssh-user ubuntu -i ~/.ssh/chef-demo.pem --node-name nginx-autoscale

Instance ID: i-0856ee80f54c8f3e6

Flavor: m1.medium

Image: ami-93d80ff3

Region: us-west-2

Availability Zone: us-west-2b

Security Group Ids: sg-1f285866

Tags: Name: nginx-autoscale

SSH Key: chef-demo
Waiting for EC2 to create the instance.......

Public DNS Name: ec2-35-165-171-46.us-west-2.compute.amazonaws.com

Public IP Address: 35.165.171.46

Private DNS Name: ip-172-31-38-163.us-west-2.compute.internal

Private IP Address: 172.31.38.163
Waiting for sshd access to become available

SSH Target Address: ec2-35-165-171-46.us-west-2.compute.amazonaws.com(dns_name)

done
SSH Target Address: ec2-35-165-171-46.us-west-2.compute.amazonaws.com()

Creating new client for nginx-autoscale

Creating new node for nginx-autoscale

Connecting to ec2-35-165-171-46.us-west-2.compute.amazonaws.com

ec2-35-165-171-46.us-west-2.compute.amazonaws.com -----> Installing Chef Omnibus (-v 12)

…

ec2-35-165-171-46.us-west-2.compute.amazonaws.com Chef Client finished, 24/34 resources updated in 43 seconds
Now we can check our autoscaler script on the autoscaler instancer to make sure the script was updated with the new node’s IP address:
root@ip-172-31-27-162:~# grep 'nginx_node =' /usr/bin/autoscale_nginx.rb

nginx_node = "172.31.38.163"

root@ip-172-31-27-162:~#
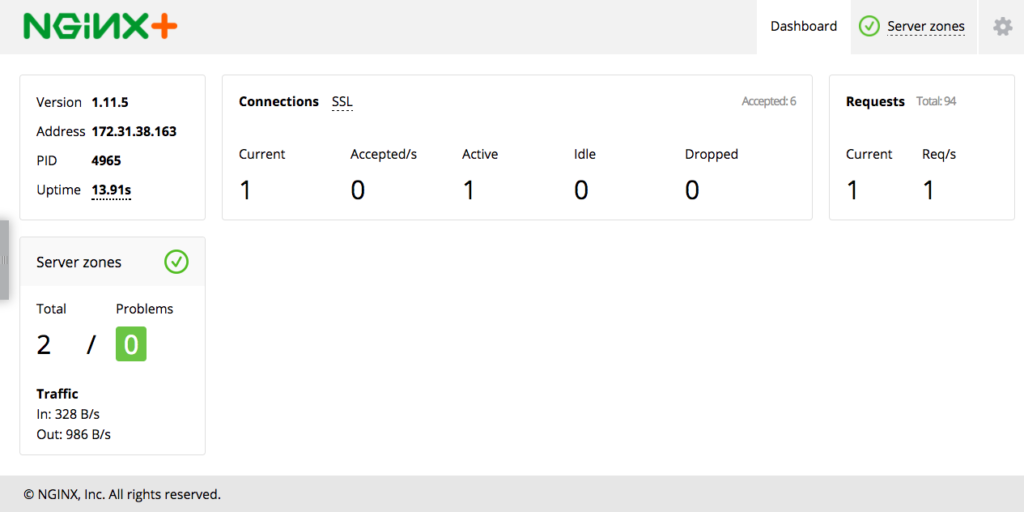
You should now be able to hit the status page for your NGINX Plus node, and it should look like below:

You can also hit the NGINX Plus server on port 80, and you’ll see a 502 Bad Gateway error page because you haven’t started any backend application servers yet.
Before we fire up the autoscaler script and get some application nodes started, let’s take a look at the script that will add these new nodes to the running NGINX config, /tmp/api_update.sh:
#!/bin/bash

NGINX_NODES="$(mktemp)"

/usr/bin/curl -s "http://localhost:8080/upstream_conf?upstream=test"| /usr/bin/awk '{print $2}' | /bin/sed -r 's/;//g' | /usr/bin/sort > $NGINX_NODES

CONFIG_NODES="$(mktemp)"

/bin/grep -E '[0-9]{1,3}.[0-9]{1,3}.[0-9]{1,3}.[0-9]{1,3}' /etc/nginx/conf.d/test-upstream.conf | /usr/bin/awk '{print $2}' | /bin/sed -r 's/;//g' | /usr/bin/sort > $CONFIG_NODES

DIFF_OUT="$(mktemp)"

/usr/bin/diff $CONFIG_NODES $NGINX_NODES > $DIFF_OUT

ADD_NODE=`/usr/bin/diff ${CONFIG_NODES} ${NGINX_NODES} | /bin/grep "" | /usr/bin/awk '{print $2}'`
for i in $ADD_NODE; do

    echo "adding node ${i}";

    /usr/bin/curl -s "http://localhost:8080/upstream_conf?add=&upstream=test&server=${i}&max_fails=0"

done

for i in $DEL_NODE; do

    echo "removing node ${i}";

    #NODE_ID=`/usr/bin/curl -s "http://localhost:8080/upstream_conf?upstream=test" | /bin/grep ${i} | /usr/bin/awk '{print $4}' | /bin/sed -r 's/id=//g'`

    NODE_ID=`/usr/bin/curl -s "http://localhost:8080/upstream_conf?upstream=test" | /bin/grep ${i} | /bin/grep -oP 'id=Kd+'`

    NODE_COUNT=`/usr/bin/curl -s "http://localhost:8080/upstream_conf?upstream=test" | /bin/grep -n ${i} | /bin/grep -oP 'd+:server' | /bin/sed -r 's/:server//g'`

    JSON_NODE_NUM=$(expr $NODE_COUNT - 1)

    NODE_CONNS=`/usr/bin/curl -s "http://localhost:8080/status" | /usr/bin/jq ".upstreams.test.peers[${JSON_NODE_NUM}].active"`

    NODE_STATE=`/usr/bin/curl -s "http://localhost:8080/status" | /usr/bin/jq ".upstreams.test.peers[${JSON_NODE_NUM}].state"`

    if [[ ${NODE_STATE} == '"up"' ]] && [[ ${NODE_CONNS} == 0 ]]; then

	echo "nodes is up with no active connections, removing ${i}"

	/usr/bin/curl -s "http://localhost:8080/upstream_conf?remove=&upstream=test&id=${NODE_ID}"

    elif [[ ${NODE_STATE} == '"draining"' ]] && [[ ${NODE_CONNS} == 0 ]]; then

    echo "nodes is draining with no active connections, removing ${i}"

    /usr/bin/curl -s "http://localhost:8080/upstream_conf?remove=&upstream=test&id=${NODE_ID}"

    elif [[ ${NODE_STATE} == '"down"' ]]; then

	echo "node state is down, removing ${i}":

	/usr/bin/curl -s "http://localhost:8080/upstream_conf?remove=&upstream=test&id=${NODE_ID}"

    elif [[ ${NODE_STATE} == '"unhealthy"' ]]; then

	echo "node state is down, removing ${i}":

	/usr/bin/curl -s "http://localhost:8080/upstream_conf?remove=&upstream=test&id=${NODE_ID}"

    elif [[ ${NODE_STATE} == '"up"' ]] && [[ ${NODE_CONNS} != 0 ]]; then

	echo "node has active connections, draining connections on ${i}"

    fi

done
rm $NGINX_NODES $CONFIG_NODES $DIFF_OUT

ubuntu@ip-172-31-38-163:~$
This script will be called every time Chef runs, and it’ll compare the existing running config to the upstream config file defined for the autoscaling group. As you can see from the recipe snippet below, Chef manages the config file, but doesn’t reload NGINX when it is updated. Instead, it calls the apt_update script:
template "/etc/nginx/conf.d/#{node[:nginx][:upstream]}-upstream.conf" do

  source 'upstreams.conf.erb'

  owner 'root'

  group node['root_group']

  mode 0644

  variables(

    hosts: upstream_node_ips

  )

  # notifies :reload, 'service[nginx]', :delayed

  notifies :run, 'execute[run_api_update_script]', :delayed

end
Now we can start the autoscaler script and get some application servers brought online. Because we need to utilize the Ruby binary shipped with the Chef client, we have to fully qualify the path to the Ruby binary for the script to run properly:
ubuntu@ip-172-31-27-162:~$ /opt/chef/embedded/bin/ruby /usr/bin/autoscale_nginx.rb

Current connections = 0

connections per server = NaN

Creating new ec2 Instance

No existing hosts

test-app-1

Instance ID: i-0c671d851a1c5e6d0

Flavor: m1.medium

Image: ami-93d80ff3

Region: us-west-2

Availability Zone: us-west-2b

Security Group Ids: chef-demo

Tags: Name: test-app-1

SSH Key: chef-demo
Waiting for EC2 to create the instance...

…

ec2-35-165-4-158.us-west-2.compute.amazonaws.com Chef Client finished, 16/26 resources updated in 34 seconds

…

Private IP Address: 172.31.40.186

Environment: _default

Run List: role[test-upstream]

.

.

.

.

.

.

.

.

.

.

Current connections = 0

connections per server = 0.0

Current connections = 0

connections per server = 0.0
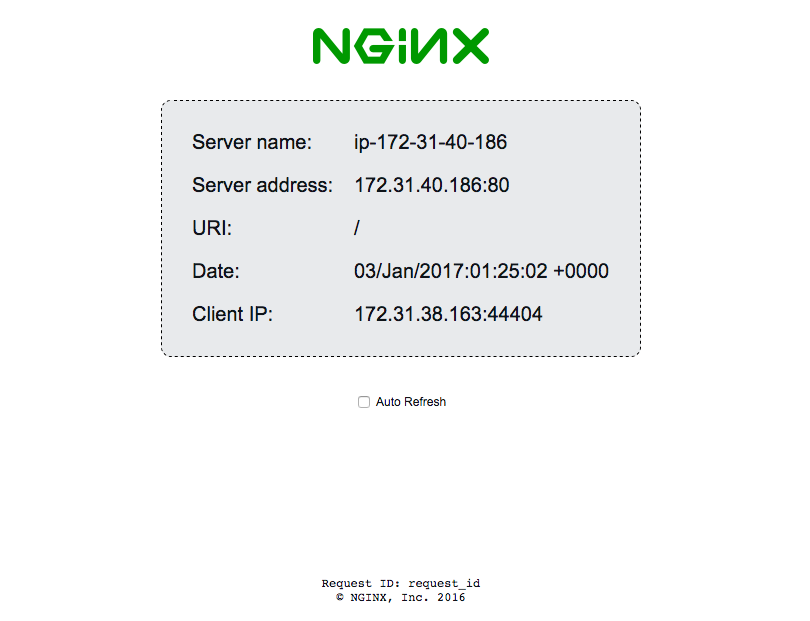
Now that you have one application node up, you can go back to your NGINX Plus node. You should see this demo page now, instead of the 502 error page:

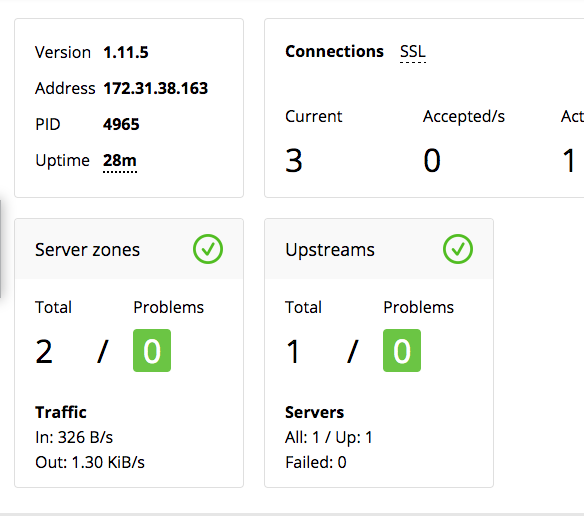
And if you go back to the status page, you now have an upstream defined:

Next, we can use a tool like wrk to generate some load against the site:
Damians-MacBook-Pro:wrk damiancurry$ ./wrk -c 25 -t 2 -d 10m http://ec2-35-165-171-46.us-west-2.compute.amazonaws.com/

Running 10m test @ http://ec2-35-165-171-46.us-west-2.compute.amazonaws.com/

  2 threads and 25 connections
And on the autoscaler node, you can see the script catch the increase in connections and start a new instance:
[terminal]Current connections = 0

connections per server = 0.0

Current connections = 24

connections per server = 24.0

Creating new ec2 Instance

new number is

2

test-app-2

Instance ID: i-07186f5451c7d9e77

Flavor: m1.medium

Image: ami-93d80ff3

Region: us-west-2

Availability Zone: us-west-2b

Security Group Ids: chef-demo

Tags: Name: test-app-2

SSH Key: chef-demo
Waiting for EC2 to create the instance......

….

ec2-35-166-214-136.us-west-2.compute.amazonaws.com Chef Client finished, 16/26 resources updated in 35 seconds

Current connections = 24

connections per server = 12.0

Current connections = 24

connections per server = 12.0
You should now be able to see two upstream nodes in your dashboard. Now the script will stay at this point, because it's configured to scale up when the nodes have more than 20 active connections on average. If you go back and refresh your browser pointed at port 80 of your NGINX server, you should see the data change as it switches between the different backend nodes. If we stop the traffic from being generated, you can see the script take one of the nodes offline, as it is configured to always have a minimum of one server running.
Current connections = 24

connections per server = 12.0

Current connections = 0

connections per server = 0.0

Removing test-app-2

no instance id is specific, trying to retrieve it from node name

WARNING: Deleted server i-0dcf4740c1b34417f

WARNING: Deleted node test-app-2

WARNING: Deleted client test-app-2

Current connections = 0

connections per server = 0.0
Conclusion
This is a rather basic script at this point, but it should provide a starting point for you to build a customized autoscaling solution that fits your environment. And if you ever want to migrate to a different cloud provider, it’s as simple as changing one attribute in the Chef configuration.
The post Autoscaling and Orchestration with NGINX Plus and Chef appeared first on NGINX.
Source: Autoscaling and Orchestration with NGINX Plus and Chef


Leave a Reply