Building a Docker Image for Deploying NGINX Management Suite Without Helm
Earlier this year we introduced NGINX Management Suite as our new control plane for NGINX software solutions, enabling you to configure, scale, secure and monitor user applications and REST APIs on the NGINX data plane from a single pane of glass.
NGINX Management Suite has a modular design: at its core is the Instance Manager module, which provides tracking, configuration, and visibility for your entire fleet of NGINX Open Source and NGINX Plus instances. As of this writing, API Connectivity Manager is the other available module, used to manage and orchestrate NGINX Plus running as an API gateway.
NGINX Management Suite can run on bare metal, as a Linux virtual machine, or containerized. The recommended way to deploy it on Kubernetes is using the Helm chart we provide, but for specific purposes you might need to build your own Docker image and manage its lifecycle through a custom CI/CD pipeline that doesn’t necessarily rely on Helm.
Prerequisites
We provide a GitHub repository of the resources you need to create a Docker image for NGINX Management Suite, with support for these versions of Instance Manager and API Connectivity Manager:
- Instance Manager 2.4.0+
- API Connectivity Manager 1.0.0+
To build the Docker image, you need:
- A Linux host (bare metal or VM)
- Docker 20.10+
- A private registry to which you can push the target Docker image
- A subscription (or 30-day free trial) for NGINX Management Suite and an account at MyF5.com to download the software
To run the Docker image, you need:
- A running Kubernetes cluster
kubectlwith access to the Kubernetes cluster- A subscription (or 30-day free trial) for the NGINX Ingress Controller based on NGINX Plus
Building the Docker Image
Follow these instructions to build the Docker image.
Note: We have made every effort to accurately represent the NGINX Management Suite UI at the time of publication, but the UI is subject to change. Use these instructions as a reference and adapt them to the current UI as necessary.
-
Clone the GitHub repository:
$ git clone https://github.com/nginxinc/NGINX-Demos Cloning into 'NGINX-Demos'... remote: Enumerating objects: 215, done. remote: Counting objects: 100% (215/215), done. remote: Compressing objects: 100% (137/137), done. remote: Total 215 (delta 108), reused 171 (delta 64), pack-reused 0 Receiving objects: 100% (215/215), 2.02 MiB | 1.04 MiB/s, done. Resolving deltas: 100% (108/108), done. -
Change to the build directory:
$ cd NGINX-Demos/nginx-nms-docker/ - Log in to your account at MyF5.com and navigate to the page for NGINX Management Suite, under either Subscriptions or Trials as appropriate.
-
Click +Licenses and Certificates, and in the Instance [License] panel that appears, click Download License under Step 3 to copy your license to your local disk.
- Click the download the latest version link (in Step 1) to download the NGINX Management Suite software.
-
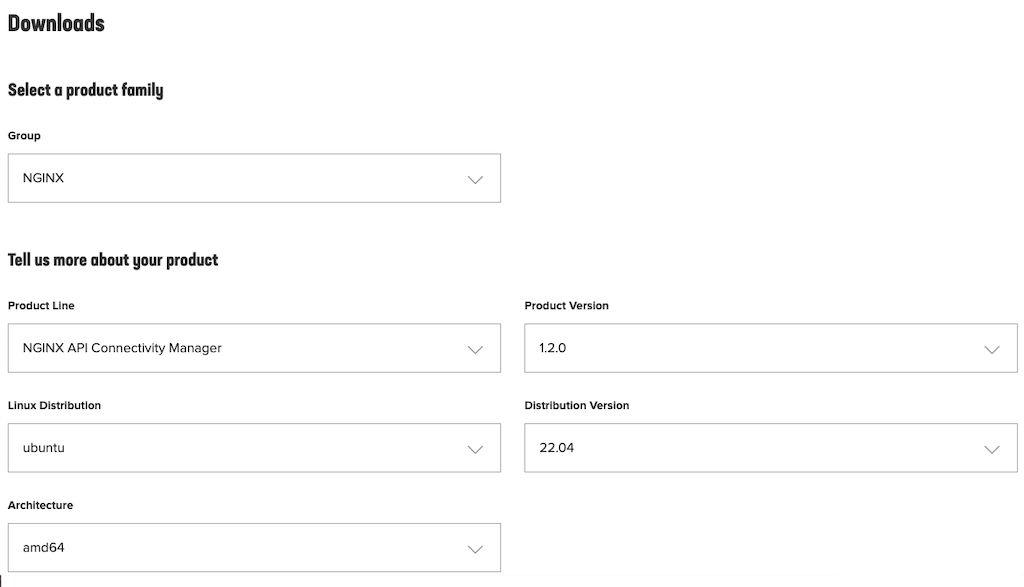
On the Downloads page that opens, select these values in the indicated fields for the purposes of this demo (new fields open in response to your choices):
- Group – NGINX
- Product Line – NGINX API Connectivity Manager
- Product version – The latest (1.2.0 in the screenshot)
- Linux Distribution – ubuntu
- Distribution Version – 22.04
- Architecture – amd64
-
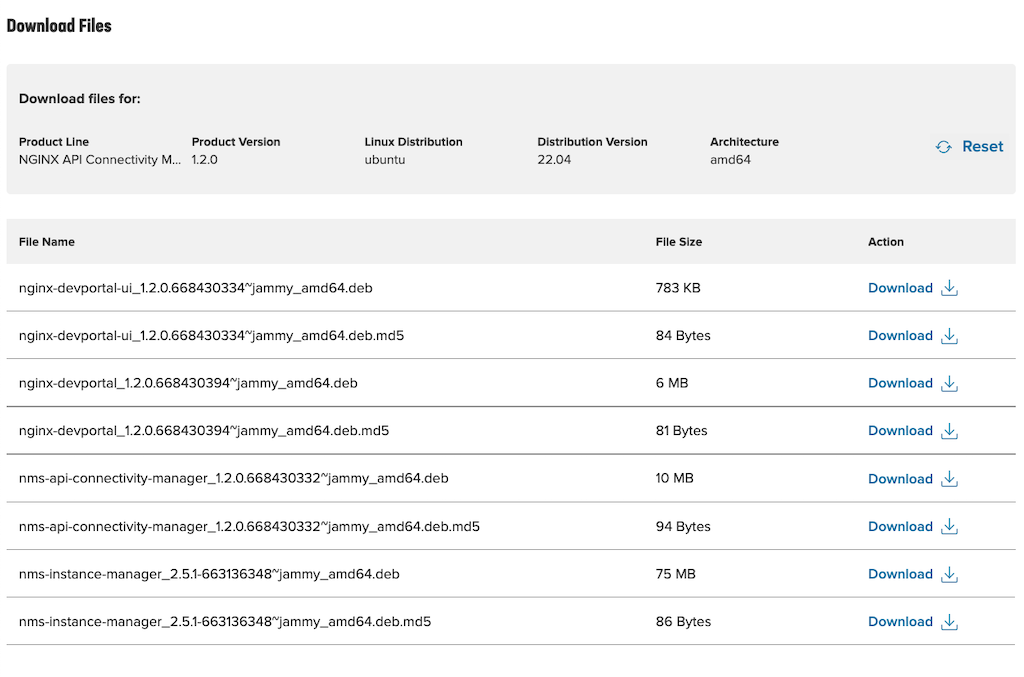
Scroll down to the Download Files section and click Download in the row for these two .deb packages: nms-api-connectivity-manager_* and nms-instance-manager_*.
-
Copy the downloaded packages into the nim-files/ directory (the result looks like this):
$ ls -al nim-files/ total 87216 drwxrwxr-x 2 f5 f5 4096 Mon DD hh:mm . drwxrwxr-x 8 f5 f5 4096 Mon DD hh:mm .. -rw-r--r-- 1 f5 f5 10724974 Mon DD hh:mm nms-api-connectivity-manager_1.2.0.668430332~jammy_amd64.deb -rw-r--r-- 1 f5 f5 78567074 Mon DD hh:mm nms-instance-manager_2.5.1-663136348~jammy_amd64.deb -rw-rw-r-- 1 f5 f5 0 Mon DD hh:mm .placeholder -
Run
dockerpsto verify that Docker is running and then run the buildNIM.sh script to build the Docker image. The‑nand‑aoptions specify the .deb package filenames for Instance Manager and API Connectivity Manager respectively, and the‑toption specifies the location and name of the private registry to which the image is pushed.$ ./scripts/buildNIM.sh -n nim-files/nms-instance-manager_2.5.1-663136348~jammy_amd64.deb -a nim-files/nms-api-connectivity-manager_1.2.0.668430332~jammy_amd64.deb -t registry.ff.lan:31005/nginx-nms:2.5.1 ==> Building NGINX Management Suite docker image Sending build context to Docker daemon 92.19MB Step 1/18 : FROM ubuntu:22.04 ---> a8780b506fa4 Step 2/18 : ARG NIM_DEBFILE ---> Running in 0f2354280c34 Removing intermediate container 0f2354280c34 […] ---> 0588a050c852 Step 18/18 : CMD /deployment/startNIM.sh ---> Running in d0cc5466a43d Removing intermediate container d0cc5466a43d ---> 25117ec0410a Successfully built 25117ec0410a Successfully tagged registry.ff.lan:31005/nginx-nms:2.5.1 The push refers to repository [registry.ff.lan:31005/nginx-nms] 9c4918474e3a: Pushed 42543d044dbb: Pushed 1621b2ec0a5e: Pushed c6a464fc6a79: Pushed 75fa1d3c61bb: Pushed 3501fcf5dbd8: Pushed d4a221057e67: Pushed 9ad05eafed57: Pushed f4a670ac65b6: Pushed 2.5.1: digest: sha256:9a70cfdb63b71dc31ef39e4f20a1420d8202c85784cb037b45dc0e884dad74c9 size: 2425
Running NGINX Management Suite on Kubernetes
Follow these instructions to prepare the Deployment manifest and start NGINX Management Suite on Kubernetes.
-
Base64‑encode the NGINX Management Suite license you downloaded in Step 4 of the previous section, and copy the output to the clipboard:
$ base64 -w0 nginx-mgmt-suite.lic TulNRS1WZXJz... - <a name="edit-nginx-nim"
Using your favorite editor, open manifests/1.nginx-nim.yaml and make the following changes:
-
On line 19, substitute your Docker image name for the default (
your.registry.tld/nginx-nim2:tag):16 spec: 17 containers: 18 - name: nginx-nim2 19 image: registry.ff.lan:31005/nginx-nms:2.5.1 -
In the Instance Manager Environment section, configure authentication credentials:
- On line 28, optionally substitute a different admin account name for the default,
admin. - On line 30, substitute the admin password for the default,
nimadmin. - On line 32, substitute the base64‑encoded license you generated in Step 1 above for
<BASE64_ENCODED_LICENSE_FILE>.
25 env: 26 ### NGINX Instance Manager environment 27 - name: NIM_USERNAME 28 value: admin 29 - name: NIM_PASSWORD 30 value: nimadmin 31 - name: NIM_LICENSE 32 value: "" - On line 28, optionally substitute a different admin account name for the default,
- Check and modify files under manifests/certs to customize the TLS certificate and key used for TLS offload by setting the FQDN you want to use. By default, the scripts/nimDockerStart.sh startup script publishes the containerized NGINX Management Suite through NGINX Ingress Controller.
- Optionally, edit manifests/3.vs.yaml and customize the hostnames used to reach NGINX Management Suite.
-
Start NGINX Management Suite in your Kubernetes cluster. As indicated in the trace, it runs as the nginx-nim2 pod. The script also initializes pods for ClickHouse as the backend database and Grafana for analytics visualization. For more information, see the README at the GitHub repo.
$ ./scripts/nimDockerStart.sh start namespace/nginx-nim2 created ~/NGINX-NIM2-Docker/manifests/certs ~/NGINX-NIM2-Docker Generating a RSA private key .....................................+++++ .....................................+++++ writing new private key to 'nim2.f5.ff.lan.key' ----- secret/nim2.f5.ff.lan created configmap/clickhouse-conf created configmap/clickhouse-users created persistentvolumeclaim/pvc-clickhouse created deployment.apps/clickhouse created service/clickhouse created deployment.apps/nginx-nim2 created service/nginx-nim2 created service/nginx-nim2-grpc created persistentvolumeclaim/pvc-grafana-data created persistentvolumeclaim/pvc-grafana-log created deployment.apps/grafana created service/grafana created virtualserver.k8s.nginx.org/nim2 created virtualserver.k8s.nginx.org/grafana created ~/NGINX-NIM2-Docker -
Verify that three pods are now running:
$ kubectl get pods -n nginx-nim2
NAME                        READY     STATUS    RESTARTS   AGE
clickhouse-759b65db8c-74pn5   1/1     Running   0          63s
grafana-95fbbf5c-jczgk        1/1     Running   0          63s
nginx-nim2-5f54664754-lrhmn   1/1     Running   0          63s
Accessing NGINX Management Suite
To access NGINX Management Suite, navigate in a browser to https://nim2.f5.ff.lan (or the alternate hostname you set in Step 4 of the previous section). Log in using the credentials you set in Step 2 of the previous section.
Stopping NGINX Management Suite
To stop and remove the Docker instance of NGINX Management Suite, run this command:
$ ./scripts/nimDockerStart.sh stop
namespace "nginx-nim2" deleted
The post Building a Docker Image for Deploying NGINX Management Suite Without Helm appeared first on NGINX.
Source: Building a Docker Image for Deploying NGINX Management Suite Without Helm

![Screenshot of 'Instance [License]' panel on TRIALS > NGINX MANAGEMENT SUITE page at f5.com](http://www.nginx.com/wp-content/uploads/2022/12/NGINX-Management-Suite_InstanceLicense.png)


Leave a Reply