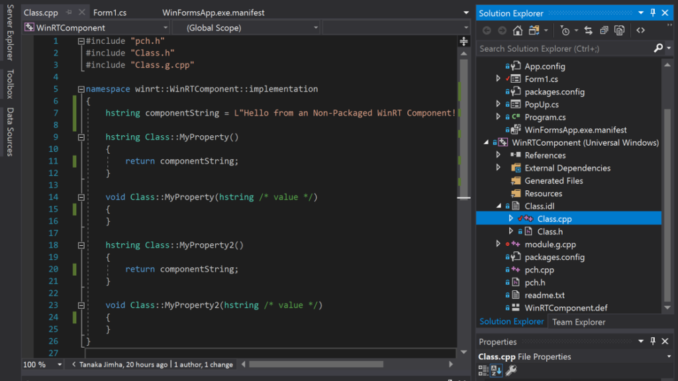
Enhancing Non-packaged Desktop Apps using Windows Runtime Components
Windows 10 Version 1903, May 2019 Update adds support for non-packaged desktop apps to make use of user-defined (3rd party) Windows Runtime (WinRT) Components. Previously, Windows only supported using 3rd party Windows Runtime components in a packaged app (UWP or Desktop Bridge). Trying to call a user-defined Windows Runtime Component in a non-packaged app would fail because of the absence of package identity in the app, no way to register the component with the System and in turn no way for the OS to find the component at runtime.
The restrictions blocking this application scenario have now been lifted with the introduction of Registration-free WinRT (Reg-free WinRT). Similar to the classic Registration-free COM feature, Reg-Free WinRT activates a component without using a registry mechanism to store and retrieve information about the component. Instead of registering the component during deployment which is the case in packaged apps, you can now declare information about your component’s assemblies and classes in the classic Win32-style application.manifest. At runtime, the information stored in the manifest will direct the activation of the component.
Why use Windows Runtime Components in Desktop Apps
Using Windows Runtime components in your Win32 application gives you access to more of the modern Windows 10 features available through Windows Runtime APIs. This way you can integrate modern experiences in your app that light up for Windows 10 users. A great example is the ability to host UWP controls in your current WPF, Windows Forms and native Win32 desktop applications through UWP XAML Islands.
How Registration-free WinRT Works
The keys to enabling this functionality in non-packaged apps are a newly introduced Windows Runtime activation mechanism and the new ”activatableClass” element in the application manifest. It is a child element of the existing manifest “file” element, and it enables the developer to specify activatable Windows Runtime classes in a dll the application will be making use of. At runtime this directs activation of the component’s classes. Without this information non-packaged apps would have no way to find the component. Below is an example declaration of a dll (WinRTComponent.dll) and the activatable classes (WinRTComponent.Class*) our application is making use of. The “threadingModel” and namespace (“xmlns”) must be specified as shown:
<?xml version="1.0" encoding="utf-8"?>
<assembly manifestVersion="1.0" xmlns="urn:schemas-microsoft-com:asm.v1">
<assemblyIdentity version="1.0.0.0" name="MyApplication.app"/>

  <file name="WinRTComponent.dll">
    <activatableClass
        name="WinRTComponent.Class1"
        threadingModel="both"
        xmlns="urn:schemas-microsoft-com:winrt.v1" />
    <activatableClass
        name="WinRTComponent.Class2"
        threadingModel="both"
        xmlns="urn:schemas-microsoft-com:winrt.v1" />
  </file>

</assembly>
The Windows Runtime Component
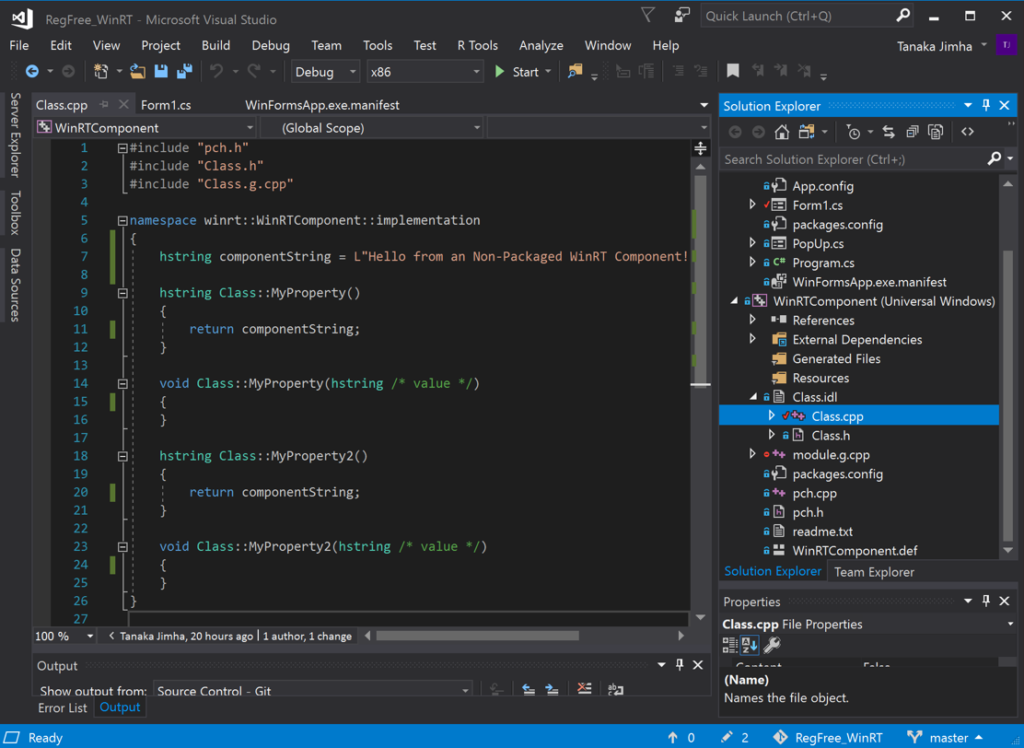
For our examples we’ll be using a simple C++ Windows Runtime component with a single class (WinRTComponent.Class) that has a string property. In practice you can make use of more sophisticated components containing UWP controls. Some good examples are this UWP XAML Islands sample and these Win2D samples.

Figure 1: C++ Windows Runtime Component
Using A C# Host App
GitHub Sample: https://aka.ms/regfreewinrtcs
In our first example we’ll look at a non-packaged Windows Forms app (WinFormsApp) which is referencing our C++ Windows Runtime Component (WinRTComponent). Below is an implementation of a button in the app calling the component class and displaying its string in a textbox and popup:
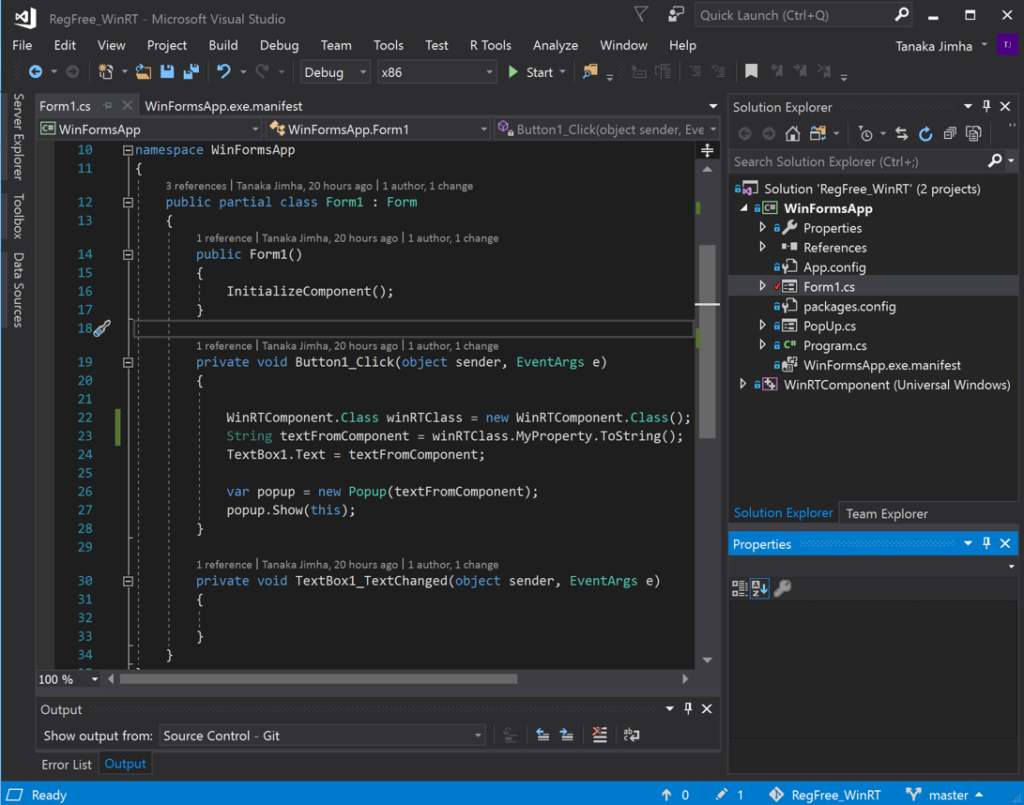
Figure 2: WinForms App Consuming component
All we need to get the code to compile is to add a reference to the WinRTComponent project from our WinForms app – right click the project node | Add | Reference | Projects | WinRTComponent. Adding the reference also ensures every time we build our app, the component is also built to keep track of any new changes in the component.
Although the code compiles, if we try to run the solution, the app will fail. This is because the system has no way of knowing which DLL contains WinRTComponent.Class and where to find the DLL. This is where the application manifest and Registration-free WinRT come in. On the application node right click | Add | New Item | Visual C# | Application Manifest File. The manifest file naming convention is that it must have the same name as our application’s .exe and have the .manifest extension, in this case I named it “WinFormsApp.exe.manifest”. We don’t need most of the text in the template manifest so we can replace it with the DLL and class declarations as shown below:
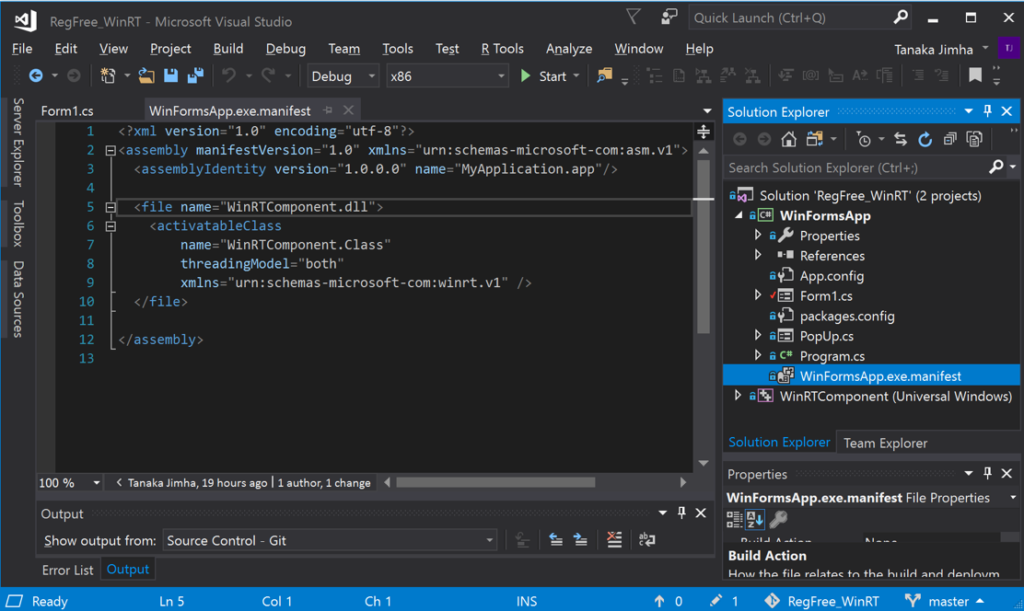
Figure 3: Application Manifest in WinForms App
Now that we’ve given the system a way of knowing where to find WinRTComponent.Class, we need to make sure the component DLL and all its dependencies are in the same directory as our app’s .exe. To get the component DLL in the correct directory we will use a Post Build Event – right click app project | Properties | Build Events | Post Build Event, and specify a command to copy the component dll from its output directory to the same output directory as the .exe:
copy /Y “$(SolutionDir)WinRTComponentbin$(Platform)$(Configuration)WinRTComponent.dll” “$(SolutionDir)$(MSBuildProjectName)$(OutDir)WinRTComponent.dll”
Handling Dependencies
Because our component is built in visual C++, it has a runtime dependency on the C++ Runtime. Windows Runtime components were originally created to only work in packaged applications distributed through the Microsoft Store, as a result, they have a dependency on the ‘Store version’ of the C++ Runtime DLLs, aka the VCLibs framework package. Unfortunately, redistributing the VCLibs framework package outside the Microsoft Store is currently not supported. As a result, we’ve had to come up with an alternate solution to satisfy the framework package dependency in non-packaged applications. We created app-local forwarding DLLs in the ‘form’ of the Store framework package DLLs that forward their function calls to the standard VC++ Runtime Libraries, aka the VCRedist. You can download the forwarding DLLs as the NuGet package Microsoft.VCRTForwarders.140 to resolve the Store framework package dependency.
The combination of the app-Local forwarding DLLs obtained via the NuGet package and the VCRedist allows your non-Store deployed Windows Runtime component to work as if it was deployed through the Store. Since native C++ applications already have a dependency on the VCRedist, the Microsoft.VCRTForwarders.140 NuGet package is a new dependency. For managed applications the NuGet package and the VCRedist are both new dependencies.
The Microsoft.VCRTForwarders.140 NuGet package can be found here: https://www.nuget.org/packages/Microsoft.VCRTForwarders.140/
The VCRedist can be found here: https://support.microsoft.com/en-us/help/2977003/the-latest-supported-visual-c-downloads
After adding the Microsoft.VCRTForwarders.140 NuGet package in our app everything should be set, and running our application displays text from our Windows Runtime component:
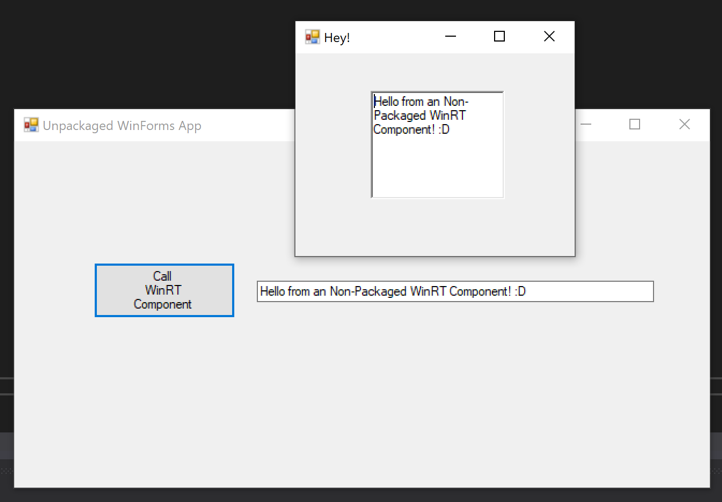
Figure 4: Running WinForms App
Using A C++ Host App
GitHub Sample: https://aka.ms/regfreewinrtcpp
To successfully reference a C++ Windows Runtime component from a C++ app, you need to use C++/WinRT to generate projection header files of your component. You can then include these header files in your app code to call your component. You can find out more about the C++/WinRT authoring experience here. Making use of a C++ Windows Runtime component in a non-packaged C++ app is very similar to the process we outlined above when using a C# app. However, the main differences are:
- Visual Studio doesn’t allow you to reference the C++ Windows Runtime component from a non-packaged C++ host app.
- You need C++/WinRT generated projection headers of the component in your app code.
Visual Studio doesn’t allow you to reference the Windows Runtime component from a non-packaged C++ app due to the different platforms the projects target. A nifty solution around this is to reference the Component’s WinMD using a property sheet. We need this reference so that C++/WinRT can generate projection header files of the component which we can use in our app code. So the first thing we’ll do to our C++ app is add a property sheet – right-click the project node| Add | New Item | Visual C++ | Property Sheets | Property Sheet (.props)
- Edit the resulting property sheet file (sample property sheet is shown below)
- Select View | Other Windows | Property Manager
- Right-click the project node
- Select Add Existing Property Sheet
- Select the newly created property sheet file
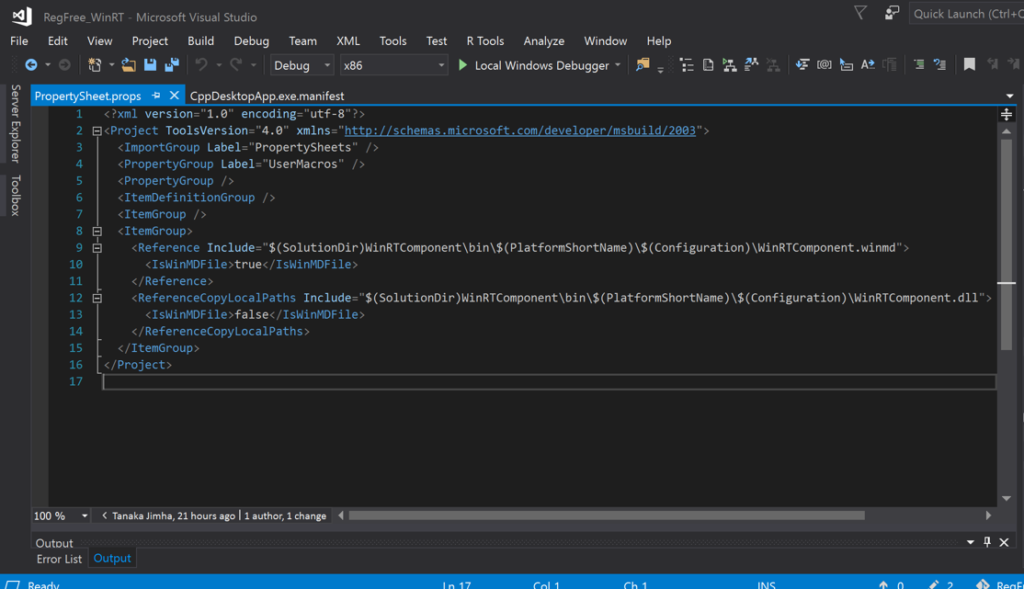
Figure 5: Property Sheet in C++ Host App
This property sheet is doing two things: adding a reference to the component WinMD and copying the component dll to the output directory with our app’s .exe. The copying step is so that we don’t have to create a post build event as we did in the C# app (the component dll needs to be in the same directory as the app’s .exe). If you prefer using the post build event instead, you can skip the copy action specified in the property sheet.
The next step would be to make sure your app has the C++/WinRT NuGet package installed. We need this for the component projection headers. Because Visual Studio doesn’t allow us to directly add a reference to the component, we need to manually build the component whenever we update it, so that we are referencing the latest component bits in our app. When we’ve made sure the component bits are up to date, we can go ahead and then build our app. The C++/WinRT NuGet package will generate a projection header file of the component based on the WinMD reference we added in the app property sheet. If you want to see the header file click on the “All Files” icon in Visual Studio Solution Explorer | Generated Files | winrt | <ComponentName.h>:
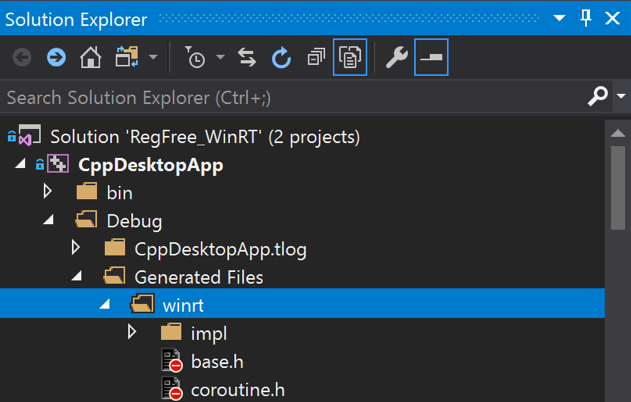
Figure 6: C++/WinRT Generated Projections
By including the generated component projection header file (WinRTComponent.h) in our app code we can reference our component code:
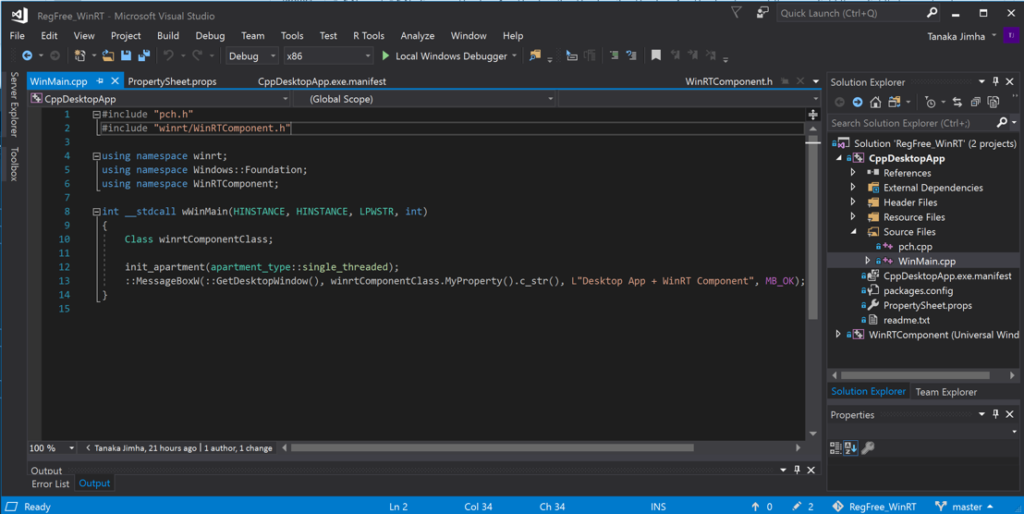
Figure 7: C++ App referencing code in WinRTComponent
We then add an application manifest to our app and specify the component DLL and component classes we’re making use of:
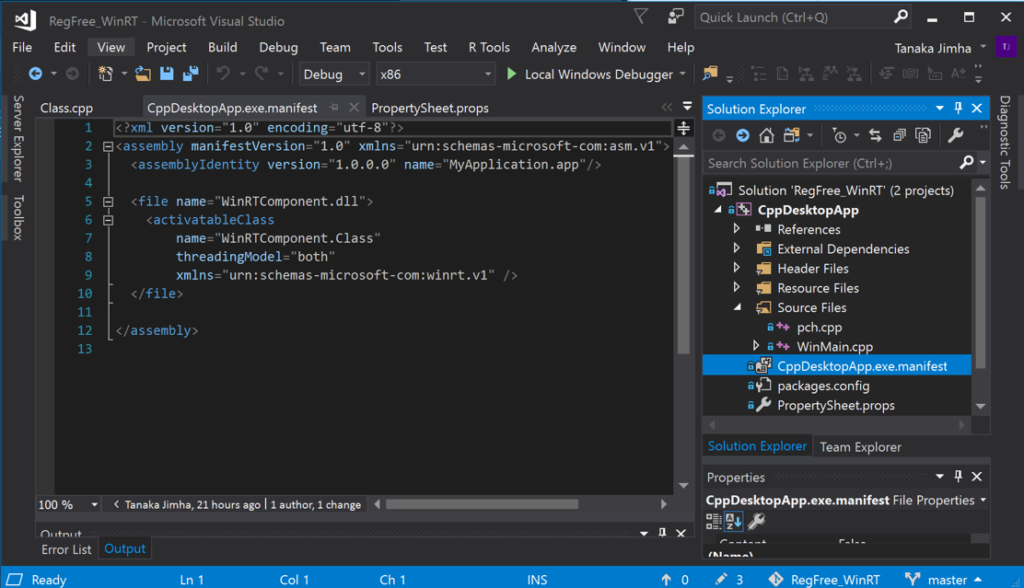
Figure 8: Win32 Application Manifest in C++ App
And this is what we get when we build and run the app:
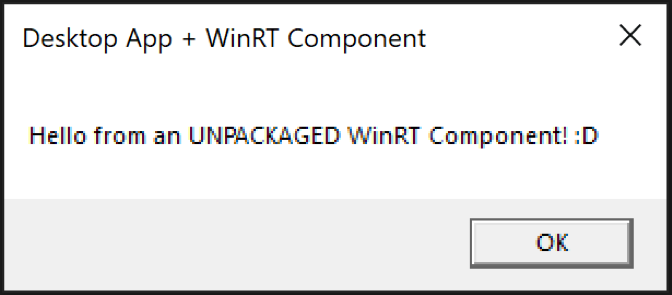
Figure 9: Running C++ Host App
Conclusion
Registration-free WinRT enables you to access more features in the UWP ecosystem by allowing you to use Windows Runtime Components without the requirement to package your application. This makes it easier for you to keep your existing Win32 code investments and enhance your applications by additively taking advantage of modern Windows 10 features. This means you can now take advantage of offerings such as UWP XAML Islands from your non-packaged desktop app. For a detailed look at using UWP XAML Islands in your non-packaged desktop app have a look at these samples: UWP XAML Islands and Win2D. Making use of C++ Windows Runtime components in non-packaged apps comes with the challenge of handling dependencies. While the solutions currently available are not ideal, we aim to make the process easier and more streamlined based on your feedback.
The post Enhancing Non-packaged Desktop Apps using Windows Runtime Components appeared first on Windows Blog.
Source: Enhancing Non-packaged Desktop Apps using Windows Runtime Components




Leave a Reply