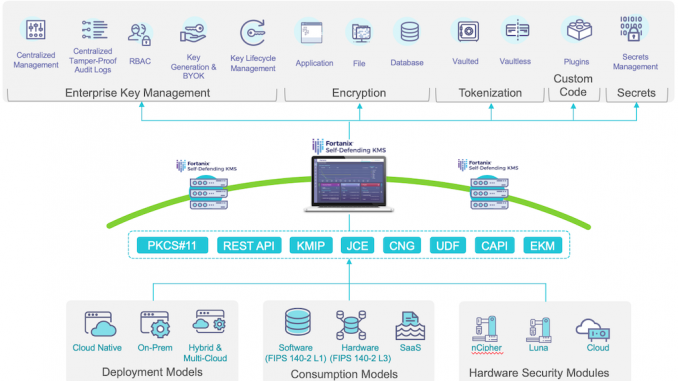
Integrating Fortanix Self-Defending KMS with NGINX and NGINX Plus
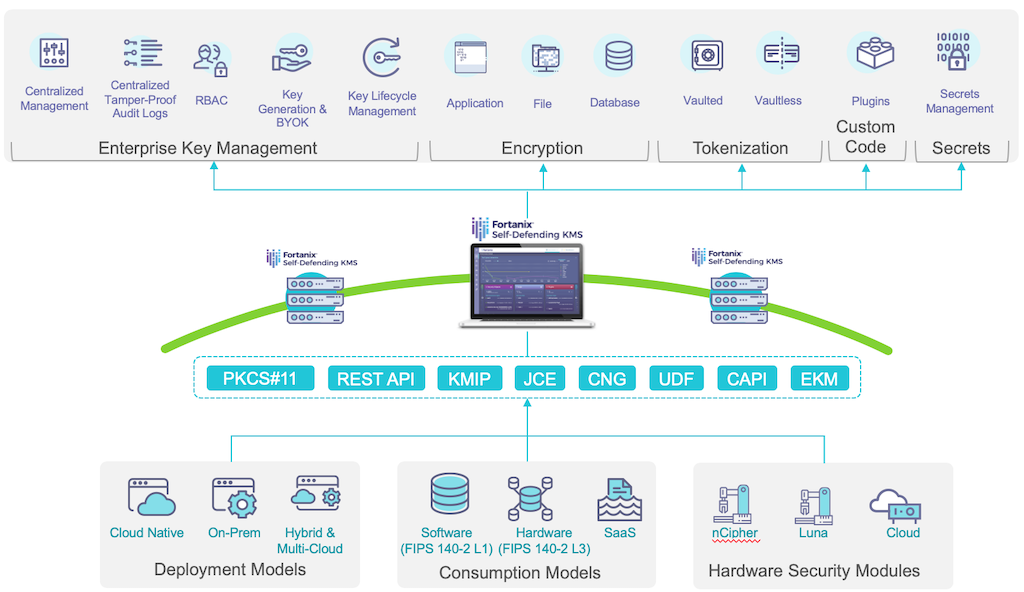
If you have a large number of NGINX servers, it can be a challenge to manage their TLS keys and certificates. One solution is to manage them centrally with a key management system (KMS), one example of which is a hardware security module (HSM).
Enterprises with modern applications deployed in public or hybrid clouds need a KMS that is cloud‑agnostic, highly secure, scalable, and highly available so it can offload crypto operations from web applications deployed on a variety of platforms across the globe. In the interest of maximum security, many organizations want full control and ownership of the KMS and its operations, which rules out many cloud HSMs and SaaS offerings.
The Fortanix Self‑Defending Key Management Service™ (Self‑Defending KMS) meets all of these requirements:
- Cloud‑agnostic – Can be accessed by applications running on all public cloud platforms as well as on premises.
-
Highly secure, scalable, and highly available – Makes use of Intel® Software Guard Extensions (SGX) technology to provide ultrasecure encryption of data at rest and in motion. All crypto operations are accomplished inside the SGX secure enclave for HSM‑grade security.
You can deploy Self‑Defending KMS as an appliance on premises or in public clouds that support Intel SGX. At the time of writing, that includes Microsoft Azure and IBM Cloud.
- Full control – Deploys in your infrastructure or IaaS and provides web‑based UI for centralized management.
In this blog we cover two use cases for Self‑Defending KMS with NGINX Open Source and NGINX Plus:
- Offloading TLS cryptographic operations (both NGINX and NGINX Plus)
- Loading TLS keys and ephemeral TLS keys into the NGINX Plus key‑value store (NGINX Plus only)
For both use cases, you first need to follow the instructions in the next section to create a Self‑Defending KMS application and import its TLS key.
Creating a Self‑Defending KMS Application and Importing the TLS Key
We tested the instructions in this blog with the following software:
- NGINX Plus R20 and NGINX Open Source 1.16.1.
- Ubuntu 16.04 and 18.04.
-
A Fortanix Self‑Defending KMS cluster hosted in Microsoft Azure. As mentioned previously, Azure supports Intel SGX on its DCsv2‑series virtual machines (VMs). As of the time of writing, DCsv2‑series VMs are available for public preview in the US East region only.
If you have purchased Self‑Defending KMS, you can sign in at the Fortanix support portal to access the installation instructions. You can also start a free trial of the SaaS version (scroll down to the Easy to get started section and click TRY SAAS). The GUI in the SaaS version might differ slightly from the following screenshots; adapt these instructions as necessary.
Creating a Self‑Defending KMS Application
The first step is to create an application object in Self‑Defending KMS. The application object stores certificates, keys, and secrets to be used by the NGINX servers.
- Log in to the Fortanix Self‑Defending KMS GUI.
- If you haven’t already created a group to manage the application, follow the instructions in the Fortanix documentation. For this blog, we’ve previously created a group called aserracorp-admins. A group is a collection of security objects (applications, keys, certificates, and so on) that are available to members of the group.
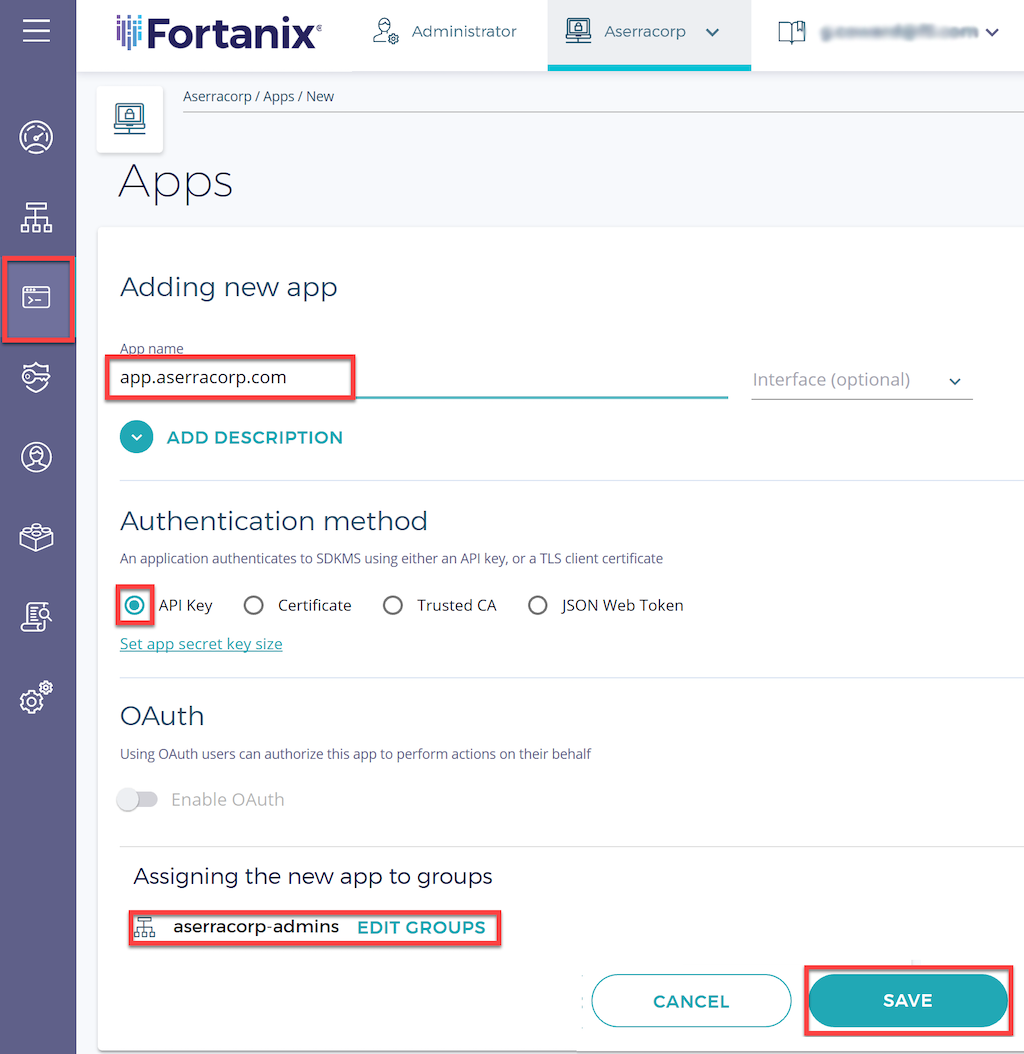
- Click the Apps icon in the left navigation column and then the + icon to create a new application.
- In the Adding new app window that opens, type the application name in the App name field (here it’s app.aserracorp.com).
- Select API Key as the authentication method.
- Select the group to which the app belongs (here it’s the aserracorp-admins group we created in Step 2).
-
Click the SAVE button in the lower right corner.
-
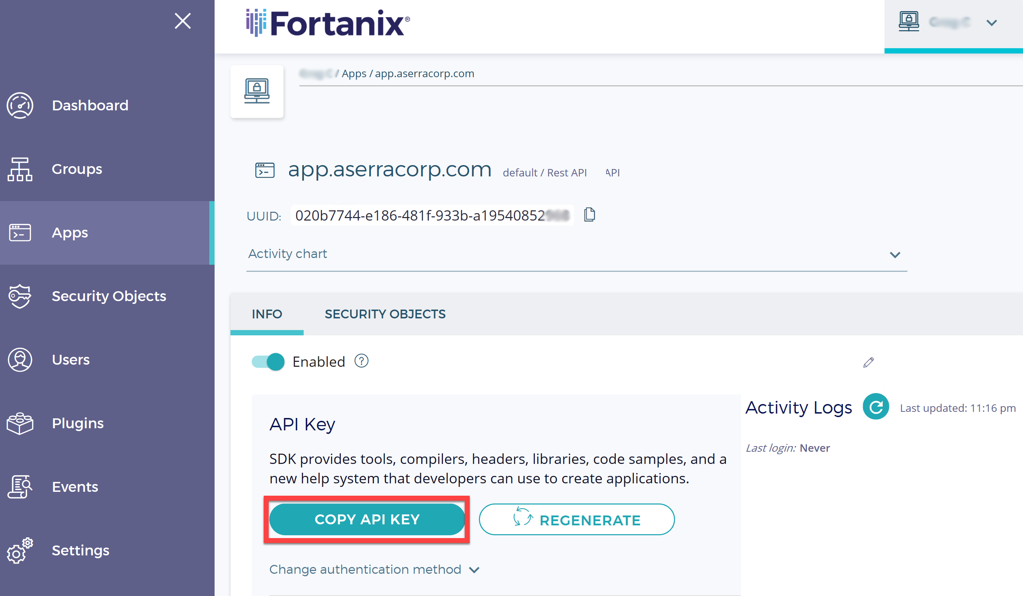
In the details window that opens, click the COPY API KEY button to copy the API key to the clipboard (you might also want to copy it to a temporary file). You’ll use the key in Installing the Fortanix PKCS #11 Plug‑In.
Importing the TLS Key into Self‑Defending KMS
With our Fortanix Self‑Defending KMS ready at https://fortanix.aserracorp.com, let’s put it to use. We start by importing our NGINX private key into Self‑Defending KMS.
- Click the Security Objects icon in the left navigation column and then the + icon to create a new security object.
- In the Adding New Security Object window that opens, type the security object name in the Security Object name field (here it’s app.aserracorp.com-key).
- Select IMPORT.
- Select RSA in the Choose a type for your Security Object section.
- Select Base64 in the Choose value format field.
- Upload your TLS key.
- In the Add it to a group section, select the group you selected in Step 6 of Creating a Self‑Defending KMS Application (here it’s aserracorp-admins).
-
Click the IMPORT button.

Offloading TLS Crypto Operations to Fortanix Self‑Defending KMS

Prerequisites
- Complete the steps in Creating a Self‑Defending KMS Application and Importing the TLS Key.
- Connect to the NGINX server using your preferred
sshclient.
Installing the Fortanix PKCS #11 Plug‑In
After satisfying the prerequisites:
-
On the NGINX instance, run the following commands to download and install the Fortanix plug‑in onto the NGINX server. The commands are appropriate for Debian and Ubuntu systems. For RHEL/CentOS/Oracle Linux, you can download the RPM package for the plug‑in.
### Update installed packages $ sudo apt-get update $ sudo apt-get upgrade ### Download and install the Fortanix PKCS #11 plug-in $ sudo wget https://d2bzqwib4mjc49.cloudfront.net/3.14.1298/fortanix-pkcs11-3.14.1298-amd64.deb $ sudo dpkg -I ./fortanix-pkcs11-3h1298-amd64.deb -
Run this command to install the OpenSSL pkcs#11 engine library.
$ sudo apt-get install libengine-pkcs11-openssl -
Create a backup of the OpenSSL configuration file (openssl.cnf) in preparation for modifying it in the next step.
$ sudo cp /etc/ssl/openssl.cnf /etc/ssl/openssl.cnf.backup -
Replace the contents of openssl.cnf with the following text, which references the Fortanix PKCS#11 engine. For
<API_KEY>, substitute the API key copied in Step 8 of Creating a Self‑Defending KMS Application. Save the file.# PKCS11 engine config openssl_conf=openssl_def [openssl_def] engines=engine_section [req] distinguished_name=req_distinguished_name [req_distinguished_name] # empty [engine_section] pkcs11=pkcs11_section [pkcs11_section] engine_id=pkcs11 dynamic_path=/usr/lib/engines/engine_pkcs11.so MODULE_PATH=/opt/fortanix/pkcs11/fortanix_pkcs11.so PIN=<API_KEY> init=1
Configuring NGINX to Offload Crypto Operations
-
Edit the NGINX service (/lib/systemd/system/nginx.service), adding the indicated
Environmentvariable in the[Service]section to point to the Self‑Defending KMS endpoint (in our example, https://fortanix.aserracorp.com).# [Unit] Description=A high-performance web server and reverse proxy Documentation=man:nginx(8) After=network.target [Service] Environment="FORTANIX_API_ENDPOINT=https://fortanix.aserracorp.com" Type=forking PIDFile=/run/nginx.pid ExecStartPre=/usr/sbin/nginx -t -q -g 'daemon on; master_process on;' ExecStart=/usr/sbin/nginx -g 'daemon on; master_process on;' ExecReload=/usr/sbin/nginx -g 'daemon on; master_process on;' -s reload ExecStop=-/sbin/start-stop-daemon --quiet --stop --retry QUIT/5 --pidfile /run/nginx.pid TimeoutStopSec=5 KillMode=mixed [Install] WantedBy=multi-user.target -
Modify the NGINX configuration. In this example, we’re working with a very basic configuration consisting of the default /etc/nginx/nginx.conf file and a simple web server defined in /etc/nginx/conf.d/default.conf. While the certificate file is stored locally in /etc/nginx/cert.pem, the corresponding key is securely located on Fortanix Self‑Defending KMS, as specified by the
ssl_certificate_keydirective. Theapp.aserracorp.com-keylabel is the key we defined in Step 2 of Importing the TLS Key into Self‑Defending KMS.### /etc/nginx/nginx.conf # SSL settings in the 'http' context ssl_certificate /etc/nginx/cert.pem; ssl_certificate_key engine:pkcs11:label_app.aserracorp.com-key; ssl_protocols TLSv1 TLSv1.1 TLSv1.2; # Dropping SSLv3, ref: POODLE ssl_prefer_server_ciphers on;###/etc/nginx/conf.d/default.conf server { # SSL configuration listen 443 ssl default_server; server_name app.aserracorp.com; root /var/www/html; # Add index.php to this list if using PHP index index.html index.htm index.nginx-debian.html; location / { # First attempt to serve request as file, then # as directory, then fall back to returning 404 try_files $uri $uri/ =404; } } -
Run this command to reload the
systemdmanager configuration and restart the NGINX service.$ sudo systemctl daemon-reload && sudo systemctl restart nginx
Testing Connectivity
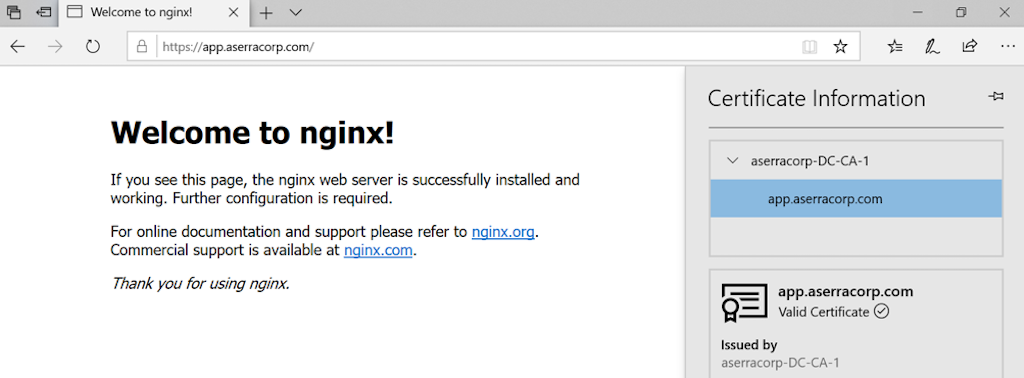
That’s it! With NGINX now configured, in a browser we successfully access our web server at app.aserracorp.com, as confirmed by the default “Welcome to nginx!” web page.
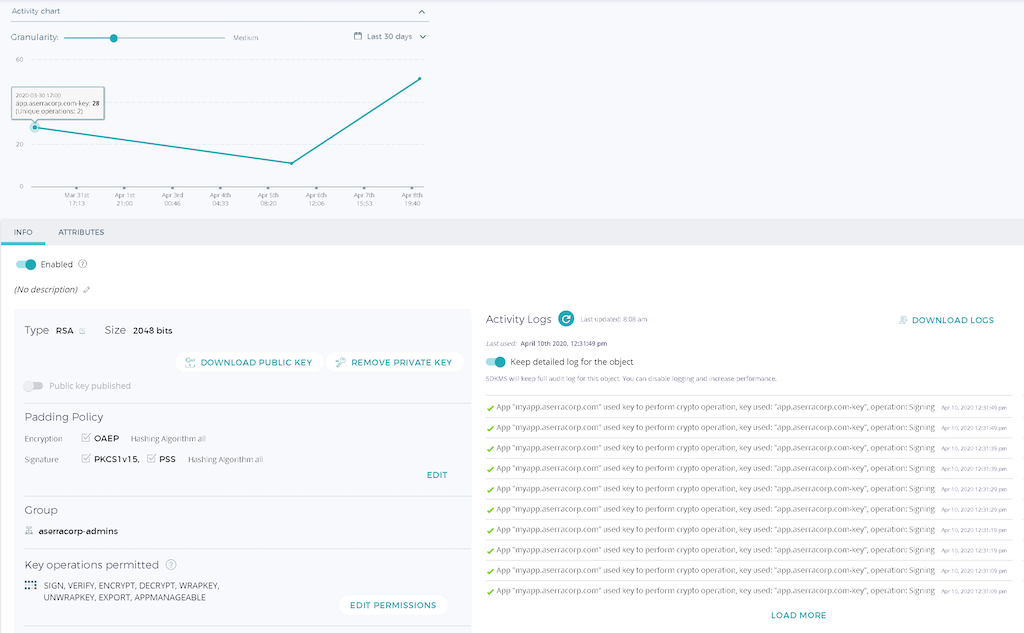
In the Self‑Defending KMS portal, we can view information about the app.aserracorp.com-key key and when it’s been used on the site.
Loading TLS and Ephemeral TLS Keys into the NGINX Plus Key‑Value Store from Fortanix Self‑Defending KMS
NGINX Plus R18 and later supports storage of TLS keys and certificates NGINX Plus’s in‑memory key‑value store, which is populated by fetching the data from a secure external store via a variable in the NGINX Plus configuration file.
In this section, we show how to configure NGINX Plus and Fortanix Self‑Defending KMS for this use case. Your TLS keys and certificates are stored securely in Self‑Defending KMS and fetched on demand using the Fortanix Self‑Defending KMS agent to populate NGINX Plus key‑value store. The big advantage of this setup is that the keys and certificates are managed in the Intel SGX‑secured enclave, so they can’t be stolen by techniques like root kits, BIOS attacks, man-in-the-middle or even memory scraping. Ultrasafe!

Prerequisites
- Complete the steps in Creating a Self‑Defending KMS Application and Importing the TLS Key.
- Connect to the NGINX Plus server using your preferred
sshclient. - Install the Self‑Defending KMS CLI tool using the instructions in the Fortanix documentation.
- Download and install the Self‑Defending KMS NGINX Plus agents from the Fortanix support portal (login required).
Configuring NGINX Plus to Load Keys and Certificates into the Key‑Value Store
After satisfying the prerequisites:
- Edit the main NGINX Plus configuration file, /etc/nginx/nginx.conf. Remove or comment out the
ssl_certificateandssl_certificate_keydirectives. -
Create a new configuration file called /etc/nginx/conf.d/ssl_keyval.conf with the following content.
In this configuration:
- The
keyval_zonedirective sets up a key‑value store named sdkms_ssl_pem for storing TLS keys and certificates. - The
keyvaldirective means NGINX Plus matches the certificate in the key‑value store at connection time, based on the value of the SNIHostheader in the incoming request, as captured in the$ssl_server_namevariable. - The
ssl_certificateandssl_certificate_keydirectives load the PEM data in theserverblock bound to port 443. - In the second server block, the
location/apidirective defines the endpoint for accessing the NGINX Plus API.
log_format sdkms_ssl_keyval '$remote_addr [$time_local] - ' 'ssl_server_name:"$ssl_server_name" ' 'host:"$host"'; keyval_zone zone=sdkms_ssl_pem:1m; keyval $ssl_server_name $certificate_pem zone=sdkms_ssl_pem; server { listen 443 ssl; access_log /var/log/nginx/sdkms-ssl-keystore-access.log sdkms_ssl_keyval; error_log /var/log/nginx/sdkms-ssl-keystore-error.log debug; # Load PEMs from variable. Note the 'data:' prefix. ssl_certificate data:$certificate_pem; ssl_certificate_key data:$certificate_pem; location / { root /usr/share/nginx/html; index index.html; } } server { listen 8443; #access_log /var/log/nginx/status-api-access.log notice; error_log /var/log/nginx/status-api-error.log notice; location /api { api write=on; allow 127.0.0.1; deny all; if $request_method !~ ^(GET|POST|HEAD|OPTIONS|PUT|PATCH|DELETE)$ { return 405; } } } - The
-
Restart the NGINX Plus service.
$ sudo systemctl restart nginx
Populating the NGINX Plus Key‑Value Store with Data from Fortanix Self‑Defending KMS
The NGINX Plus key‑value store is now configured, but it’s still empty and requests to the web server result in status code 500 Internal Server Error. Now you set up Fortanix Self‑Defending KMS to populate the NGINX Plus key‑value store with TLS keys and certificates. There are two ways to do this, depending on your use case:
- Fetching TLS keys and certificates stored in Self‑Defending KMS
- Fetching ephemeral TLS keys and certificates generated by Self‑Defending KMS
Populating the Key‑Value Store with TLS Keys and Certificates Stored in Self‑Defending KMS
In this use case, you store TLS keys and certificates in Self‑Defending KMS, and its agent running on the NGINX Plus server populates the key‑value store.
-
On the NGINX Plus server, run the following command to start the Self‑Defending KMS agent:
$ sdkms_agent.sh <key-value_store_name> <Self-Defending_KMS_URL> <API_key> <SNI_Host_name> <private_key_name> <certificate_name>As an example, if you imported the private key as NGINX_Private_Key and certificate as NGINX_Certificate into the cluster running at app.aserracorp.com, and the SNI
Hostname of your NGINX Plus server is nginx-demo.aserracorp.com, the command is:$ sdkms_agent.sh sdkms_ssl_pem https://app.aserracorp.com M2ZjNzczZTMtM2U...p3 nginx-demo.aserracorp.com NGINX_Private_Key NGINX_Certificate -
Run the following command to verify that the NGINX Plus key‑value store is populated with an entry in which the key is the nginx-demo.aserracorp.com hostname and the value is the text of the private key and certificate:
$ curl http://127.0.0.1:8443/api/6/http/keyvals/sdkms_ssl_pem
{
  "nginx-demo.aserracorp.com":"-----BEGIN RSA PRIVATE KEY-----nMIIEPQIB…CpGeJuCsk=n-----END RSA PRIVATE KEY-----n-----BEGIN CERTIFICATE-----nMIIDHDCCA…RA==n-----END CERTIFICATE-----n"
}
Populating the Key‑Value Store with Ephemeral TLS Keys and Certificates Generated by Self‑Defending KMS
In this use case the Self‑Defending KMS agent requests an ephemeral TLS key and certificate from Self‑Defending KMS and loads it into NGINX Plus key‑value store. The agent invokes an X.509 certificate authority (CA) plug‑in in Fortanix Self‑Defending KMS to issue an ephemeral key and certificate using an existing CA stored in Self‑Defending KMS.
-
Add the following to your Self‑Defending KMS account:
- Your root CA private key and certificate
- The X.509 CA plug‑in from Fortanix
-
On the NGINX Plus server, run the following command to start the Self‑Defending KMS agent:
$ python sdkms_get_ephemeral_tls_cert.py <key-value_store_name> <Self-Defending_KMS_URL> <API_key> <plug-in_ID> <SNI_Host_name> <issuer_key_name> <issuer_certificate_name>As an example, if the CA private key is CA_Private_Key and certificate is CA_Certificate in the cluster running at app.aserracorp.com, and the SNI
Hostname of your NGINX Plus server is nginx-demo.aserracorp.com, the command is:$ python sdkms_get_ephemeral_tls_cert.py sdkms_ssl_pem https://app.aserracorp.com M2ZjNzczZTMtM2U...p3 4b816a17-09e2-4ddd-98c8-593f6d3079d3 nginx-demo.aserracorp.com CA_Private_Key CA_Certificate -
Run the following command to verify that the NGINX Plus key‑value store is populated with an entry in which the key is the nginx-demo.aserracorp.com hostname and the value is the text of the private key and certificate:
$ curl http://127.0.0.1:8443/api/6/http/keyvals/sdkms_ssl_pem
{
  "nginx-demo.aserracorp.com":"-----BEGIN RSA PRIVATE KEY-----nrB4BNhQOPva…KTSPCwx6=n-----END RSA PRIVATE KEY-----n-----BEGIN CERTIFICATE-----ngAwlBagIVAJJ…Nw8u4mA0==n-----END CERTIFICATE-----n"
}
Conclusion
Fortanix Self‑Defending KMS is the only key management and encryption solution that offers hardware‑grade security in the cloud. It’s not only the most secure, enterprise‑ready and multi‑tenant key management solution, it’s also extremely DevOps friendly with support for 100% REST, PKCS11, KMIP, and JCE‑based APIs.
We provide many SDKs to enable your developers to write secure applications from the ground up. They enable you to easily and securely tie the integration flows detailed above into your existing CI/CD pipelines for key and certificate management in your NGINX and NGINX Plus deployments. Fortanix Self‑Defending KMS’s native supports for plug‑ins means you can easily extend these flows further with other cloud‑native integrations to satisfy more of your business workflows.
Additional Resources
Fortanix Self‑Defending Key Management Service
NGINX Plus
Azure Confidential Computing
PKCS#11 Terminology
The post Integrating Fortanix Self-Defending KMS with NGINX and NGINX Plus appeared first on NGINX.
Source: Integrating Fortanix Self-Defending KMS with NGINX and NGINX Plus




Leave a Reply