
TCP/UDP Load Balancing with NGINX: Overview, Tips, and Tricks

td {
padding-right: 10px;
}

This post is adapted from a presentation delivered at nginx.conf 2016 by Konstantin Pavlov of NGINX, Inc. You can view a recording of the complete presentation on YouTube.
| Introduction | |
| 1:00 | TCP Load Balancing |
| 1:53 | UDP Load Balancing |
| 3:31 | TCP/UDP Load Balancer Tuning |
| 6:18 | TCP/UDP Active Health Checks |
| 8:53 | Access Control and Limiting |
| 9:43 | Passing the Client’s IP Address to the Backend |
| 11:46 | TLS Termination |
| 12:32 | TLS Re-Encryption |
| 13:05 | TLS Wrapping |
| 13:20 | Logging |
| 14:40 | Better Logging |
| 16:25 | Variables |
| 19:17 | Extending TCP/UDP Load Balancing with nginScript |
| 20:45 | TCP/UDP Payload Filtering with nginScript |
| 29:26 | TCP/UDP nginScript: Performance |
| 31:48 | Future of the TCP/UDP Load Balancer |
| 33:04 | Related Reading |
| 33:34 | Thank You |
Introduction
Konstantin Pavlov: My name is Konstantin Pavlov. I’m a Systems Engineer at NGINX, Inc. and I work in the Professional Services department. In this session, we will dive into the features of the TCP and UDP load balancer we have in NGINX.
The Stream module was introduced two years ago in NGINX 1.9. Since then, it has become quite a mature and well‑proven solution [and] addition to NGINX’s HTTP load‑balancing stack.
I’ll give an overview of the supported load‑balancing methods, SSL and TLS support, and go over additional features provided by NGINX Plus, such as active health checks.
I’ll show some configurations: some minimal and some not so minimal. I’ll also share a few tricks for using the Stream module and nginScript, such as how to build a simple web application firewall.
1:00 TCP Load Balancing
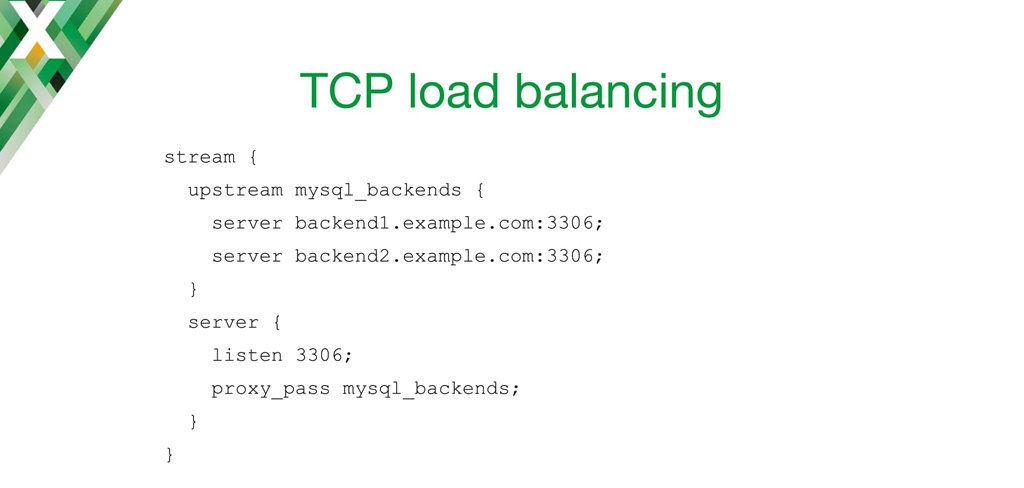
Let’s jump straight into the configuration.
For TCP load balancing, it’s quite simple. As you can see, I’m defining an upstream block. First, I’m defining a stream block in NGINX’s main configuration file, and I’m defining an upstream block [in it] with two MySQL backends on my domain name.
Then in the server block, I’m defining the listen socket to listen on a TCP protocol and proxy it to my defined backend. So, it’s quite easy and simple. As you can see, it’s quite similar to the HTTP configuration we have in NGINX.
I’ll show some more sophisticated configurations in later slides.
1:53 UDP Load Balancing
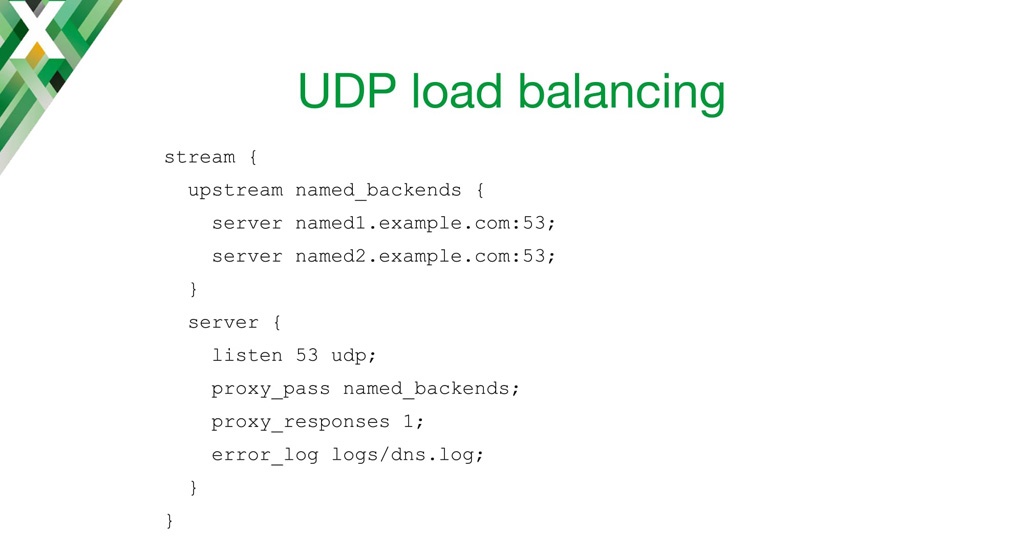
We’ve also added UDP load balancing to NGINX. It serves two primary use cases: high availability, and scaling of UDP services.
When the UDP datagram comes into NGINX, NGINX monitors the health of backend services using passive health checks, or in the case of NGINX Plus, using active health checks. It’ll forward the connections for the datagrams to the servers that are alive.
In this configuration, I’m doing some DNS load balancing. I’ve defined an upstream block of two backends. The listen directive is similar to the TCP configuration, but here I’m using the udp parameter to tell NGINX to listen for UDP on this port.
One of the things to keep in mind is that NGINX UDP load balancing is built in a way that it expects one or more responses from the backend. In case of DNS, we’re expecting one request and one reply.
I’ve also defined an error log [so I can] go through the logs from UDP load balancer.
3:31 TCP/UDP Load Balancer Tuning
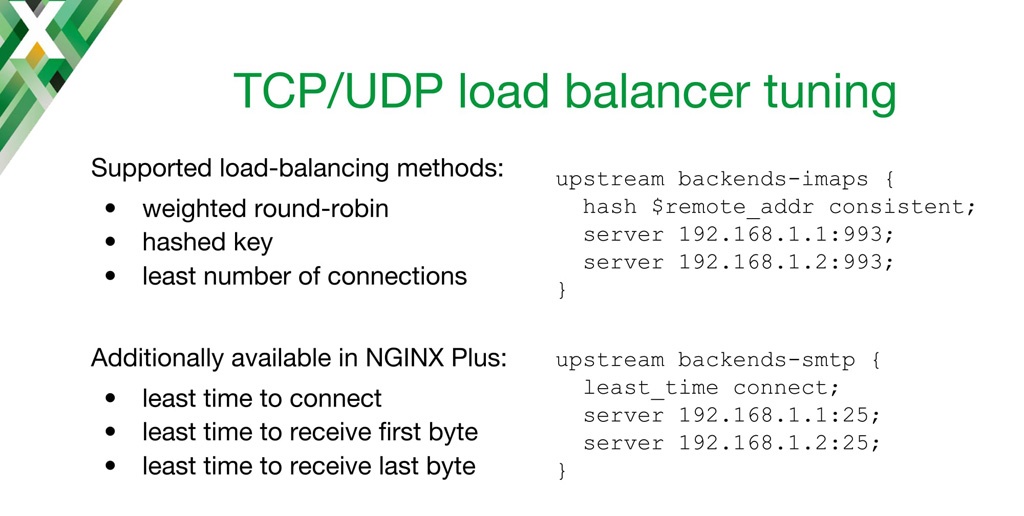
Of course, we can fine‑tune the TCP and UDP load balancer.
In previous slides, I’ve only shown the default [upstream] configuration, which uses the weighted Round Robin load‑balancing algorithm. But there are also other choices. [Load balancing based on a hash of the] remote address, for instance, enables session affinity based on IP address. Or you can use the least number of connections [Least Connections algorithm]. In that case, NGINX forwards the UDP datagram or TCP connection to a server that has the least amount of active connections.
In NGINX Plus, you’re also able to use the Least Time load balancing method. You can choose [the server based on] the fastest time to connect, or to receive the first byte from the backend, or to receive the last byte (meaning the whole response). On the right side of the slide, you can see how to implement that method in the configuration.
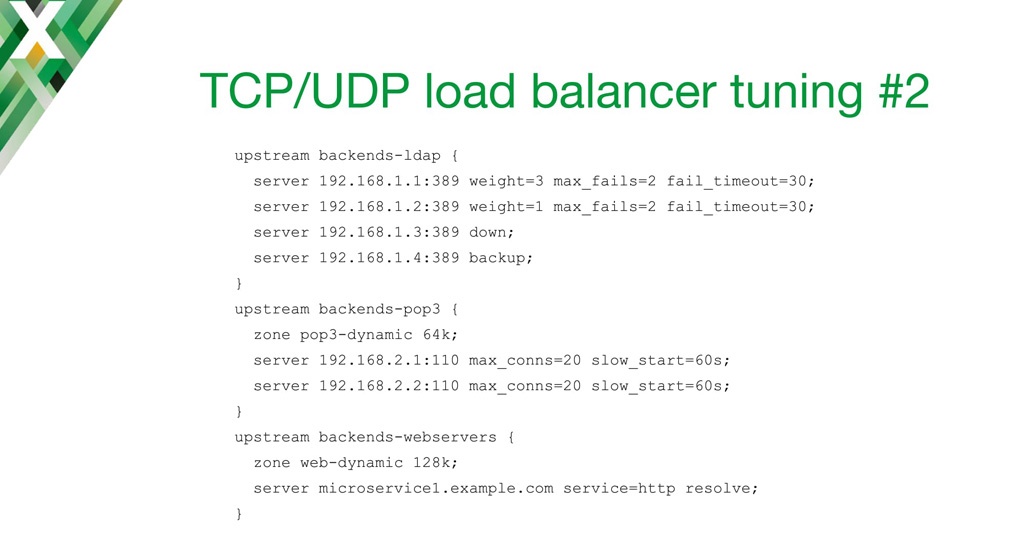
As with the HTTP load balancer, you can define per‑server parameters, such as a weight, the maximum number of failed connections before we consider the server as down, or the time in which those failed connections must occur for the server to be considered down. You can also explicitly mark a server as down, or as a backup server.
In NGINX Plus, you can also set the maximum number of connections to the backend. In this example, NGINX Plus does not create new connections if there are already more than 20. The slow_start parameter instructs NGINX to gradually move the weight of the server from 0 to a nominal value. This can be useful, for instance, if your backend requires some kind of warm‑up, so you won’t flood it with a big number of new requests as soon as it starts up.
You can also use the service parameter to populate the upstream group by querying DNS SRV records. You must also include the resolve parameter in this case. With this configuration, you don’t need to restart NGINX when [a backend server’s] IP address has changed or there are some new entries in DNS for your service.
6:18 TCP/UDP Active Health Checks
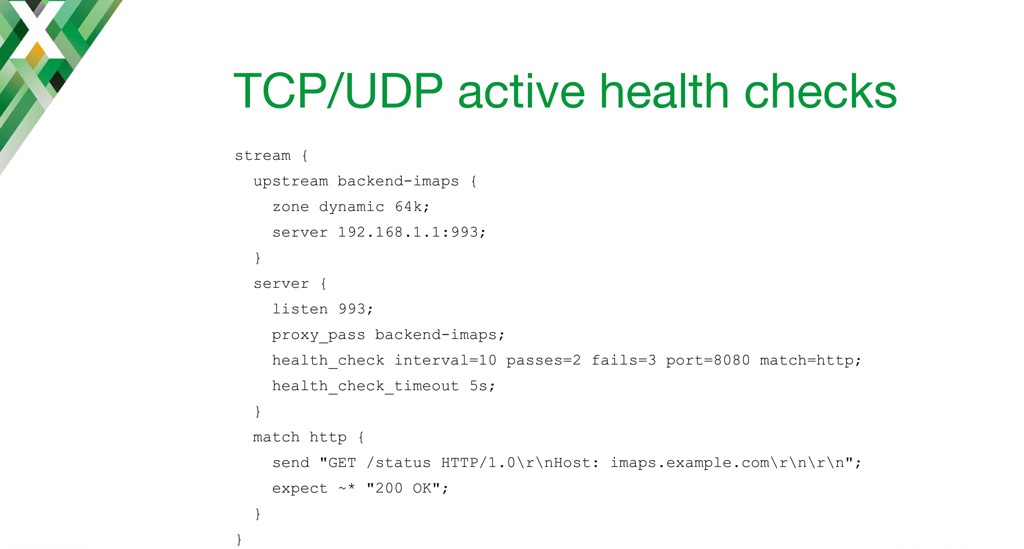
As I mentioned on the previous slide, we’ve enabled passive health checks using the max_fails parameter, but in NGINX Plus, you can also use active, asynchronous health checks.
Imagine we have a load balancer in front of multiple IMAP servers. (On the slide there is only one, but that’s only because more wouldn’t fit.) Imagine we have an IMAP server, but the status of the IMAP server is actually published on the built‑in HTTP server.
With the port parameter to the health_check directive, we instruct NGINX not to connect to the regular IMAP port [when sending the health check], but rather to a different port [here, 8080]. In the match block, I’m defining the request NGINX sends and the specific response it expects. Here I’m just asking for a status code for this host, and it needs to be 200 OK for the health check to pass.
I’m also setting health_check_timeout to a low value, because we don’t want to spend a lot of time waiting for the health check to time out before marking the server as down.
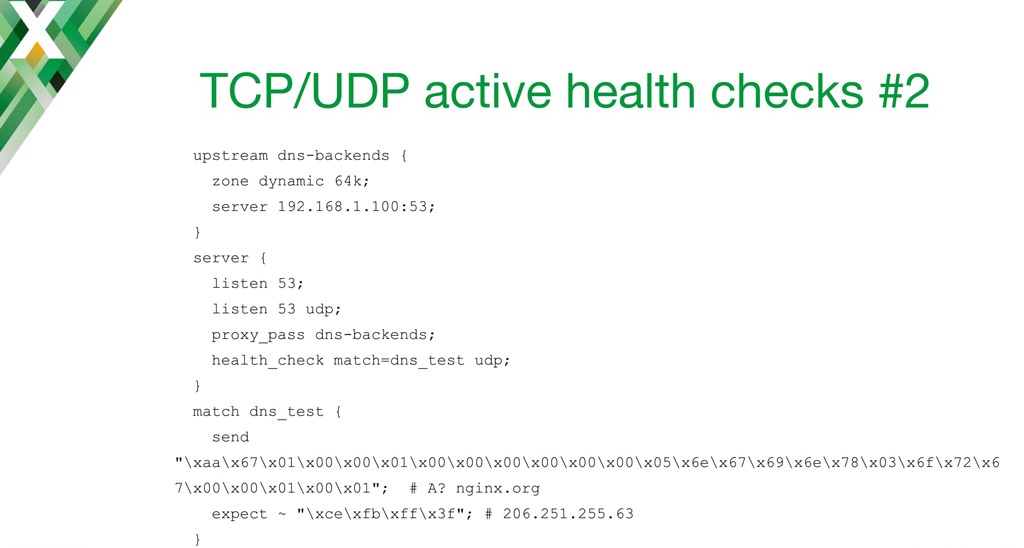
Of course in the TCP and UDP world, you don’t usually get to use clear‑text protocols. For instance, if you’re implementing a health check for DNS, it will be necessary to send hex‑encoded data.
In this particular configuration, I’m sending the server a payload that asks for the DNS A resource record for nginx.org. For the health check to pass, the server needs to reply with the hex‑encoded IP address specified by the expect directive.
8:53 Access Control and Limiting
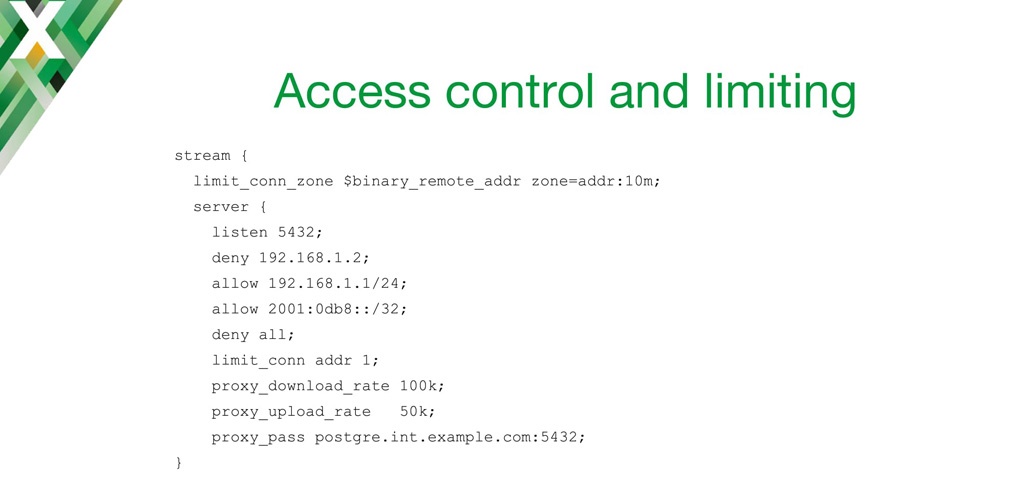
The Stream module is quite similar to the HTTP module in some ways. With the module, you can control who accesses the virtual server and limit use of resources.
The configuration is pretty much the same as in an HTTP server block. You can use the deny and allow directives to allow [clients with] specific IP addresses or [on specific] networks to access your service. You can use limit_conn and limit_conn_zone to limit the number of simultaneous connections to the server. And you can limit the download and upload rate to and from the backend server, if you wish to do that.
9:43 Passing the Client’s IP Address to the Backend
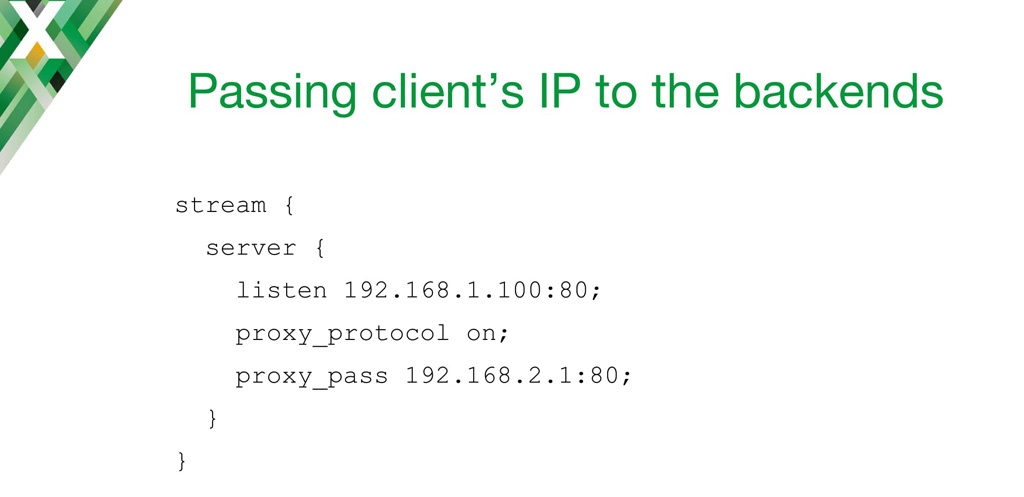
One of the biggest challenges with using a TCP and UDP load balancer is passing the client’s IP address. Your business requirements might call for that, but maybe your proxy doesn’t have the information. Of course, there are ways in HTTP to do that quite easily. You just basically inject the X‑Forwarded‑For header or something like that. But what can we do in a TCP load balancer?
One of the possible solutions would be to use the HTTP‑based PROXY protocol. It can be enabled on the backend side with the proxy_protocol directive – NGINX basically wraps the incoming connection in the PROXY protocol, includes the client’s IP address and the protocol to receive the message on, and passes it to the backend.
Of course, that also means that the backend that your proxy is passing to must speak the PROXY protocol as well. That’s the main downside – you have to make sure your backend speaks the PROXY protocol.
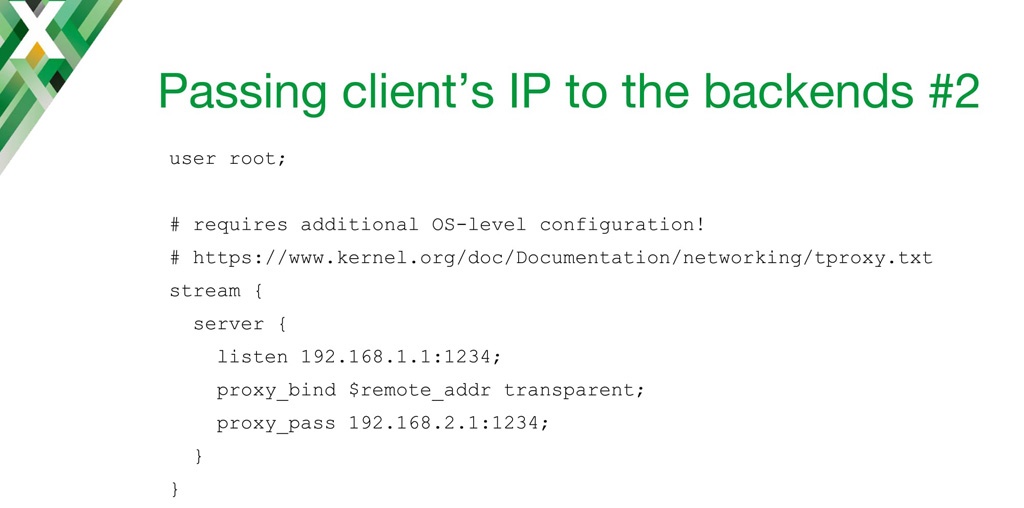
Another way to pass the client IP address is to use the proxy_bind directive and the transparent parameter. This tells NGINX to bind to a socket in the backend using the IP address of the client.
Unfortunately, that requires not only configuration on NGINX side, but also configuring your routing table on Linux and messing with the IP tables. But the worst thing about it is that you have to make sure your worker processors are using a superuser or root identity. From a security point of view, that’s something you most definitely want to avoid.
11:46 TLS Termination
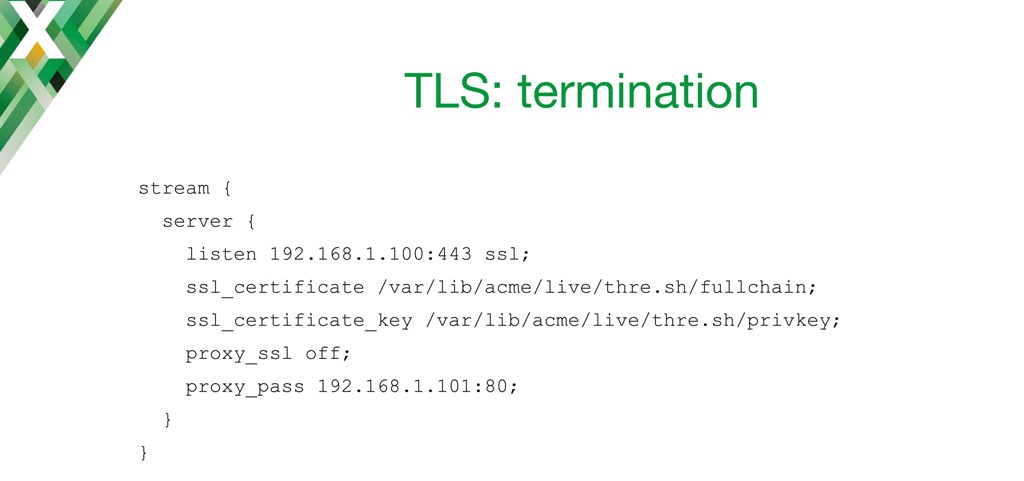
Speaking of security, there are multiple ways NGINX handles TLS encryption with the Stream module.
One of the first modes of operation is TLS termination. You configure it by including the ssl parameter on the listen directive, and you provide the SSL certificate and the key, just as you would with your HTTP load balancer.
With the proxy_ssl directive, you’re telling NGINX to strip TLS off [decrypt] and forward an unencrypted connection to your backend. This can be used, for instance, to add TLS support to a non‑TLS application.
12:32 TLS Re-Encryption
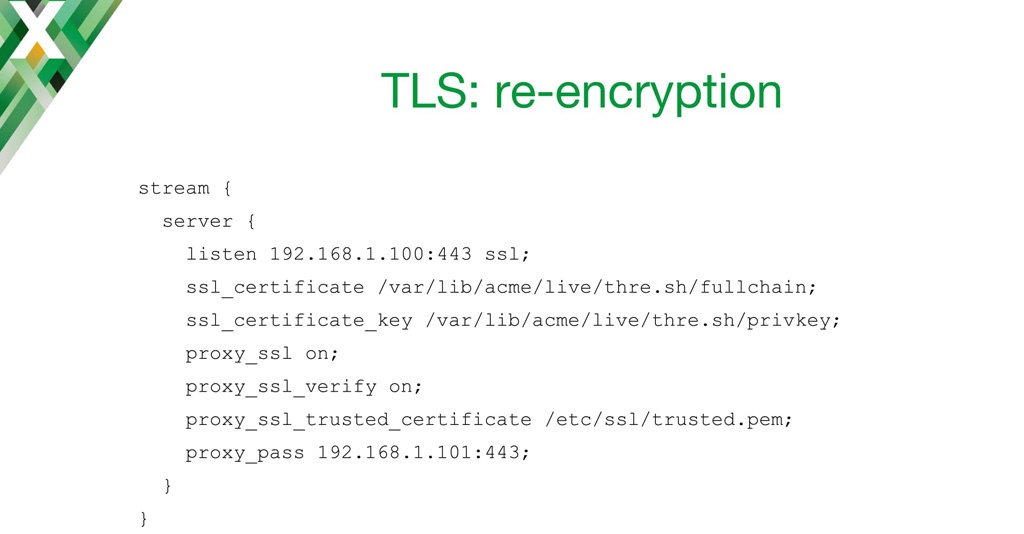
Another mode is to re‑encrypt the connection.
Basically, NGINX listens on a specified socket, decrypts incoming requests, and then re‑encrypts them before sending them to the backend.
Here’s how you do it. You enable TLS encryption to your backend with the proxy_ssl on directive, and then you specify that you need to verify the backend with proxy_ssl_verify on, and provide the certificate location with proxy_ssl_trusted_certificate.
13:05 TLS Wrapping
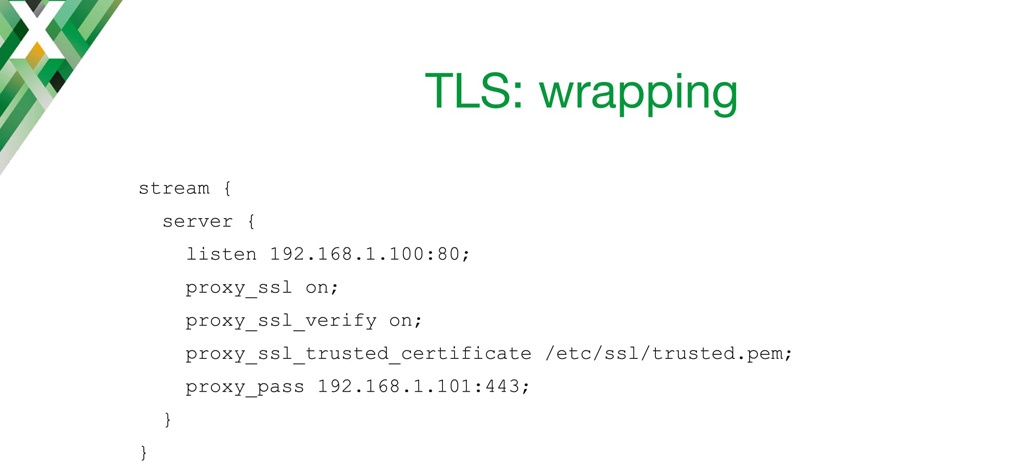
And of course, another way to use TLS in NGINX is where you’re listening on a non‑TLS port for plaintext requests, and you encrypt the connection to your backend.
13:20 Logging
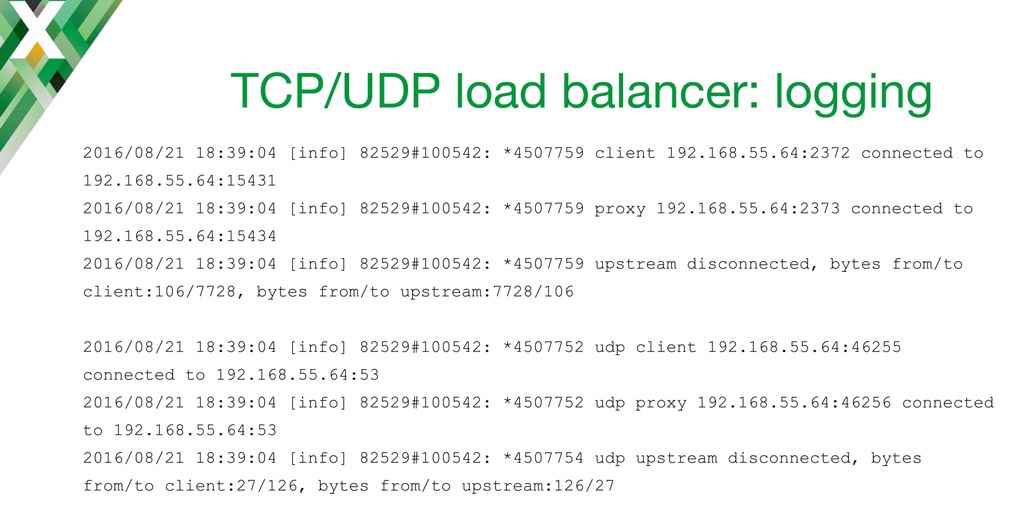
We all know that we need to do some monitoring and analysis of what’s going on with our load balancer.
In the current release [Editor – NGINX 1.11.3 and NGINX Plus Release 10 at the time of this talk], there is preliminary logging available. The logging is available in the form shown above. It’s only an error log. You can see the client IP address and the port, and the IP address and port our server is listening on.
[In each of the two cases] we can see that our server connected to one of the backends, and then the session ended. And we can see we transferred a certain amount of bytes to and from the client, and to and from the upstream. It’s pretty much the same for UDP.
One of the issues we had with this is that you couldn’t configure the log format of the error log in NGINX. We added logging before we had any variable support in NGINX Stream module, and that’s why it’s so concise, and cannot really be extended.
14:40 Better Logging
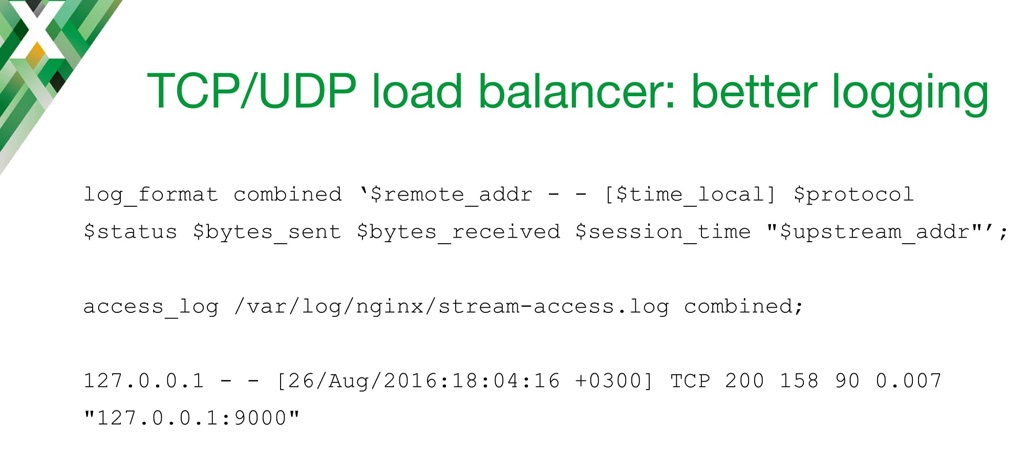
Fortunately, we have recently added the ability to enable the access log for the Stream module. In the current versions of NGINX and NGINX Plus, you’re now able to reconfigure the logs in any way you would like. [Editor – This capability was implemented in the Stream Log module which was released in NGINX 1.11.4 the week after this talk; it was then included in NGINX Plus Release 11, released in late October.] That way you can configure it to work optimally with your monitoring or logging software. This isn’t turned on by default, but you just need to specify the access_log directive in your NGINX stream configuration block.
By default, a log entry looks like the last line on the slide. It’s quite similar to HTTP logging. One of your HTTP log parsers might even be able to parse it. We have the client IP address, local time, and protocol (either TCP or UDP). And we have the status of a connection – we decided to reuse the status codes from HTTP, because everyone used to working with NGINX in HTTP will be familiar with them. [Here 200 indicates a successful TCP response.]
Then we log the number of bytes sent to the client [158] and received from the client [90]. Finally we have the overall time that it took for the session, and an upstream address, which is the IP address and the port of the backend that served the connection.
Of course, you can define whatever log format you would want, and reuse any variables that are available in NGINX.
16:25 Variables
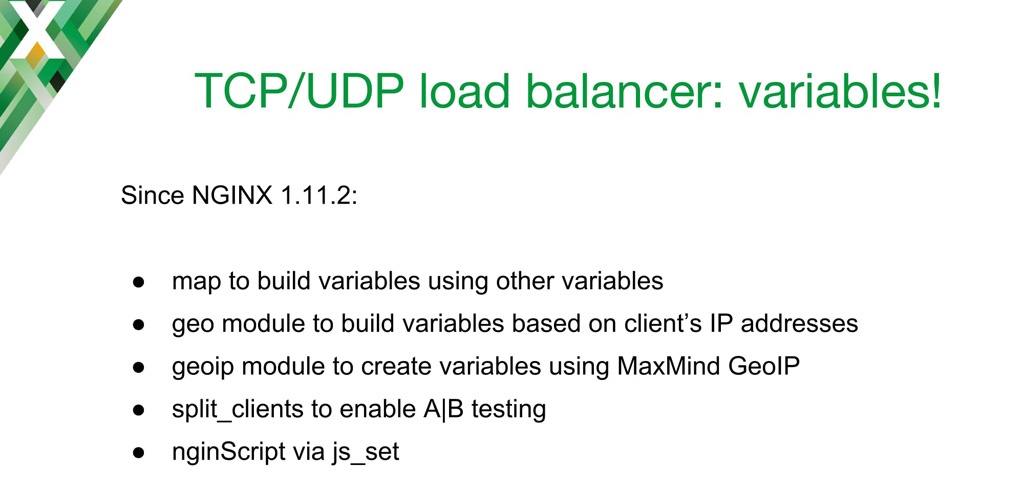
Speaking of variables: recently, it has become possible to create variables in the Stream module. This greatly expands the possibilities of the Stream module because configurations can now be programmed in many ways.
You can use the Map module to build variables based on other variables, which is pretty much the same as with an HTTP block. You can use the Geo module to build variables based on the client’s IP address or networks.
You can populate variables using MaxMind GeoIP geographic data. You can split clients to enable A/B testing; basically you’re defining different backends your request will go to. And of course, you can set variables and use them later with nginScript and the js_set directive, which I’ll show later.
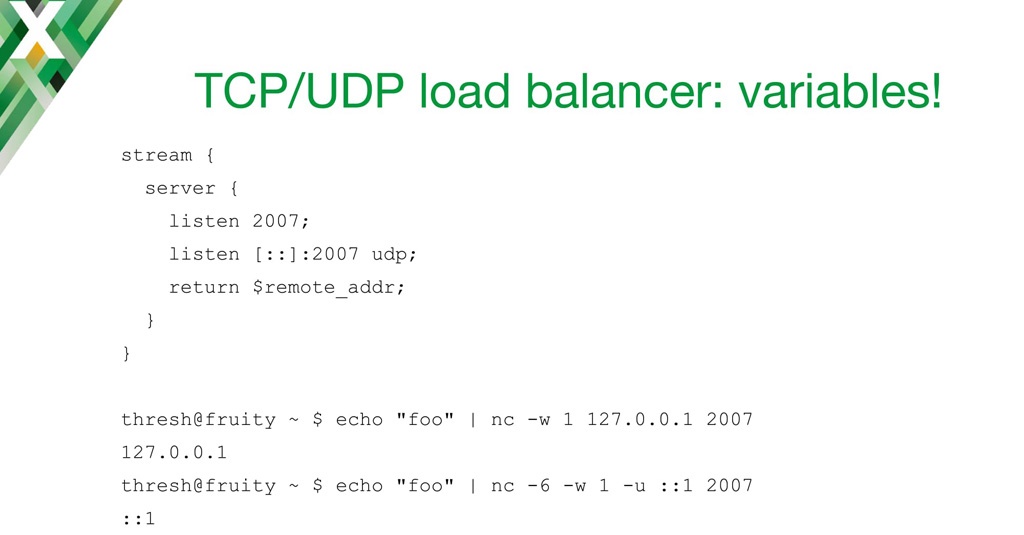
Here’s an example of a simple echo server using variables.
I’m telling NGINX to listen for TCP traffic on localhost port 2007, and for UDP traffic on IPv6 on the same port. I’m instructing NGINX to return the client’s IP address in the $remote_addr variable.
Using netcat on my laptop, I’m connecting to my NGINX server. As you can see, it returns the client’s address.
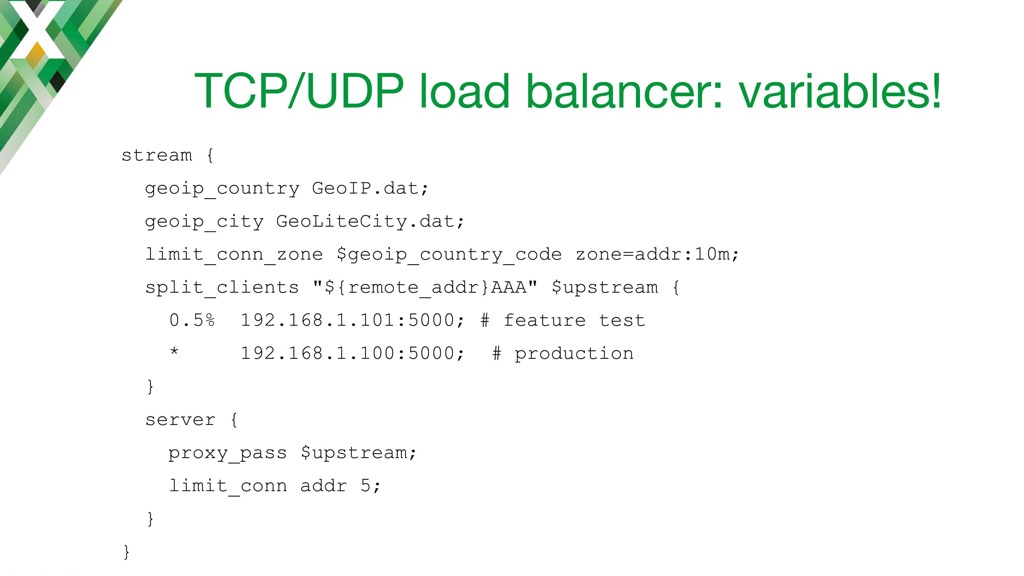
Another way to use variables in the Stream module in the TCP load balancer is GeoIP.
The GeoIP module populates certain variables. You can use them to limit connections or in the proxy_pass line.
What I’m doing here is splitting the clients based on their remote address. So, half a percent of connections will go to the “feature test” backend. That way we can see if our features are working well. The rest will go to the production backend.
Other use cases for variables include, but are not limited to, proxy_bind as I’ve shown before. You can use them in proxy_ssl_name directive. It instructs NGINX to put the server name into TLS SNI connections to our backends. And of course, the access log, as I’ve shown on previous slides.
19:17 Extending TCP/UDP Load Balancing with nginScript
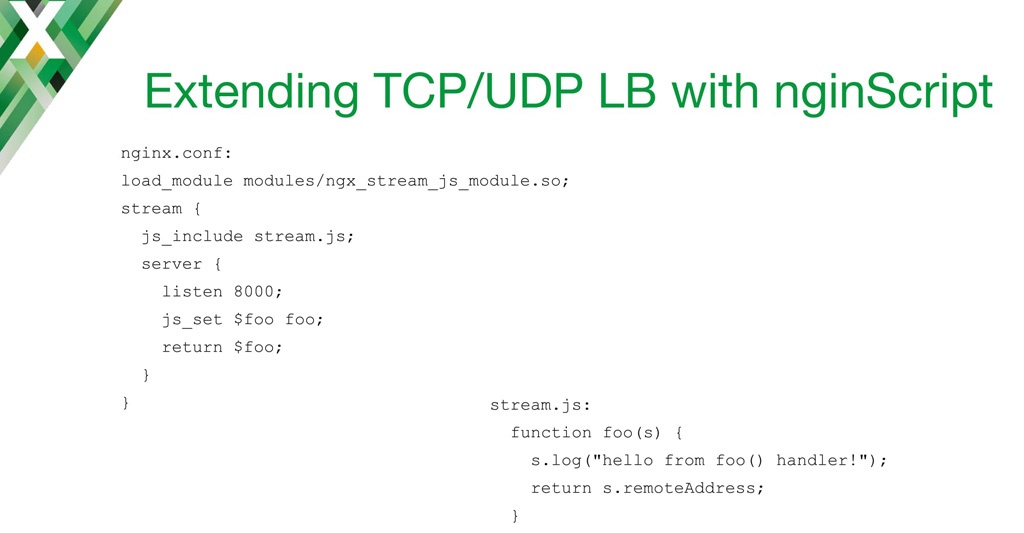
Using nginScript, this configuration snippet does pretty much the same as the other slide. We’re showing the remote address of our client in the response.
In this nginx.conf, I load the dynamic stream nginScript module. In the stream block, I use the special js_include directive. It instructs NGINX to access stream.js, which contains all the JavaScript code we will be using.
In the server block, I’m using the js_set directive to set the value of the $foo variable, which is the return value of the JavaScript function.
Finally I’m returning that value in the TCP connection to my client.
In stream.js, I define a function called foo(). The s is the session object which is passed through that function by default. I’m doing some logging just to see if there’s anything going on, and I’m returning the remote address, which is available as a built‑in variable [s.remoteAddress] within the stream object.
20:45 TCP/UDP Payload Filtering with nginScript
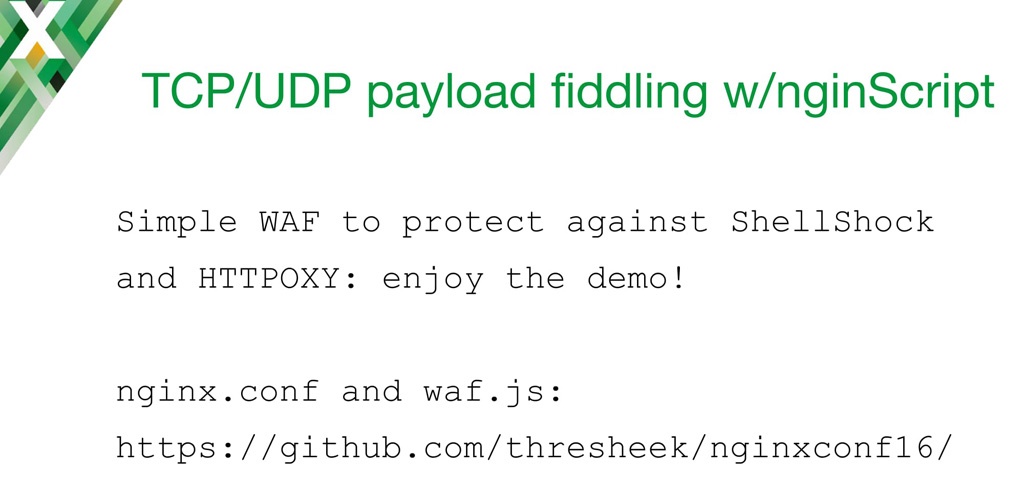
What I’ve shown on the previous slide was pretty simple. Another thing that is coming soon to NGINX is filtering the payloads. You will be able to actually look into the data that goes through load balancing to make some decisions, and change that traffic accordingly. You’ll be able to modify the payload.
I’m going to show a little demo of how I would implement a simple web application firewall using nginScript. You can find the configuration and the JavaScript here.
Now let’s look at the demo.
Editor – The video below skips to the beginning of the demo at 21:50.
29:26 TCP/UDP nginScript: Performance
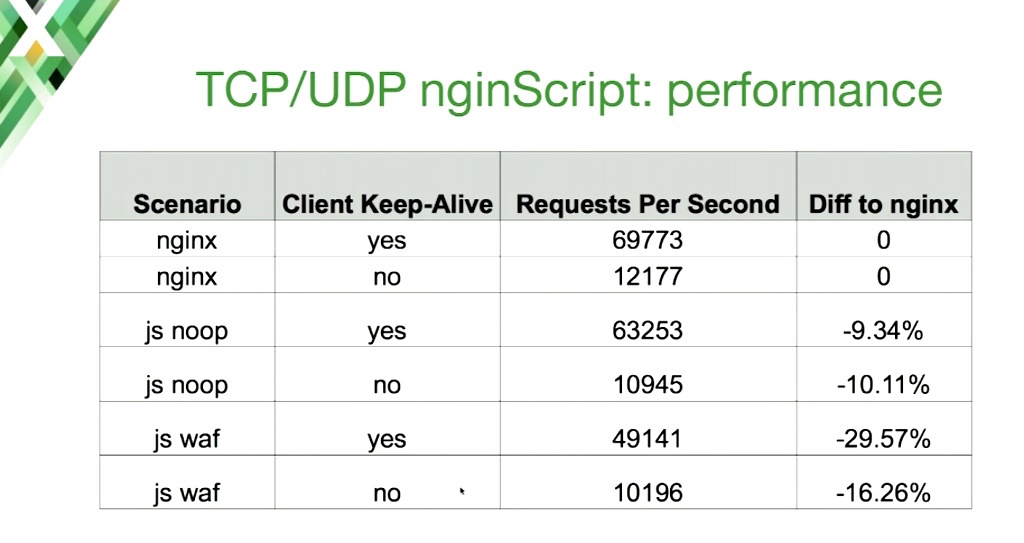
If you’re doing some processing in JavaScript, there will be some performance hits.
Here I’ve used one worker in NGINX, and I’ve measured [the performance hit] on requests per second in a typical scenario where the HTTP backend is covered by a load balancer. The first two lines are the baseline scenarios.
As you can see, just enabling JavaScript resulted in around a 10% drop in performance. The noop means that I’m passing the function handler to a JavaScript machine, but it’s not really doing anything. It just returns from the function. I’m invoking the JavaScript code, but not doing anything. That already results in about a 10% performance drop.
Things get worse when I use regular expressions. That results in a 30% performance hit. I think that’s somewhat expected, because although web application firewalls do in‑place filtering, they are slow. They are really slow.
These numbers are from a 2010 Xeon server, so they would probably be quite different for you, but the overall percentage should be similar.
31:48 Future of the TCP/UDP Load Balancer
What should you expect from the NGINX Stream module and UDP/TCP load balancing in the future?
At the moment, we’re actually exploring the possibilities. If you have any ideas and features that you would like to see, you’re more than welcome to discuss that.
What we’ll be committing soon: we’ll parse the TLS SNI coming from the client, and we’ll provide some variables from that which you can use, for instance, in proxy_pass, so you can check what’s in the TLS connection. In SNI, you receive the server name of your requested server, and you can forward it to a specific backend if you would like.
The next thing to be committed is PROXY protocol support on the listening side. We will populate variables like the remote address from the PROXY protocol as well. Those are the additions coming in the near future.
If you have a specific use case which is not covered by the current or upcoming stream load balancer functionality, please contact us and let us know about it.
33:04 Related Reading
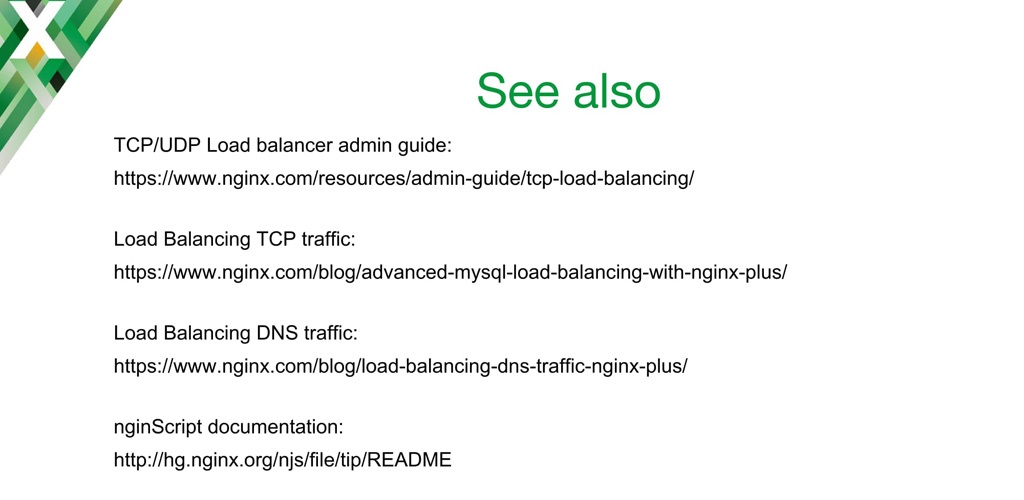
We have several resources on our website for TCP and UDP load balancing: our Admin Guide, we have couple of blog posts, and more are coming.
As for nginScript documentation, please go ahead and check the source code and the README file. [Editor – The README file has been superseded by standard reference documentation and a series of blog posts.]
33:34 Thank You

You can find all the configuration snippets as well as these slides on Github.
The post TCP/UDP Load Balancing with NGINX: Overview, Tips, and Tricks appeared first on NGINX.
Source: TCP/UDP Load Balancing with NGINX: Overview, Tips, and Tricks


Leave a Reply