Deploying NGINX and NGINX Plus as an API Gateway, Part 1
table.nginx-blog {
width: 100%;
}
table.nginx-blog th {
align: left;
padding-left: 5px;
padding-right: 5px;
padding-bottom: 2px;
padding-top: 2px;
line-height: 120%;
}
table.nginx-blog td {
padding-left: 5px;
padding-right: 5px;
padding-bottom: 2px;
padding-top: 5px;
line-height: 120%;
}
At the heart of modern application architectures is the HTTP API. HTTP enables applications to be built rapidly and maintained easily. The HTTP API provides a common interface, regardless of the scale of the application, from a single‑purpose microservice to an all‑encompassing monolith. By using HTTP, the advancements in web application delivery that support hyperscale Internet properties can also be used to provide reliable and high‑performance API delivery.
For an excellent introduction to the importance of API gateways for microservices applications, see Building Microservices: Using an API Gateway on our blog.
As the leading high‑performance, lightweight reverse proxy and load balancer, NGINX has the advanced HTTP processing capabilities needed for handling API traffic. This makes NGINX the ideal platform with which to build an API gateway. In this blog post we describe a number of common API gateway use cases and show how to configure NGINX to handle them in a way that is efficient, scalable, and easy to maintain. We describe a complete configuration, which can form the basis of a production deployment.
Note: Except as noted, all information in this post applies to both NGINX Plus and NGINX Open Source.
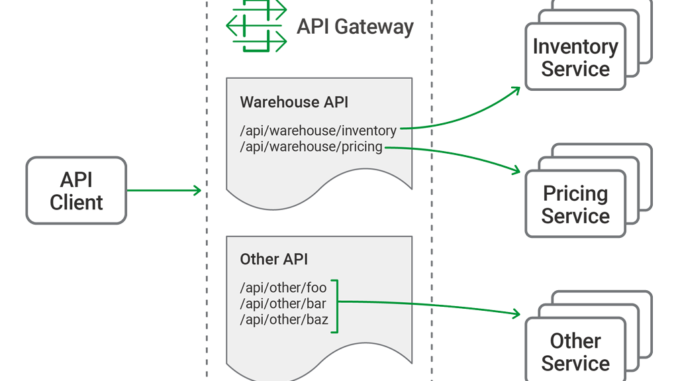
Introducing the Warehouse API
The primary function of the API gateway is to provide a single, consistent entry point for multiple APIs, regardless of how they are implemented or deployed at the backend. Not all APIs are microservices applications. Our API gateway needs to manage existing APIs, monoliths, and applications undergoing a partial transition to microservices.
In this blog post we refer to a hypothetical API for inventory management, the “Warehouse API”. We use sample configuration code to illustrate different use cases. The Warehouse API is a RESTful API that consumes JSON requests and produces JSON responses. The use of JSON is not, however, a limitation or requirement of NGINX when deployed as an API gateway; NGINX is agnostic to the architectural style and data formats used by the APIs themselves.
The Warehouse API is implemented as a collection of discrete microservices and published as a single API. The inventory and pricing resources are implemented as separate services and deployed to different backends. So the API’s path structure is:
api
└── warehouse
    ├── inventory
    └── pricing
As an example, to query the current warehouse inventory, a client application makes an HTTP GET request to /api/warehouse/inventory.

Organizing the NGINX Configuration
One advantage of using NGINX as an API gateway is that it can perform that role while simultaneously acting as a reverse proxy, load balancer, and web server for existing HTTP traffic. If NGINX is already part of your application delivery stack then it is generally unnecessary to deploy a separate API gateway. However, some of the default behavior expected of an API gateway differs from that expected for browser‑based traffic. For that reason we separate the API gateway configuration from any existing (or future) configuration for browser‑based traffic.
To achieve this separation, we create a configuration layout that supports a multi‑purpose NGINX instance, and provides a convenient structure for automating configuration deployment through CI/CD pipelines. The resulting directory structure under /etc/nginx looks like this.
etc/
└── nginx/
    ├── api_conf.d/ ………………………………… Subdirectory for per-API configuration
    │   └── warehouse_api.conf …… Definition and policy of the Warehouse API
    ├── api_backends.conf ………………… The backend services (upstreams)
    ├── api_gateway.conf …………………… Top-level configuration for the API gateway server
    ├── api_json_errors.conf ………… HTTP error responses in JSON format
    ├── conf.d/
    │   ├── ...
    │   └── existing_apps.conf
    └── nginx.conf
The directories and filenames for all API gateway configuration are prefixed with api_. Each of these files and directories enable different features and capabilities of the API gateway and are explained in detail below.
Defining the Top-Level API Gateway
All NGINX configuration starts with the main configuration file, nginx.conf. To read in the API gateway configuration, we add an include directive in the http block in nginx.conf that references the file containing the gateway configuration, api_gateway.conf (line 28 just below). Note that the default nginx.conf file uses an include directive to pull in browser‑based HTTP configuration from the conf.d subdirectory (line 29). This blog post makes extensive use of the include directive to aid readability and to enable automation of some parts of the configuration.
The api_gateway.conf file defines the virtual server that exposes NGINX as an API gateway to clients. This configuration exposes all of the APIs published by the API gateway at a single entry point, https://api.example.com/ (line 13), protected by TLS as configured on lines 16 through 21. Notice that this configuration is purely HTTPS – there is no plaintext HTTP listener. We expect API clients to know the correct entry point and to make HTTPS connections by default.
This configuration is intended to be static – the details of individual APIs and their backend services are specified in the files referenced by the include directive on line 24. Lines 27 through 30 deal with logging defaults and error handling, and are discussed in Responding to Errors below.
Single-Service vs. Microservice API Backends
Some APIs may be implemented at a single backend, although we normally expect there to be more than one, for resilience or load balancing reasons. With microservices APIs, we define individual backends for each service; together they function as the complete API. Here, our Warehouse API is deployed as two separate services, each with multiple backends.
All of the backend API services, for all of the APIs published by the API gateway, are defined in api_backends.conf. Here we use multiple IP address‑port pairs in each upstream block to indicate where the API code is deployed, but hostnames can also be used. NGINX Plus subscribers can also take advantage of dynamic DNS load balancing to have new backends added to the runtime configuration automatically.
Defining the Warehouse API
This part of the configuration first defines the valid URIs for the Warehouse API and then defines a common policy for handling requests to the Warehouse API.
The Warehouse API is defined with a number of location blocks. NGINX has a highly efficient and flexible system for matching the request URI to a section of the configuration. In general, a request is matched by the most specific path prefix and the order of the location directives is not important. Here, on lines 3 and 8 we define two path prefixes. In each case the $upstream variable is set to the name of the upstream block that represents the backend API service or services for the inventory and pricing services respectively.
The goal of this configuration is to separate API definition from the policy governing how the API is delivered. To achieve this, we minimize the configuration that appears in the API definition section. After determining the appropriate upstream group for each location, we stop processing and use a rewrite directive to find the policy for the API (line 10).

rewrite directive to move processing to the API policy sectionThe result of the rewrite directive is that NGINX searches for a location block that matches URIs starting with /_warehouse. The location block on line 15 uses the = modifier to perform an exact match, which speeds up processing.
At this stage our policy section is very simple. The location block itself is marked as internal on line 16, meaning that clients cannot make requests to it directly. The $api_name variable is redefined to match the name of the API so that it appears correctly in log files. Finally, the request is proxied to the upstream group specified in the API definition section, using the $request_uri variable – which contains the original request URI, unmodified.
Choosing Broad vs. Precise Definition for APIs
There are two approaches to API definition – broad and precise. The most suitable approach for each API depends on the API’s security requirements and whether it is desirable for the backend services to handle invalid URIs.
In warehouse_api_simple.conf, we use the broad approach for the Warehouse API by defining URI prefixes on lines 3 and 8. This means that any URI that begins with either prefix is proxied to the appropriate backend service. With prefix‑based location matching, API requests to the following URIs are all valid:
/api/warehouse/inventory
/api/warehouse/inventory/
/api/warehouse/inventory/foo
/api/warehouse/inventoryfoo
/api/warehouse/inventoryfoo/bar/
If the only consideration is proxying each request to the correct backend service, the broad approach provides the fastest processing and most compact configuration. On the other hand, the precise approach enables the API gateway to understand the API’s full URI space by explicitly defining the URI path for each available API resource. Taking the precise approach, the following configuration for the Warehouse API uses a combination of exact matching (=) and regular expressions (~) to define each and every URI.
This configuration is more verbose, but more accurately describes the resources implemented by the backend services. This has the advantage of protecting the backend services from malformed client requests, at the cost of some small additional overhead for regular expression matching. With this configuration in place, NGINX accepts some URIs and rejects others as invalid:
| Valid URIs | Invalid URIs | |
|---|---|---|
| /api/warehouse/inventory | /api/warehouse/inventory/ | |
| /api/warehouse/inventory/shelf/foo | /api/warehouse/inventoryfoo | |
| /api/warehouse/inventory/shelf/foo/box/bar | /api/warehouse/inventory/shelf | |
| /api/warehouse/inventory/shelf/-/box/- | /api/warehouse/inventory/shelf/foo/bar | |
| /api/warehouse/pricing/baz | /api/warehouse/pricing | |
| /api/warehouse/pricing/baz/pub |
Using a precise API definition enables existing API documentation formats to drive the configuration of the API gateway. It is possible to automate the NGINX API definitions from the OpenAPI Specification (formerly Swagger). A sample script for this purpose is provided among the Gists for this blog post.
Rewriting Client Requests
As APIs evolve, breaking changes sometimes occur that require clients to be updated. One such example is when an API resource is renamed or moved. Unlike a web browser, an API gateway cannot send its clients a redirect (code 301) naming the new location. Fortunately, when it’s impractical to modify API clients, we can rewrite client requests on the fly.
In the following example, we can see on line 3 that the pricing service was previously implemented as part of the inventory service: the rewrite directive converts requests made to the old pricing resource to the new pricing service.
Rewriting the URI on the fly means that we can no longer use the $request_uri variable when we ultimately proxy the request at line 26 (as we did on line 21 of warehouse_api_simple.conf). This means we need to use slightly different rewrite directives on lines 9 and 14 of the API definition section in order to preserve the URI as processing switches to the policy section.

rewrite directive to move processing to the API policy section while preserving the URIResponding to Errors
One of the key differences between HTTP APIs and browser‑based traffic is how errors are communicated to the client. When NGINX is deployed as an API gateway, we configure it to return errors in a way that best suits the API clients.
The top‑level API gateway configuration includes a section that defines how to handle error responses.
The error_page directive on line 27 specifies that when a request does not match any of the API definitions, NGINX returns the 400 (Bad Request) error instead of the default 404 (Not Found) error. This (optional) behavior requires that API clients make requests only to the valid URIs included in the API documentation, and prevents unauthorized clients from discovering the URI structure of the APIs published through the API gateway.
Line 28 refers to errors generated by the backend services themselves. Unhandled exceptions may contain stack traces or other sensitive data that we don’t want to be sent to the client. This configuration adds a further level of protection by sending a standardized error to the client.
The complete list of error responses is defined in a separate configuration file referenced by the include directive on line 29, the first few lines of which are shown below. This file can be modified if a different error format is preferred, and by changing the default_type value on line 30 to match. You can also have a separate include directive in each API’s policy section to define a different set of error responses which override the default.
With this configuration in place, a client request for an invalid URI receives the following response.
$ curl -i https://api.example.com/foo
HTTP/1.1 400 Bad Request
Server: nginx/1.13.10
Content-Type: application/json
Content-Length: 39
Connection: keep-alive

{"status":400,"message":"Bad request"}
Implementing Authentication
It is unusual to publish APIs without some form of authentication to protect them. NGINX and NGINX Plus offer several approaches for protecting APIs and authenticating API clients. See the documentation for information about IP address‑based access control lists (ACLs), digital certificate authentication, and HTTP Basic authentication. Here, we focus on API‑specific authentication methods.
API Key Authentication
API keys are a shared secret known by the client and the API gateway. They are essentially a long and complex password issued to the API client as a long‑term credential. Creating API keys is simple – just encode a random number as in this example.
$ $ openssl rand -base64 18
7B5zIqmRGXmrJTFmKa99vcit
On line 6 of the top‑level API gateway configuration file, api_gateway.conf, we include a file called api_keys.conf, which contains an API key for each API client, identified by the clients name or other description.
The API keys are defined within a map block. The map directive takes two parameters. The first defines where to find the API key, in this case in the apikey HTTP header of the client request as captured in the $http_apikey variable. The second parameter creates a new variable ($api_client_name) and sets it to the value of the second parameter on the line where the first parameter matches the key.
For example, when a client presents the API key 7B5zIqmRGXmrJTFmKa99vcit, the $api_client_name variable is set to client_one. This variable can be used to check for authenticated clients and included in log entries for more detailed auditing.
The format of the map block is simple and easy to integrate into automation workflows that generate the api_keys.conf file from an existing credential store. API key authentication is enforced by the policy section for each API.
Clients are expected to present their API key in the apikey HTTP header. If this header is missing or empty (line 20), we send a 401 response to tell the client that authentication is required. Line 23 handles the case where the API key does not match any of the keys in the map block – in which case the default parameter on line 2 of api_keys.conf sets $api_client_name to an empty string – and we send a 403 response to tell the client that authentication failed.
With this configuration in place, the Warehouse API now implements API key authentication.
$ curl https://api.example.com/api/warehouse/pricing/item001
{"status":401,"message":"Unauthorized"}
$ curl -H "apikey: thisIsInvalid" https://api.example.com/api/warehouse/pricing/item001
{"status":403,"message":"Forbidden"}
$ curl -H "apikey: 7B5zIqmRGXmrJTFmKa99vcit" https://api.example.com/api/warehouse/pricing/item001
{"sku":"item001","price":179.99}
JWT Authentication
JSON Web Tokens (JWTs) are increasingly used for API authentication. NGINX Plus natively supports JWT validation, as described in Authenticating API Clients with JWT and NGINX Plus on our blog.
Summary
This first blog in a series details a complete solution for deploying NGINX as an API gateway. The complete set of files discussed in this blog can be reviewed and downloaded from our GitHub Gist repo. The next blog in the series will explore more advanced use cases for protecting backend services from malicious or badly behaved clients.
To try NGINX Plus as an API gateway, start your free 30-day trial today or contact us to discuss your use case.
The post Deploying NGINX and NGINX Plus as an API Gateway, Part 1 appeared first on NGINX.
Source: Deploying NGINX and NGINX Plus as an API Gateway, Part 1


Leave a Reply