Installing NGINX and NGINX Plus with Puppet

In previous blog posts we have shown how to use Ansible and Chef to install the open source NGINX software and NGINX Plus. In this post we’ll cover how to use Puppet.
Puppet maintains an extensive collection of modules, both community-contributed and in-house, that make it easy to get started. The default NGINX module, written by James Fryman, is very powerful and has built‑in support for generating NGINX configuration files from simple Puppet manifest files. In this post we show how to use that module to install the open source NGINX software, as well as how to make the necessary modifications for installing and configuring NGINX Plus.
This post assumes that you have a basic understanding of Puppet and its configuration files. If you need to review, please check out the tutorials and documentation at the Puppet website. It is also assumed that you have a basic understanding of NGINX Plus. For more information on NGINX Plus, please check out the NGINX Plus Admin Guide.
Preparing the Puppet Environment
To keep things simple for our demo Puppet environment, we are going to do our work using puppet apply, a built‑in Puppet utility that allows you to apply Puppet manifests and modules to a local node without having to set up a full Puppet server. There are functional limitations with puppet apply compared to a full Puppet server, but nothing we are doing here requires a full server installation.
Here is a quick rundown on how to install the packages you need to run puppet apply, along with the default NGINX module:
-
Download and install the package to enable the Puppet repo:
$ wget https://apt.puppetlabs.com/puppetlabs-release-pc1-trusty.deb

$ sudo dpkg -i puppetlabs-release-pc1-trusty.deb -
Run these two
apt‑getcommands:$ sudo apt-get update
$ sudo apt-get install puppet -
Install the jfryman/nginx module:
$ sudo puppet module install jfryman-nginx

Notice: Preparing to install into /etc/puppet/modules ...

Notice: Downloading from https://forge.puppetlabs.com ...

Notice: Installing -- do not interrupt ...

/etc/puppet/modules

└─┬ jfryman-nginx (v0.3.0)

  ├── puppetlabs-apt (v2.2.2)

  ├── puppetlabs-concat (v2.2.0)

  └── puppetlabs-stdlib (v4.12.0)
You can see that when you install the nginx module, a few prerequisite modules are installed as well. Now you are ready to get started with Puppet.
Installing Open Source NGINX with Puppet
With the default Puppet module for open source NGINX, you can easily install and manage NGINX and its configuration files. First you just need to create a basic manifest, which is a grouping of variables and modules that are run against a node. To do a simple install of NGINX, we put this content in the most basic possible manifest file, /etc/puppet/manifests/nginx.pp:
# /etc/puppet/manifests/nginx.pp

class{"nginx": }
Now run this puppet apply command to install NGINX:
$ sudo puppet apply /etc/puppet/manifests/nginx.pp

Warning: Could not retrieve fact fqdn

Warning: Config file /etc/puppet/hiera.yaml not found, using Hiera defaults

Notice: Compiled catalog for puppet-master in environment production in 0.30 seconds

Notice: /Stage[main]/Apt/Apt::Setting[conf-update-stamp]/File[/etc/apt/apt.conf.d/15update-stamp]/content: content changed '{md5}b9de0ac9e2c9854b1bb213e362dc4e41' to '{md5}0962d70c4ec78bbfa6f3544ae0c41974'

Notice: /Stage[main]/Apt/File[preferences]/ensure: created

Notice: /Stage[main]/Nginx::Package::Debian/Apt::Source[nginx]/Apt::Setting[list-nginx]/File[/etc/apt/sources.list.d/nginx.list]/ensure: created

Notice: /Stage[main]/Apt::Update/Exec[apt_update]: Triggered 'refresh' from 1 events

Notice: /Stage[main]/Nginx::Package::Debian/Package[nginx]/ensure: ensure changed 'purged' to 'present'

Notice: /Stage[main]/Nginx::Config/File[/var/nginx]/ensure: created

Notice: /Stage[main]/Nginx::Config/File[/var/nginx/client_body_temp]/ensure: created

Notice: /Stage[main]/Nginx::Config/File[/var/nginx/proxy_temp]/ensure: created

Notice: /Stage[main]/Nginx::Config/File[/etc/nginx/nginx.conf]/content: content changed '{md5}f7984934bd6cab883e1f33d5129834bb' to '{md5}2967baa174db82fcedda4f95f605a2d8'

Notice: /Stage[main]/Nginx::Config/File[/etc/nginx/conf.stream.d]/ensure: created

Notice: /Stage[main]/Nginx::Config/File[/etc/nginx/conf.mail.d]/ensure: created

Notice: /Stage[main]/Nginx::Config/File[/etc/nginx/sites-enabled]/ensure: created

Notice: /Stage[main]/Nginx::Config/File[/etc/nginx/sites-available]/ensure: created

Notice: /Stage[main]/Nginx::Config/File[/etc/nginx/conf.d/example_ssl.conf]/ensure: removed

Notice: /Stage[main]/Nginx::Config/File[/etc/nginx/conf.d/default.conf]/ensure: removed

Notice: /Stage[main]/Nginx::Service/Service[nginx]: Triggered 'refresh' from 1 events

Notice: Finished catalog run in 14.98 seconds
As you can see from the output, the module adds the official NGINX open source repositories, installs the NGINX package, and creates a set of base configuration files. For more detailed information about how the module works, see its GitHub page.
Modifying the Default Module for NGINX Plus
Now we’ll modify the default module so we can use it to install and configure NGINX Plus.
Before making any changes to the default module, you need to decide how you want to maintain your changes. By default, the Puppet command‑line tools create all of the files in a newly installed module with read‑only permissions, to avoid accidental changes being made. You can change the permissions and edit the files manually, but I prefer to clone the GitHub repo on my local machine, make all of the necessary changes in the clone, and ship them to the server as a tarball. Then you can use CLI commands to install the module from the tar file. Another possibility is to clone fork the GitHub repo into an internal copy, make the changes via GitHub, and point Puppet at your repo to install the module. All of the options for managing modules are well covered at the Puppet website.
To use the Puppet NGINX module to install NGINX Plus, perform the following steps:
-
Modify the file that controls the repository configuration, adding the certificate and key that enable access the NGINX Plus repository. There are separate files for Debian/Ubuntu and RHEL/CentOS/Oracle Linux.
We recommend putting the additional content between the
nginx‑mainlineandpassengersections in both files.The final two
fileblocks create the certificate and key files, nginx‑repo.crt and nginx‑repo.key, by passing the file contents as a single‑line argument to thecontentdirective. Replace the placeholder arguments with the contents of your own certificate and key files. You can find the full repository configuration files here.-
For Debian/Ubuntu, add the following content to /etc/puppet/modules/nginx/manifests/package/debian.pp:
'nginx-plus': {

  apt::source { 'nginx':

    location => "https://plus-pkgs.nginx.com/${distro}",

    repos    => 'nginx-plus',

    key      => '573BFD6B3D8FBC641079A6ABABF5BD827BD9BF62',

  }

  exec { 'download 90nginx file':

  command => "/usr/bin/wget -q -O /etc/apt/apt.conf.d/90nginx https://cs.nginx.com/static/files/90nginx",

  creates => "/etc/apt/apt.conf.d/90nginx"

  }

  file { '/etc/ssl/nginx':

    ensure => directory,

    mode => "0700",

    owner => "root",

    group => "root",

  }

  file { '/etc/ssl/nginx/nginx-repo.crt':

    ensure => present,

    mode => "0700",

    owner => "root",

    group => "root",

    content => "Contents of your nginx-repo.crt file here as one line",

  }

  file { '/etc/ssl/nginx/nginx-repo.key':

    ensure => present,

    mode => "0700",

    owner => "root",

    group => "root",

    content => "Contents of your nginx-repo.key file here as one line",

  }

} -
For RHEL/CentOS/Oracle Linux, add the following content to /etc/puppet/modules/nginx/manifests/package/redhat.pp:
'nginx-plus': {

  yumrepo { 'nginx-release':

    baseurl  => "https://plus-pkgs.nginx.com/centos/${::operatingsystemmajrelease}/$basearch/",

    descr    => 'nginx-plus repo',

    enabled  => '1',

    gpgcheck => '0',

    priority => '1',

    sslclientcert => '/etc/ssl/nginx/nginx-repo.crt',

    sslclientkey => '/etc/ssl/nginx/nginx-repo.key',

    before   => Package['nginx'],

  }

  file { '/etc/ssl/nginx':

    ensure => directory,

    mode => "0700",

    owner => "root",

    group => "root",

  }

  file { '/etc/ssl/nginx/nginx-repo.crt':

    ensure => present,

    mode => "0700",

    owner => "root",

    group => "root",

    content => "Contents of your nginx-repo.crt file here as one line",

  }

  file { '/etc/ssl/nginx/nginx-repo.key':

    ensure => present,

    mode => "0700",

    owner => "root",

    group => "root",

    content => "Contents of your nginx-repo.key file here as one line",

  }

}
-
-
Import the modified module to Puppet. As we mentioned before, there are a couple options for this, but for this post we’re installing it via a tarball. First we have to create the tar file and ship it to the test server, here called puppet‑master:
$ tar -czf jfryman-nginx-0.3.0.tar.gz puppet-nginx/

$ scp jfryman-nginx-0.3.0.tar.gz puppet-master:/tmp/ -
Run this command on the test server to install the tar file:
puppet-master $ sudo puppet module install /tmp/jfryman-nginx-0.3.0.tar.gz --force

Notice: Preparing to install into /etc/puppet/modules ...

Notice: Downloading from https://forge.puppetlabs.com ...

Notice: Installing -- do not interrupt ...

/etc/puppet/modules

└─┬ jfryman-nginx (v0.3.0)

  ├── puppetlabs-apt (v2.2.2)

  ├── puppetlabs-concat (v2.2.0)

  └── puppetlabs-stdlib (v4.12.0)
Notice that we are adding the
‑‑forceflag to thepuppetmoduleinstallcommand. This is to force the installation of the module even if the default module is already installed. Otherwise, if the default module is installed thepuppetmoduleinstallcommand generates the following error:Notice: Preparing to install into /etc/puppet/modules ...
Error: Could not install module 'jfryman-nginx' (v0.3.0)
Module 'jfryman-nginx' (v0.3.0) is already installed
Use `puppet module upgrade` to install a different version
Use `puppet module install --force` to re-install only this module
Creating a Manifest and Installing NGINX Plus
In Installing Open Source NGINX with Puppet, we created a very basic manifest. For NGINX Plus, we add two important variables that define which apt‑repo to set up and which package to install. The file is stored as /etc/puppet/manifests/nginx‑plus.pp on the test server:
# /etc/puppet/manifests/nginx-plus.pp

class{"nginx":

  package_source => 'nginx-plus',

  package_name => 'nginx-plus',

}
All we need to do to install NGINX Plus is run puppet apply on the test server:
puppet-master $ sudo puppet apply /etc/puppet/manifests/nginx_plus.pp

Warning: Could not retrieve fact fqdn

Warning: Config file /etc/puppet/hiera.yaml not found, using Hiera defaults

Notice: Compiled catalog for puppet-master in environment production in 0.31 seconds

Notice: /Stage[main]/Nginx::Package::Debian/File[/etc/ssl/nginx]/ensure: created

Notice: /Stage[main]/Nginx::Package::Debian/File[/etc/ssl/nginx/nginx-repo.crt]/ensure: created

Notice: /Stage[main]/Nginx::Package::Debian/File[/etc/ssl/nginx/nginx-repo.key]/ensure: created

Notice: /Stage[main]/Apt/Apt::Setting[conf-update-stamp]/File[/etc/apt/apt.conf.d/15update-stamp]/content: content changed '{md5}b9de0ac9e2c9854b1bb213e362dc4e41' to '{md5}0962d70c4ec78bbfa6f3544ae0c41974'

Notice: /Stage[main]/Nginx::Package::Debian/Exec[download 90nginx file]/returns: executed successfully

Notice: /Stage[main]/Apt/File[preferences]/ensure: created

Notice: /Stage[main]/Nginx::Package::Debian/Apt::Source[nginx]/Apt::Setting[list-nginx]/File[/etc/apt/sources.list.d/nginx.list]/ensure: created

Notice: /Stage[main]/Apt::Update/Exec[apt_update]: Triggered 'refresh' from 1 events

Notice: /Stage[main]/Nginx::Config/File[/var/nginx]/ensure: created

Notice: /Stage[main]/Nginx::Config/File[/var/nginx/client_body_temp]/ensure: created

Notice: /Stage[main]/Nginx::Config/File[/var/nginx/proxy_temp]/ensure: created

Notice: /Stage[main]/Nginx::Config/File[/etc/nginx/nginx.conf]/content: content changed '{md5}945c4341b51292da0ffe0815b80ef3ea' to '{md5}2967baa174db82fcedda4f95f605a2d8'

Notice: /Stage[main]/Nginx::Config/File[/etc/nginx/conf.stream.d]/ensure: created

Notice: /Stage[main]/Nginx::Config/File[/etc/nginx/conf.mail.d]/ensure: created

Notice: /Stage[main]/Nginx::Config/File[/etc/nginx/sites-enabled]/ensure: created

Notice: /Stage[main]/Nginx::Config/File[/etc/nginx/sites-available]/ensure: created

Notice: /Stage[main]/Nginx::Config/File[/etc/nginx/conf.d/example_ssl.conf]/ensure: removed

Notice: /Stage[main]/Nginx::Config/File[/etc/nginx/conf.d/default.conf]/ensure: removed

Notice: /Stage[main]/Nginx::Service/Service[nginx]: Triggered 'refresh' from 1 events

Notice: Finished catalog run in 10.33 seconds
Notice that near the end of the process two default configuration files, example_ssl.conf and default.conf, are removed. As a result, no virtual servers are configured, so if we try to access the host IP address in a browser or run netstat on the host, we see nothing listening on port 80.
Configuring a Virtual Server for NGINX Plus Management Features
To add virtual servers to the NGINX Plus configuration, we modify the basic manifest file. First we’ll configure a virtual server listening on port 8080 to set up two NGINX Plus management features, live activity monitoring and the on‑the‑fly reconfiguration API. Although the default Puppet module is for open source NGINX and does not automatically support NGINX Plus features like these, we can enable them simply by modifying the manifest – no changes to the module are needed.
Our modifications consist of defining variables ($my_status_redirect and $my_status_config) and then using two built-in Puppet directives – location_custom_cfg and vhost_cfg_prepend – to push our custom code into the configuration. You can use built-in Puppet directives like these to enable most NGINX Plus features.
$my_status_redirect = {"return" => "301 /status.html"}

nginx::resource::vhost{'status_page':

  listen_port => '8080',

  location_custom_cfg => $my_status_redirect,

}
nginx::resource::location{'/status.html':

  www_root => '/usr/share/nginx/html',

  vhost => 'status_page',

}
$my_status_config = {

  'status' => '',

  'status_format' => 'json',

}
nginx::resource::location{'/status':

  vhost => 'status_page',

  location_custom_cfg => $my_status_config,

}
$my_upstream_conf = { 'upstream_conf' => '',}
nginx::resource::location{'/upstream_conf':

  vhost => 'status_page',

  location_custom_cfg => $my_upstream_conf,

}
Now we go ahead and rerun puppet apply with the new manifest:
$ sudo puppet apply /etc/puppet/manifests/nginx_plus.pp

Warning: Could not retrieve fact fqdn

Warning: Config file /etc/puppet/hiera.yaml not found, using Hiera defaults

Notice: Compiled catalog for puppet-master in environment production in 0.46 seconds

Notice: /Stage[main]/Main/Nginx::Resource::Vhost[status_page]/Concat[/etc/nginx/sites-available/status_page.conf]/File[/etc/nginx/sites-available/status_page.conf]/ensure: defined content as '{md5}a7c1127d79ea9eb6c9645b779f0e35b8'

Notice: /Stage[main]/Main/Nginx::Resource::Vhost[status_page]/File[status_page.conf symlink]/ensure: created

Notice: /Stage[main]/Nginx::Service/Service[nginx]: Triggered 'refresh' from 1 events

Notice: Finished catalog run in 0.49 seconds
You can see in the Puppet output that it has created a new configuration file and reloaded the NGINX Plus service. Here is what the configuration file, /etc/nginx/sites-enabled/status_page.conf, now looks like:
# /etc/nginx/sites-enabled/status_page.conf

# MANAGED BY PUPPET

server {

  listen      *:8080;

  server_name status_page;
  index       index.html index.htm index.php;
  access_log  /var/log/nginx/status_page.access.log combined;

  error_log   /var/log/nginx/status_page.error.log;
  location / {

    return 301 /status.html;

  }
  location /status {

    status;

    status_format json;

  }
  location /status.html {

    root      /usr/share/nginx/html;

    index     index.html index.htm index.php;

  }
  location /upstream_conf {

    upstream_conf;

  }

}
Now when we point a browser at http://server‑ip‑address:8080, we are redirected to http://server‑ip‑address:8080/status.html and see the NGINX Plus live activity monitoring dashboard page. There is limited information on this page currently but more will appear as we build out the NGINX Plus configuration in the next section.
Creating a Basic Proxy Configuration
A very common use case for NGINX Plus is as a reverse proxy, so we’re providing detailed instructions here for setting up a virtual server for that purpose. You can adapt the instructions to configure NGINX Plus for other roles, such as load balancer or content cache.
-
Create a backend server for NGINX Plus to proxy to. An easy way to do this is to leverage the NGINX Hello image from Docker Hub. This is a basic Docker image running the open source NGINX software that simply displays the hostname, IP address, and port of the Docker container.
-
Install Docker:
$ sudo curl -sSL https://get.docker.com/ | sh -
Download and start the NGINX Hello image:
$ sudo docker run -P -d nginxdemos/hello
-
-
Spin up a couple more Docker containers running the NGINX Hello image, to give NGINX Plus something to load balance:
$ sudo docker run -P -d nginxdemos/hello

$ sudo docker run -P -d nginxdemos/hello -
Run the
dockerpscommand and make note of the port number of each instance so you can add them to the NGINX Plus configuration. Here they are 32773, 32771, and 32769 (to make it easier to pick out the port numbers in this sample output, we’ve split the lines between the fourth and fifth fields, moving the final three fields to a separate set of lines).$ sudo docker ps
CONTAINER ID IMAGE COMMAND CREATED ...
7be41c1165b1 nginxdemos/hello "nginx -g 'daemon off" 2 seconds ago ...
187df1f85f1f nginxdemos/hello "nginx -g 'daemon off" 9 seconds ago ...
90129216ffa2 nginxdemos/hello "nginx -g 'daemon off" 27 seconds ago ...... STATUS PORTS NAMES
... Up 2 seconds 0.0.0.0:32773->80/tcp, 0.0.0.0:32772->443/tcp insane_austin
... Up 8 seconds 0.0.0.0:32771->80/tcp, 0.0.0.0:32770->443/tcp lonely_murdock
... Up 27 seconds 0.0.0.0:32769->80/tcp, 0.0.0.0:32768->443/tcp determined_babbage -
Add the following to the /etc/puppet/manifests/nginx_plus.pp manifest file to configure NGINX Plus as a basic reverse proxy. (Substitute your containers’ IP addresses and ports in the
membersblock.)# addition to /etc/puppet/manifests/nginx_plus.pp
# Docker hello config
$my_zone = {"zone" => "docker-test 64k"}
nginx::resource::upstream { 'docker-test':
members => [
'127.0.0.1:32773',
'127.0.0.1:32771',
'127.0.0.1:32769',
],
upstream_cfg_prepend => $my_zone,
}$my_docker_zone = {"status_zone" => "docker-test"}
nginx::resource::vhost{'docker-test.local':
listen_port => '80',
vhost_cfg_prepend => $my_docker_zone,
proxy => 'http://docker-test',
}As in Configuring a Virtual Server for NGINX Plus Management Features, we are using the built-in Puppet directives
upstream_cfg_prependandvhost_cfg_prependalong with variables, this time to define thestatus_zonedirective for the virtual server and thezonedirective for the upstream group. Thestatus_zonedirective is required for the virtual server to show up on the Server zones tab of the live activity monitoring dashboard, while thezonedirective in the upstream group not only sets the name used on the Upstream tab, but also defines the shared memory pool that the NGINX worker processes use for that upstream group. -
Run
puppetapplyagain to load the configuration:$ sudo puppet apply /etc/puppet/manifests/nginx_plus.pp
Warning: Could not retrieve fact fqdn
Warning: Config file /etc/puppet/hiera.yaml not found, using Hiera defaults
Warning: You cannot collect exported resources without storeconfigs being set; the collection will be ignored on line 102 in file /etc/puppet/modules/nginx/manifests/resource/upstream.pp
Notice: Compiled catalog for puppet-master in environment production in 0.74 seconds
Notice: /Stage[main]/Main/Nginx::Resource::Vhost[docker-test.local]/Concat[/etc/nginx/sites-available/docker-test.local.conf]/File[/etc/nginx/sites-available/docker-test.local.conf]/ensure: defined content as '{md5}8757498b3e6d2f237e1e5a4ba8e121b1'
Notice: /Stage[main]/Main/Nginx::Resource::Vhost[docker-test.local]/Concat[/etc/nginx/sites-available/docker-test.local.conf]/File[/etc/nginx/sites-available/docker-test.local.conf]/ensure: defined content as '{md5}51047b07b58989722e62fb1b14db26ad'
Notice: /Stage[main]/Main/Nginx::Resource::Vhost[docker-test.local]/File[docker-test.local.conf symlink]/ensure: created
Notice: /Stage[main]/Nginx::Service/Service[nginx]: Triggered 'refresh' from 1 events
Notice: Finished catalog run in 0.62 seconds
Here is the NGINX configuration file that the puppet apply command creates, /etc/nginx/sites‑enabled/docker‑test.local.conf:
# /etc/nginx/sites-enabled/docker-test.local.conf

# MANAGED BY PUPPET

server {

  listen *:80;

  server_name docker-test.local;

  status_zone docker-test;
  index  index.html index.htm index.php;
  access_log            /var/log/nginx/docker-test.local.access.log combined;

  error_log             /var/log/nginx/docker-test.local.error.log;
  location / {

    proxy_pass            http://docker-test;

    proxy_read_timeout    90;

    proxy_connect_timeout 90;

    proxy_redirect        off;

    proxy_set_header      Host $host;

    proxy_set_header      X-Real-IP $remote_addr;

    proxy_set_header      X-Forwarded-For $proxy_add_x_forwarded_for;

  }

}
The command also creates /etc/nginx/conf.d/docker-test-upstream.conf to define the upstream group:
# /etc/nginx/conf.d/docker-test-upstream.conf

# MANAGED BY PUPPET

upstream docker-test {

  zone docker-test 64k;
  server 127.0.0.1:32773  fail_timeout=10s;

  server 127.0.0.1:32771  fail_timeout=10s;

  server 127.0.0.1:32769  fail_timeout=10s;

}
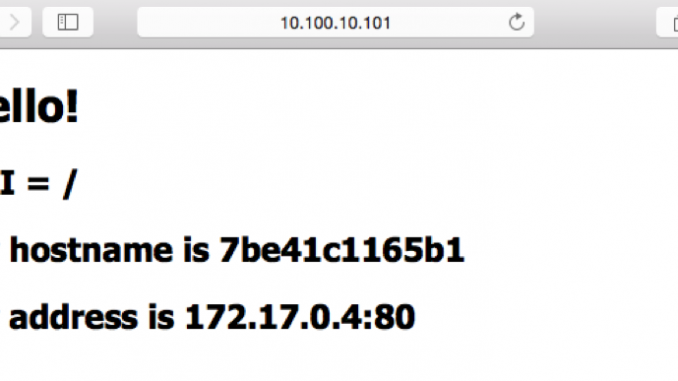
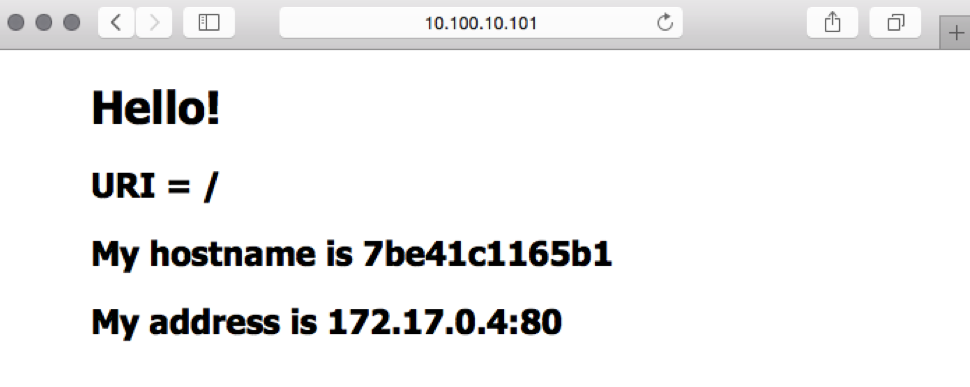
Now when we hit the server’s IP address on port 80, we see the page generated by the NGINX Hello image, with the hostname and IP address of the Docker container. As we repeatedly reload the page, we see the values in the My hostname is and My address is fields change to indicate which of the three Docker containers is serving the request.
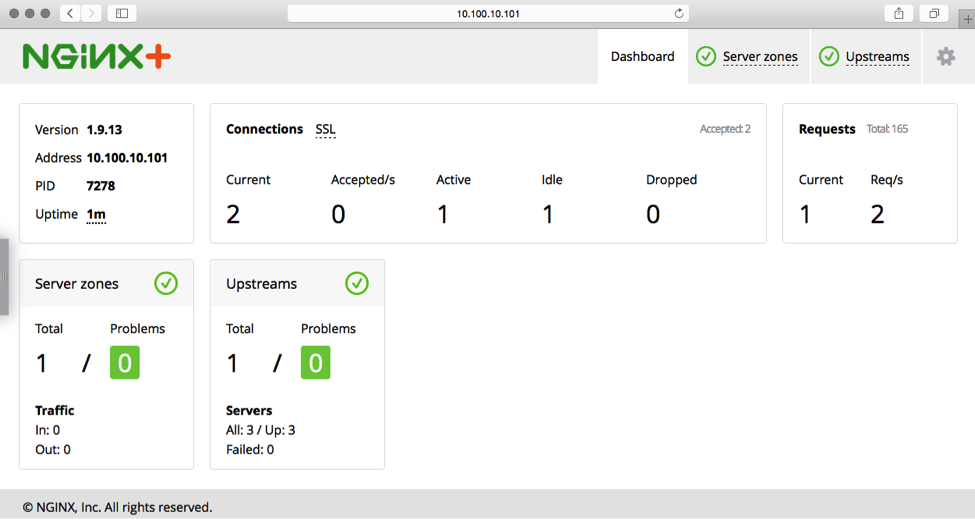
The NGINX Plus live activity monitoring dashboard confirms that one server zone and one upstream group are now defined:
Summary
We have just started looking at what is possible with the default Puppet module for NGINX, let alone Puppet as a whole, but hopefully this post serves as a good jumping off point to leveraging Puppet to maintain your NGINX and NGINX Plus infrastructure. There are many more modules that can help you manage all aspects of your environment.
Try out NGINX Plus with Puppet for yourself – start your free 30‑day trial today or contact us for a live demo.
The post Installing NGINX and NGINX Plus with Puppet appeared first on NGINX.


Leave a Reply