Just One POST: Enabling Declarative DNS with F5 and the NGINX JavaScript Module
In the 1990 movie The Hunt for Red October, Sean Connery plays Marko Ramius, captain of the Soviet Union’s newest nuclear submarine, who intends to defect to the US and bring the sub with him. CIA analyst Jack Ryan, played by a young Alec Baldwin, intuits Ramius’s motive and has to convince the US Navy of his theory to prevent a violent confrontation between the superpowers. To prove his point, Ryan first needs to talk to Ramius, and suspense ratchets up as Ryan spends an inordinate amount of time trying to locate him.
On the face of it, Ryan’s search is like that of a browser client trying to find a website on the Internet – except that websites register their locations in the Domain Name System (DNS), making it trivial for clients to find them. Had Ramius published his location, the movie wouldn’t have been very interesting, but quick and easy resolution is exactly what we want for our applications.
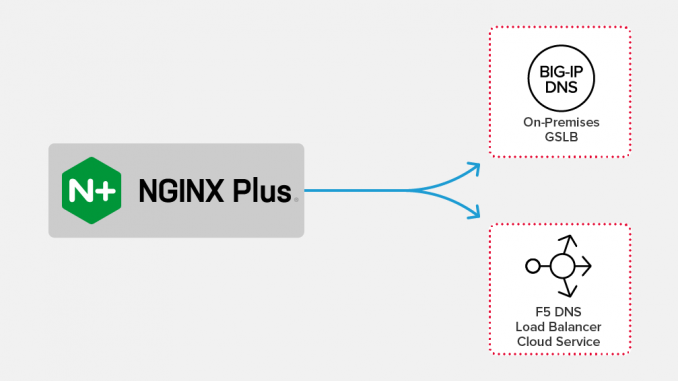
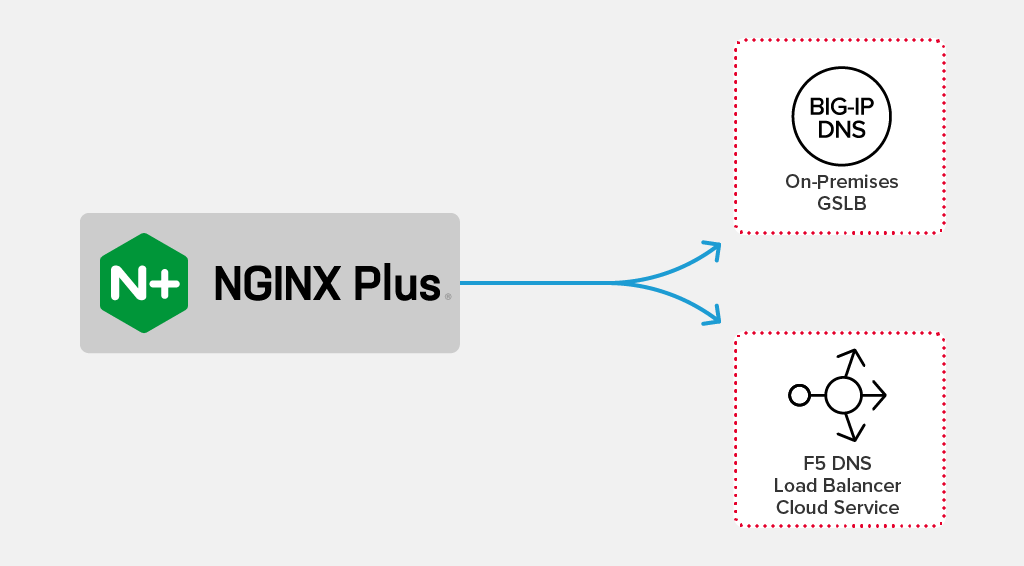
In this post, we use two DNS technologies from F5. With BIG-IP DNS, we publish DNS records for private addresses (as originally defined in RFC 1918) to internal clients, providing them with an optimized path to reach services hosted in the data center. With DNS Load Balancer Cloud Service, we provide a cloud‑based DNS service for external clients.
The title of this post is inspired by another incident in the movie. Once Ryan finds Ramius, he sends a message and Ramius verifies its receipt by sending a single ping. In our setup, we can update DNS records with a single HTTP POST message sent via API. We use NGINX Plus and the NGINX JavaScript Module to make this possible.

Many Names, One IP Address
Our example solves a common problem for platform-as-a-service (PaaS) deployments that span multiple data centers. At each location there are usually many services deployed behind the single IP address advertised in the location’s DNS record. The problem with a wildcard DNS entry is that you lose granular detail about where each service is and whether it’s healthy.
In our example we use NGINX Plus active health checks to track application health across multiple locations without the need to duplicate monitoring tasks, and update both internal and external DNS records as applications go up and down.
How We’re Using F5 and NGINX Technologies
Our example takes advantage of both F5 and NGINX software:
- F5 BIG-IP DNS – In addition to traditional load balancing, BIG‑IP can also do global server load balancing (GSLB). You can deploy BIG‑IP as a hardware or virtual device on premises, and as a virtual device in cloud environments.
-
F5 DNS Load Balancer Cloud Service – DNS LB CS provides GSLB as a cloud‑hosted SaaS service with built‑in DDoS protection and an API‑first approach.
Both BIG-IP DNS and DNS LB CS have a declarative API for updating DNS records. This makes it possible to perform updates with a single
POSTAPI call. -
NGINX Plus – We’re using several NGINX Plus features:
- Active health checks to monitor the status of upstream servers (our applications).
- The NGINX Plus API to update the key‑value store where we record application status.
- NGINX Plus zone synchronization to synchronize the key‑value store across multiple NGINX instances (similar to a distributed database like memcache or Redis).
- NGINX JavaScript module – NGINX JavaScript (njs) enables us to make subrequests to internal NGINX Plus APIs, parse JSON responses, update internal NGINX variables, and incorporate non‑native functions into the NGINX Plus traffic‑processing sequence.
Before we get into the details of how our sample solution works, here’s an overview of how the technologies work together:
- We use NGINX Plus active health checks to get the status of our backend applications running in multiple data centers.
- We use an njs function to aggregate the health information and update the key‑value store. Because NGINX Plus zone synchronization is enabled, the key‑value store is automatically synchronized across all of the NGINX Plus instances.
- We send an authenticated request to NGINX Plus that invokes an njs function to update DNS records.
For details of how we configure NGINX Plus and handle application health information, see Gathering, Storing, and Updating Application Health Information. For details on how we convey the information to our DNS servers, see Updating DNS Records.
You can access the full NGINX Plus configuration and NGINX JavaScript code for the example at our GitHub repo. (Note that this blog doesn’t discuss all of the location directives in the NGINX Plus configuration, nor all of the corresponding njs functions.)
Gathering, Storing, and Updating Application Health Information
In our sample topology, there are two data centers, dc1 and dc2 – but the solution easily generalizes to many deployment types (hybrid cloud, multi‑cloud, multiple availability zones, multiple Kubernetes clusters, or a single location or device).
In each data center, an NGINX Plus instance load balances a custom combination of four applications (app001 through app004). To store the health status of upstream servers for each application, we configure a key‑value store called pools. The following keyval directive from the NGINX Plus configuration file for dc1 maps the IP address of the NGINX Plus instance, 10.1.20.54, to the $pool variable, which stores health status information for the applications in the data center. (In the configuration for dc2, the NGINX Plus instance’s IP address is 10.1.20.55 instead.)
keyval_zone zone=pools:32k state=pools.keyval sync timeout=300;
keyval "10.1.20.54" $pool zone=pools;
To populate the $pool variable, we call our UpdatePools njs function. This function uses the NGINX Plus API to check the health of the upstream servers for each application. In pseudocode, the subrequest to the NGINX Plus API looks like this:
r.subrequest('/api/5/http/upstreams' ...The output is processed to generate a set of key‑value pairs consisting of the application name and the number of upstream servers for the application that are considered healthy. Here’s sample output for two applications, each with three healthy servers:
{"app001":3,"app002":3}We invoke the JavaScript JSON.stringify function to convert the output to JSON, with this pseudocode:
r.variables.pool = JSON.stringify(output);We use the NGINX Plus Zone Synchronization module to synchronize the contents of the pool key‑value store across both data centers (not shown in the sample configuration file). This example shows the number of healthy servers for app001 through app003 in both data centers:
{
  "10.1.20.54": "{"app001":3,"app002":3}",
  "10.1.20.55": "{"app001":2,"app003":4}"
}
We use the health_check directive to invoke an njs function every 30 seconds that updates the health information in the key‑value store on the local instance.
location /poll {
    internal;
    proxy_pass http://127.0.0.1/pools/update;
    health_check uri=/pools/update interval=30;
}
Our Summarize njs function groups the health information by application rather than data center; to display its output, we make a request to the /pools URI. In the following sample output, app001 is healthy in both data centers, app002 is running only in dc1, app003 is running only in dc2, and app004 is deployed in both data centers but is healthy only in dc2 (the number of healthy servers in dc1 is 0).
$ curl localhost:8245/pools
{"app001.f5demo.com":{"dc1":[{"10.1.20.54":3}],
                      "dc2":[{"10.1.20.55":2}]},
 "app002.f5demo.com":{"dc1":[{"10.1.20.54":3}]},
 "app003.f5demo.com":{"dc2":[{"10.1.20.55":4}]},
 "app004.f5demo.com":{"dc1":[{"10.1.20.54":0}],
                      "dc2":[{"10.1.20.55":3}]}}
Here’s a graphic representation of the current application health status.

Updating DNS Records
We update the records in both BIG-IP DNS and DNS LB CS to reflect the health of our backend applications; if an app is unavailable at one of the data centers (such as app004 at dc1 in the example above), we divert clients of that app to the other data center. BIG-IP DNS and DNS LB CS use different templates and data representations, so to update the DNS records in the two systems we direct the njs subrequest to different URLs and invoke different functions.
Updating Records in BIG-IP DNS
The configuration of a BIG‑IP device can be represented as a single JSON document in F5 Application Services 3 Extension (AS3) format, adhering to a specific schema. Using njs we can build a template of the services that we want to deploy.
var template = {
  "class": "ADC",
  "schemaVersion": "3.7.0",
  "id": "NGINXPLUS",
We update the template with information about each application’s pool members (the BIG‑IP equivalent of an NGINX Plus upstream group), as in this example for app001:
"app001_domain": {
     "class": "GSLB_Domain",
    	"domainName": "app001.f5demo.com",
    	"pools": [ { "use": "dc1_app001_pool" },
                   { "use": "dc2_app001_pool"} ],
    	"resourceRecordType": "A"
},
In the NGINX Plus configuration, we create an upstream group called bigip for the BIG-IP DNS server, and have NGINX Plus forward requests to bigip from the /mgmt/shared/appsvcs/declare location:
upstream bigip {
    server 10.1.1.5:443;
}

location /mgmt/shared/appsvcs/declare {
    internal;
    proxy_pass https://bigip;
}
Our generateAS3Dns njs function includes a subrequest that configures BIG-IP DNS with DNS records for our applications, by making a POST request with a stringified JSON payload representing the template. Here’s pseudocode for the subrequest:
r.subrequest('/mgmt/shared/appsvcs/declare',
             { method: 'POST', body: JSON.stringify(template) },
We invoke the generateAS3Dns function by making a request to /pools/push/dns. In this example we include the curl command’s -u parameter to authenticate on the BIG-IP DNS server as the admin user. Because we are using a subrequest, NGINX Plus forwards our credentials when we connect to the BIG-IP DNS server. Alternatively we could have stored the credentials in the njs file.
$ curl localhost:8245/pools/push/dns -u admin:admin_passwordUpdating Records in DNS LB CS
The method for updating records in DNS LB CS is similar to the approach for BIG-IP DNS, though the template for generating the format that the DNS LB CS API expects is different:
"load_balanced_records": {
    	"app001": {
      	...
      	"proximity_rules": [
            { ... "pool": "pools_dc1_app001" ...},
            { ... "pool": "pools_dc1_app001" ...},

      	],
          ...
In the NGINX Plus configuration, we create an upstream group called cloud for the DNS LB CS API, and have NGINX Plus forward requests to cloud from the /v1/svc-subscription/subscriptions location:
upstream cloud {
    server api.cloudservices.f5.com:443;
}
#...
location /v1/svc-subscription/subscriptions {
    internal;
    proxy_pass https://cloud;
}
Our generateCloudDns njs function includes a subrequest that configures DNS LB CS with DNS records for our applications, by making a PUT request with a stringified JSON payload representing the template. Here’s pseudocode for the subrequest (the final element in the URL, s-aabbcc1234, is the DNS LB CS subscription ID):
r.subrequest(' /svc-subscription/subscriptions/s-aabbcc1234,
             { method: 'PUT', body: JSON.stringify(template) },
We invoke the generateCloudDns function by making a request to /pools/push/cloud-dns.
$ curl localhost:8245/pools/push/cloud_dns?account_id=... -H "Authorization: ..."Tracking Application Health in the BIG-IP DNS GUI
Although we used NGINX Plus and njs subrequests to create and update BIG-IP DNS records, we can use the BIG-IP DNS GUI to verify the health of our applications. This screenshot shows that app004 is unhealthy in dc1 and healthy in dc2 (represented in the Status column by the black diamond and green circle respectively). As a result, BIG-IP DNS includes only the address for dc2 in its response to requests for app004’s location.

This screenshot shows how the records in BIG-IP DNS are located in private (10/8) address space.

Tracking Application Health in the DNS LB CS GUI
As with BIG-IP DNS, we can use the DNS LB CS GUI to verify the health of our applications, even though we used NGINX Plus and njs subrequests to create and update the DNS records. This screenshot shows that app004 is unhealthy in dc1 and healthy in dc2 (represented in the Status column by Disabled and Enabled respectively).

The following screenshot shows how DNS LB CS records, unlike those in BIG-IP DNS, are for public IP addresses (we show only the first four records).

Conclusion
To review, we used NGINX Plus to:
- Perform active health checks of upstream applications
- Store health information in the key‑value store
- Synchronize the key‑value store across multiple NGINX instances
We leveraged njs to:
- Summarize the state of the upstream applications in the format required by each DNS technology
- Templatize DNS services
- Push DNS services to appropriate API endpoints
The result is perhaps not as epic as the conclusion of The Hunt for Red October, but it is much more valuable to anyone who runs a website.
Want to try our setup yourself? Start a free trial of NGINX Plus and BIG-IP DNS or DNS LB CS, or contact us to discuss your use cases.
The post Just One POST: Enabling Declarative DNS with F5 and the NGINX JavaScript Module appeared first on NGINX.
Source: Just One POST: Enabling Declarative DNS with F5 and the NGINX JavaScript Module


Leave a Reply