NGINX Plus Sizing Guide: How We Tested
Earlier this year we benchmarked the performance of NGINX and created a sizing guide for deploying NGINX and NGINX Plus on bare metal servers. The sizing guide is helpful in deploying NGINX and NGINX Plus as load balancers. NGINX and NGINX Plus are widely used for Layer 7 load balancing, also known as application load balancing.
The sizing guide outlines the performance you can expect to achieve with NGINX Plus running on various server sizes, along with the estimated costs for the hardware. You can use the sizing guide to appropriately spec out NGINX Plus deployments, and to avoid over provisioning – which costs you money immediately – or under provisioning – which can cause performance problems, and cost you money in the long run – as much as possible.
We’ve had a lot of interest in the sizing guide, along with questions about the methodology we used, from customers and others interested in reproducing our results. This blog post provides an overview of the testing we performed to achieve the results presented in the sizing guide. It covers the topology we used, the tests we ran, and how we found the prices listed in the sizing guide.
Topology
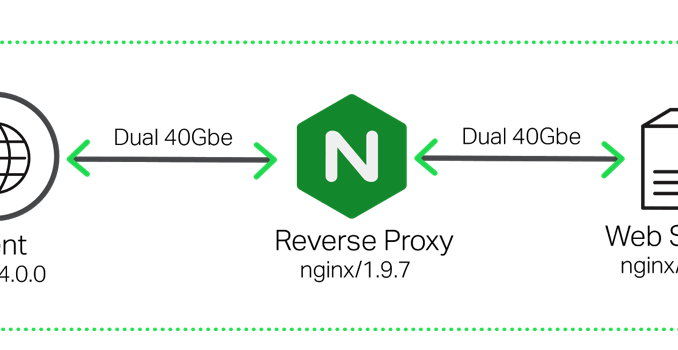
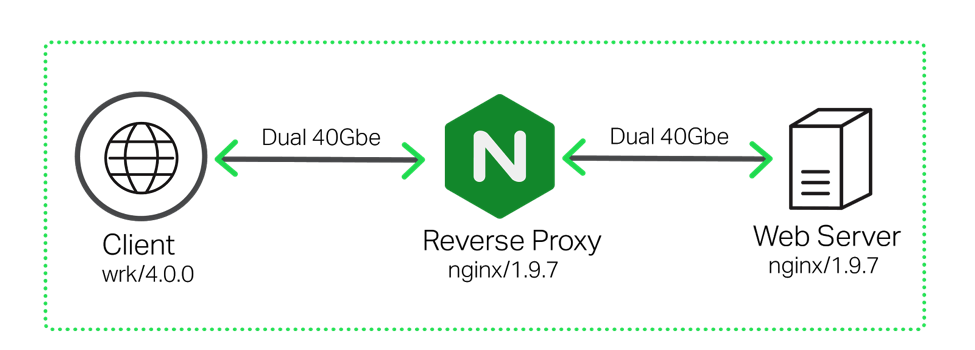
All tests were done using three separate machines connected together with dual 40 Gbe links. A simple, flat Layer 2 network was used to connect the three machines.

Traffic was generated from the client machine using wrk, a performance testing tool similar to ApacheBench. All traffic was directed to the NGINX Reverse Proxy, which then proxied the connections to the Web Server backend.
Hardware Used
The following hardware was used to do the testing.
table, th, td {
border: 1px solid black;
}
th {
background-color: #d3d3d3;
align: left;
padding-left: 5px;
padding-bottom: 2px;
padding-top: 2px;
line-height: 120%;
}
td {
padding-left: 5px;
padding-bottom: 5px;
padding-top: 5px;
line-height: 120%;
}
| Machine | CPU | Network | Memory |
|---|---|---|---|
| Client | 2x Intel(R) Xeon(R) CPU E5-2699 v3 @ 2.30GHz, 36 real (or 72 HT) cores | 2x Intel XL710 40GbE QSFP+ (rev 01) | 16 GB |
| Reverse Proxy | 2x Intel(R) Xeon(R) CPU E5-2699 v3 @ 2.30GHz, 36 real (or 72 HT) cores | 4x Intel XL710 40GbE QSFP+ (rev 01) | 16 GB |
| Web Server | 2x Intel(R) Xeon(R) CPU E5-2699 v3 @ 2.30GHz, 36 real (or 72 HT) cores | 2x Intel XL710 40GbE QSFP+ (rev 01) | 16 GB |
Software Used
The following software was used to do the testing:
- Version 4.0.0 of
wrkwas installed on the client machine following these instructions.wrkgenerated the client side traffic NGINX proxied. - Version 1.9.7 of the open source NGINX software was installed from the official repo, following these instructions under the Pre-Built Packages for Mainline version section.
- All machines were running Ubuntu Linux 14.04.1.
Testing Methodology
The unit under test was the NGINX reverse proxy server. We got performance numbers for different numbers of CPUs by varying the number of NGINX worker processes. To get performance for a single CPU we ran one NGINX worker process on the system, which consumes only one CPU. The tests were than re-run with two worker processes, four, eight, etc.
Note: The number of NGINX worker processes can be varied with the worker_processes directive. A fresh installation of NGINX or NGINX Plus will have this set to auto, which means to run 1 worker process per CPU.
Performance Metrics
The following performance metrics were tested for:
- Requests/Sec – Measures the ability of NGINX Plus to process HTTP Requests. The client sends requests for a 1 KB file down a keepalive connection. NGINX Plus processes each request and forwards it on to a web server over another keepalive connection. The web server returns the requested 1 KB file.
- SSL TPS – SSL Transactions per Second (TPS) measures the ability of NGINX Plus to process new SSL connections. The clients sends a series of HTTPS requests, each on a new connection. NGINX Plus parses the requests and forwards them onto a web server using an established keepalive connection. The web server sends back a 0 byte response for each request.
- Throughput – The throughput that NGINX Plus can sustain when serving 1 MB files over HTTP.
Running tests
All tests were running using wrk, a well known traffic generation tool similar to apachebench. The key options set in wrk were:
-
The
-c option specifies the number of TCP connections to create. For our testing, we set this to 50 connections.The
-d option specifies how long to generate traffic for. We ran our tests for 3 minutes each.The
-t option specifies the number of threads to create. We specified a single thread.To fill up the available cores we used taskset, which can pin a process to a CPU. We used this as opposed to increasing the number of threads in wrk as it is more predictable. Using taskset, we can easily run a single wrk process per CPU.
Requests Per Second
To test for requests per second, the following command was executed:
for i in `seq 1 `; do
    taskset -c $i wrk -t 1 -c 50 -d 180s http:///1kb.bin
done
This test spawned one copy of wrk per cpu, 36 total for our client machine. Each copy created 50 TCP connections making continuous requests for 3 minutes (180 seconds).
A 1 Kb file was used to get the numbers in our sizing guide.
SSL Transactions Per Second
To test SSL transactions per second, the following commands were executed:
for i in `seq 1 `; do
    taskset -c $i wrk -t 1 -c 50 -d 180s -H 'Connection: close' https:///0kb.bin
done
The test is similar to the previous test, except for two notable differences.
- The connection was closed after each request using the Connection: close HTTP header
- A 0 byte file was used
The test was conducted this way in order to test performance of creating new SSL connections.
Throughput
To test throughput the following command was executed:
for i in `seq 1 `; do
    taskset -c $i wrk -t 1 -c 50 -d 180s http:///1mb.bin
done
The main difference here is the larger file size, 1 MB in our testing. We found that using a larger file size did not increase overall throughput.
Multiple Network Cards
In our testing we used multiple network cards. The following slightly modified script ensured traffic was distributed evenly between the two cards:
for i in `seq 1 15`; do
    n=`echo $(($i+15))`;
    taskset -c $i ./wrk -t 1 -c 50 -d 180s http:///1kb.bin &
    taskset -c $n ./wrk -t 1 -c 50 -d 180s http:///1kb.bin &
done
Conclusion
The final step, once we had performance numbers with different numbers of cores, was to assign prices to them. We used prices for Dell PowerEdge servers with similar CPU specs to that we used in our testing. The appendix below has a full bill of materials for each server, along with the full NGINX configuration for both the reverse proxy server and the web server.
Appendix
Dell Hardware Configurations
The following Dell hardware configurations were used to get the prices listed in our sizing guide.
Note: The pricing and specifications shown were available and correct at the time the sizing guide was written; specification details and pricing are likely to change after that point.
.tg {border-collapse:collapse;border-spacing:0;}
.tg td{font-family:Arial, sans-serif;font-size:14px;padding:10px 5px;border-style:solid;border-width:1px;overflow:hidden;word-break:normal;}
.tg th{font-family:Arial, sans-serif;font-size:14px;font-weight:normal;padding:10px 5px;border-style:solid;border-width:1px;overflow:hidden;word-break:normal;}
.tg .tg-2sfh{font-weight:bold;background-color:#efefef}
.tg .tg-yw4l{vertical-align:top}
| Server model | Specs | Price |
|---|---|---|
| Dell PowerEdge R230 | CPU: 2 core Intel Core I3 6100 3.7GHz, 2C/4T RAM: 4 GB HDD: 500 GB NIC: Intel X710 2×10 Gbe |
$1,200 |
| Dell PowerEdge R230 | CPU: Intel® Xeon® E3-1220 v5 3.0GHz, 4C/8T RAM: 4 GB HDD: 500 GB NIC: Intel XL710 2×40 Gbe |
$1,400 |
| Dell PowerEdge R430 | CPU: Intel® Xeon® E5-2630 v3 2.4GHz, 8C/16T RAM: 4 GB HDD: 500 GB NIC: Intel XL710 2×40 Gbe |
$2,200 |
| Dell PowerEdge R430 | CPU: 2x Intel® Xeon® E5-2630 v3 2.4GHz, 8C/16T RAM: 8 GB HDD: 500 GB NIC: Intel XL710 2×40 Gbe |
$3,000 |
| Dell PowerEdge R630 | CPU: 2x Intel® Xeon® E5-2697A v4 2.6GHz, 16C/32T RAM: 8 GB HDD: 500 GB NIC: Intel XL710 2×40 Gbe |
$8,000 |
| Dell PowerEdge R630 | CPU: 2x Intel® Xeon® E5-2697A v4 2.6GHz, 16C/32T RAM: 8 GB HDD: 500 GB NIC: Intel XL710 2×40 Gbe |
$11,000 |
NGINX Reverse Proxy Configuration
The below configuration was used on the NGINX proxy servers. Please note the two sets of keepalive_timeout and keepalive_requests directives:
- For SSL TPS tests, we set the values for both directives so that connections would only stay open for a single request, as the goal of that test is to see how many SSL connections per second NGINX can create. SSL session caching was also disabled.
- For HTTP RPS tests, the directives were tuned to keep connections alive for as long as possible.
The configuration is a fairly standard reverse proxy server configuration otherwise, with NGINX proxying to a web server using the proxy_pass directive.
user  nginx;
worker_processes auto;
worker_rlimit_nofile 10240;
error_log  /var/log/nginx/error.log debug;
pid        /var/run/nginx.pid;

events {
    worker_connections  10240;
    accept_mutex off;
    multi_accept off;
}

http {
    access_log off;
    include       /etc/nginx/mime.types;
    default_type  application/octet-stream;

    log_format  main  '$remote_addr - $remote_user [$time_local] "$request" '
                      '$status $body_bytes_sent "$http_referer" '
                      '"$http_user_agent" "$http_x_forwarded_for" "$ssl_cipher" "$ssl_protocol" ';

    sendfile        on;

    # RPS tests
    keepalive_timeout 300s;
    keepalive_requests 1000000;


    # SSL TPS tests
    #keepalive_timeout 0;
    #keepalive_requests 1;

    upstream webserver {
        server <web server ip>;
    }

    server {
        listen 80;
        listen 443 ssl backlog=102400 reuseport;
        ssl_certificate /etc/nginx/ssl/rsa-cert.crt;
        ssl_certificate_key /etc/nginx/ssl/rsa-key.key;
        ssl_session_tickets off;
        ssl_session_cache off;

        root /var/www/html;
        location / {
                proxy_pass http://webserver;
        }
     }
}
NGINX Web Server Configuration
The configuration below was used on the NGINX web server. It serves static files from /var/www/html/, as configured by the root directive. The static files were generated using dd, such as this example which creates a 1 KB file of zeroes: dd if=/dev/zero of=1kb.bin bs=1KB count=1
user  nginx;
worker_processes auto;
worker_rlimit_nofile 10240;
error_log  /var/log/nginx/error.log debug;
pid        /var/run/nginx.pid;

events {
    worker_connections  10240;
    accept_mutex off;
    multi_accept off;
}

http {
    access_log off;
    include       /etc/nginx/mime.types;
    default_type  application/octet-stream;

    log_format  main  '$remote_addr - $remote_user [$time_local] "$request" '
                      '$status $body_bytes_sent "$http_referer" '
                      '"$http_user_agent" "$http_x_forwarded_for" "$ssl_cipher" "$ssl_protocol" ';

    sendfile        on;


    keepalive_timeout 300s;
    keepalive_requests 1000000;

    server {
        listen 80;
        root /var/www/html;
     }
}
The post NGINX Plus Sizing Guide: How We Tested appeared first on NGINX.


Leave a Reply