Setting Up NGINX

Setting Up NGINX and Configuring NGINX as a Proxy
Since its introduction more than a decade ago, NGINX has become the most popular web server for busy websites. More than 160 million websites use NGINX, including more than half of the top 100,000 websites.
With NGINX having reached such popularity, it makes sense to use NGINX for all your web serving needs, and additionally to take advantage of its capabilities as a reverse proxy server, caching server, load balancer, and more.
This blog post will help you get NGINX up and running on Ubuntu Linux on Amazon Web Services (AWS), an easy-to-use setup that doesn’t affect the settings on your personal computer. This blog post covers both NGINX and NGINX Plus.
Once you complete the steps given here, you may want to continue with two instructor-led courses offered by NGINX:
- NGINX Fundamentals. Covers installation, configuration, load balancing, reverse proxying, and caching. On completion, you can take the NGINX Fundamentals Exam to check your understanding.
- NGINX Advanced. Helps you address more complicated application scenarios for advanced location routing, load balancing, dynamic reconfiguration, monitoring, and more. Includes both open source NGINX features and features specific to NGINX Plus.
These courses will help ready you for Video Streaming with NGINX, Load Balancing in NGINX, Proxy and Caching in NGINX, and others.
This tutorial covers how to install NGINX on an Ubuntu 14.04 AWS virtual machine. For this tutorial, you need a terminal to connect to your Amazon Elastic Compute Cloud (EC2) instance. Macs have a built-in terminal, but Windows users need to download PuTTY or an equivalent tool. If you prefer to use your own local terminal to set up NGINX or NGINX Plus and serve web content, feel free to skip “Getting to your terminal”.
Getting to your terminal (Mac):
On mac, there is a built in tool that you can use to do everything in this tutorial – it’s called “terminal.”
- In the top right of your screen, click on the magnifying glass icon.
- Type in “terminal” and hit enter. That’s all you need!
Getting to your terminal (Windows):
Unlike mac, windows doesn’t come with a built in tool, so we you will need to download one off the internet. A good tool to use is PuTTY; it’s a common ssh client used ubiquitously throughout the world.
- Go to http://www.chiark.greenend.org.uk/~sgtatham/putty/download.html
- Install the file in a desired location and open it. You won’t be able to access the actual terminal until you finish “Setting up Amazon Web Services”
Setting up Amazon Web Services
To begin, you set up Amazon Web Services, then connect to your new instance:
- Navigate to https://aws.amazon.com/?nc2=h_lg
- Sign in to AWS or create a new account.
- In the top left of the screen: navigate to Services, to Compute, then to EC2.
- Click Launch Instance.
- Select Ubuntu Server 14.04 LTS (HVM), SSD Volume Type.
- Select Free Tier Eligible t2.micro Instance. (Should be default).
- Navigate to Edit Security Groups.
- Click Add Rule to allow all TCP Traffic With Anywhere as the source.
- Click Review and Launch, then click Launch
- Select create a new key pair and name the key pair anything, such as “NGINX_key”
- Download the key pair and place it in any folder. For this tutorial, we recommend you place it in /Desktop/NGINX.
- Select Launch Instance, then View Instances.
- Highlight your instance in AWS, then select Connect at the top of the screen.
- Follow the directions to finish connecting to your instance (Including connect using PuTTY if you’re on Windows). This includes pasting the example code into your terminal once you’ve navigated to your key.
Now that you have your AWS virtual machine, It’s time to install and configure NGINX! There are two methods available to you when installing NGINX. You can install from the binary distribution (option 1 below), or you can request a free trial from our website (option 2 below). Both options will work in the context of this tutorial, but if you want to further explore the advanced features that NGINX can provide, please feel free to request a free trial
Option 1- Installing NGINX
Now that you have your AWS virtual machine, It’s time to install and configure NGINX! Follow these steps:
- Open your terminal.
- To download the NGINX signing key, type:
sudo wget http://nginx.org/keys/nginx_signing.key - Navigate to /etc/apt
- Open the sources.list file and append:
deb http://nginx.org/packages/ubuntu trusty nginx deb-src http://nginx.org/packages/ubuntu trusty nginx - To update NGINX, type:
sudo apt-get update - To install NGINX, type:
sudo apt-get install nginx - Type Y when prompted
Next, go to "Opening your web page" below.
Option 2- Installing NGINX Plus
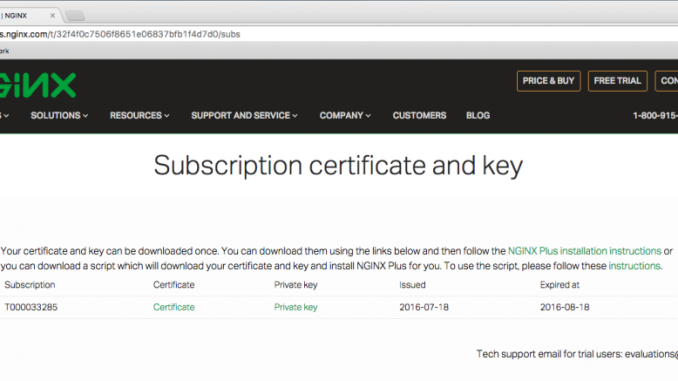
- If you don’t already have NGINX Plus, then you sign up for a 30-day free trial at https://www.nginx.com/products/.
- Once you have access to the key and cert, follow the instructions on the website on how to activate NGINX Plus on your machine. The instructions should be located here under the “instructions” hyperlink:
- Once NGINX Plus is installed on your machine, make sure by using “nginx -v.”

Now that we’ve finished starting NGINX, it’s time to see the web page that comes default before we continue our configuration.
Opening Your Web Page
Follow these steps to open the default web page:
- Navigate to the Amazon AWS web page that contains your list of instances. Look for your Public DNS Address in the description and copy it.
- Paste the Public DNS Address into a new tab. This is what it should look like:

Now that we know we have a working version of NGINX installed, it’s time to put it to good use! Let’s begin by setting up some files and directories.
Setting Up Sample Files
- Make sure you are in your root directory.
- Create a new folder named public_html.
- Inside the new folder, create a file, index.html.
- Inside the folder, create another folder named application1.
- Inside the new folder, create a file named app1.html and write some text in it.
- Navigate to your root directory.
- Create a folder named data.
- Within the new folder, create another folder named images.
Our first use case for NGINX will be to serve pages and images to the user via our web page.
Serving Pages and Images
- Open /etc/nginx/conf.d.
- Rename default.conf to default.conf.bak.
NGINX will no longer use the renamed file. - Create a file named server1.conf.
- Insert this text:
Server { Root /home/ubuntu/public_html; Location /application1 { } Location /images { Root /home/ubuntu/data; } } - Navigate to ~/data/images.
- Find the link to an image, for instance: https://assets.wp.nginx.com/wp-content/themes/nginx-theme/assets/img//logo.png
- Type:
sudo wget https://assets.wp.nginx.com/wp-content/themes/nginx-theme/assets/img//logo.png - Note the name of the file in the directory.
- Reload nginx by typing:
sudo nginx -s reload - Open your web page and reload.
The page should have changed. - Also try inputting into your browser:
server-URL/application1/app1.htmlAnd:
server-URL/images/
Setting Up a Proxy Server
Now that we have a working NGINX web server that can serve content, it’s time to learn how to configure it to route traffic. This capability allows the system administrator to push traffic through to other servers and is a major step towards setting up load balancing. Follow these steps:
- Create a folder called server2 inside of /data
- Inside the server2 folder, create another folder called sampleApp.
- Inside the new folder, create a file named index.html and write some text in it.
- Navigate to /etc/nginx/conf.d.
- Create a new file called server2.conf.
- Inside “server2.conf,” write this text:
Server { Listen 8080; Root /home/ubuntu/data/server2; } - Modify server1.conf as follows:
Server { Root /home/ubuntu/public_html; Location /application1 { Proxy_pass http://localhost:8080/sampleApp; } Location /images { Root /home/ubuntu/data; } } - Reload nginx by executing this command:
sudo nginx -s reload - Open server-URL/application1 in your browser.
- Observe what has changed.
So that’s it! You now have a working Linux instance running NGINX, which is ready to run as a proxy server.
Conclusion
In this post, we learned how to serve files and images over the internet, as well as configure it as a proxy. If you have any questions about the tutorial, we have a Fundamentals training that goes more in-depth into this material. The course also covers some of the essentials in web server and application development, such as load balancing, location routing, and security. You will have a chance to speak to an expert in the field about any questions you have, as well as delve deeper into the power of NGINX.
The post Setting Up NGINX appeared first on NGINX.
Source: Setting Up NGINX


Leave a Reply